crwdns2933423:0crwdne2933423:0

Logitech MX Master Side Feet Removal

crwdns2862623:0crwdne2862623:0
crwdns2942641:0crwdne2942641:0

crwdns2942213:0crwdne2942213:0

  1. Logitech MX Master Side Feet Removal, Soften the mouse feet adhesive: crwdns2935265:01crwdnd2935265:01crwdnd2935265:02crwdne2935265:0 Logitech MX Master Side Feet Removal, Soften the mouse feet adhesive: crwdns2935265:01crwdnd2935265:02crwdnd2935265:02crwdne2935265:0
    • Flip the mouse's power switch into the OFF position, unplug any cables, and flip it over so the feet are facing up.

    • The unique shape of some mice can prevent them from laying flat. If you need to, lay your mouse on a soft towel to prevent wobble.

    • If you're planning to reuse your existing mouse feet, note that the adhesive needs to be thoroughly heated for them to be cleanly removed.

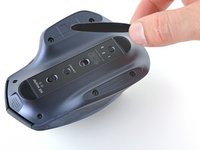
    • Apply a heated iOpener to the left and right mouse feet for about one minute each.

    • Alternatively, you can use a hair dryer to soften the mouse feet adhesive.

    • When using a hair dryer, don't heat the feet for more than a couple seconds at a time—anything hotter than just warm to the touch risks melting or warping the plastic lower case.

    • The information sticker adhesive may soften during this step, but you don't need to remove it.

  2. Logitech MX Master Side Feet Removal, Separate the left foot adhesive: crwdns2935265:02crwdnd2935265:01crwdnd2935265:03crwdne2935265:0 Logitech MX Master Side Feet Removal, Separate the left foot adhesive: crwdns2935265:02crwdnd2935265:02crwdnd2935265:03crwdne2935265:0 Logitech MX Master Side Feet Removal, Separate the left foot adhesive: crwdns2935265:02crwdnd2935265:03crwdnd2935265:03crwdne2935265:0
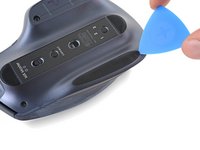
    • Insert an opening pick between the left foot and the lower case.

    • Go slowly, and make sure the pick slides underneath both the foot and its adhesive pad. These layers separate easily.

    • If you plan on reusing your mouse feet, be careful not to crease them or separate them from their adhesive pads.

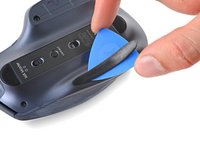
    • Slide your pick under the foot to separate its adhesive until you can grab it with your fingers.

  3. Logitech MX Master Side Feet Removal, Remove the left mouse foot: crwdns2935265:03crwdnd2935265:01crwdnd2935265:02crwdne2935265:0 Logitech MX Master Side Feet Removal, Remove the left mouse foot: crwdns2935265:03crwdnd2935265:02crwdnd2935265:02crwdne2935265:0
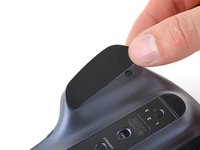
    • Peel up and remove the left mouse foot.

  4. Logitech MX Master Side Feet Removal, Remove the right mouse foot: crwdns2935265:04crwdnd2935265:01crwdnd2935265:03crwdne2935265:0 Logitech MX Master Side Feet Removal, Remove the right mouse foot: crwdns2935265:04crwdnd2935265:02crwdnd2935265:03crwdne2935265:0 Logitech MX Master Side Feet Removal, Remove the right mouse foot: crwdns2935265:04crwdnd2935265:03crwdnd2935265:03crwdne2935265:0
    • Insert and slide your opening pick under the right foot to separate its adhesive.

    • Remove the right mouse foot.

crwdns2915888:0crwdne2915888:0

To reassemble your device, follow these instructions in reverse order.

Clay Eickemeyer

crwdns2935283:009/19/22crwdne2935283:0

83,013 crwdns2915208:0crwdne2915208:0

crwdns2935297:0455crwdne2935297:0

crwdns2915084:0crwdne2915084:0

Guide Team crwdns2935289:0Guide Teamcrwdne2935289:0

Staff

crwdns2931471:09crwdne2931471:0

crwdns2935297:011,707crwdne2935297:0

crwdns2947412:00crwdne2947412:0

crwdns2917038:0crwdne2917038:0

crwdns2936625:0crwdne2936625:0:

crwdns2936751:024crwdne2936751:0 0

crwdns2936753:07crwdne2936753:0 0

crwdns2936753:030crwdne2936753:0 3

crwdns2942667:0crwdne2942667:0 80