crwdns2915892:0crwdne2915892:0
- Remove the rubber gliders on the backside:
The three gliders on the top are necessary in this step, but you will remove the bottom three later anyway so best to do all six at the same time. - Unscrew the three screws behind the top rubber gliders:
In my case the glue/adhesive covered them - Use the iFixit toolkit / picks to open the cover
- Remove the battery:
Unplug and remove, It’s lightly glued on the backside - Unscrew the little black screw on the PCB which clamps the antenna cable
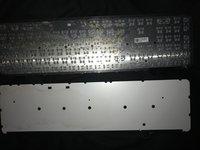
- Unscrew the PCB:
Three kind of big silver head screws - Remove the PCB
- Unplug data cable:
Lift the adhesive tape, then the white part / connector pulls up to release the cable - Remove all silver and black screws
- The backplate cover:
Start in the left top and lift / pull very slowly until you completely remove it. It’s pretty robust, but the adhesive is very strong, so take your time on this step. - Unscrew all the little black screws and the remove the metal baseplate
I have uploaded pictures, so please take a look at them if needed
Hope this helps and thanks to all the guys that helped
crwdns2942213:0crwdne2942213:0
-
-
Remove the rubber-feet from the underside
-
Unscrew the three screws behind the top rubber feet
-
Note the leftmost screw is offset to the right, and not in the center
-
Use a plastic opener to remove the cover
-
-
-
Remove the battery. Note it's lightly glued on the underside.
-
Unscrew two (slightly larger, silver) phillips screws that secure the PCB
-
Unscrew the last small black PCB screw on the top right corner
-
Remove the orange tape securing the serial cable (put it to one side, you'll need to put it back if reassembling)
-
Remove the small jumper with twisted red/black wires coming from it
-
Remove PCB
Can you please insert some basic info about the battery? Like how many mAh ie.
Search for Logitech 533-000177
VauWeh -
-
-
-
-
Unscrew all the black screws along the top (9)
Remove 9 black screws in order to remove the circuit/battery housing.
Remove six silver screws, too.
-
-
The back is glued to the metal baseplate and needs to be removed using a spatula in order to expose the screws.


To reassemble your device, follow these instructions in reverse order.
To reassemble your device, follow these instructions in reverse order.
crwdns2935221:0crwdne2935221:0
crwdns2935229:019crwdne2935229:0

crwdns2947412:019crwdne2947412:0
Do you know how I can turn the keyboard backlight so it stays on, even if if t runs down the battery faster.
I really need that back light. I am willing to risk breaking my keyboard for the reward of having the light. If I am really lucky changing the circuit to add a manual switch for that dang back light :)
I have basic skills and I am still learning...
Thank to all the Content Makers and Fix-It guide makers...!
perhaps I could find the correct voltage for the light and prob with a test light to find the circuit for the back light with out damaging something important, like the old days_?
Put a cover over the right top LED (green when turned on) - this is also the "window" for the ambient light sensor. By making it "dark", the backlight will be fully on when your hands are close to the keyboard.
Hello,
Excellent tutorial!
Could you show me where the 2 red and black wires are connected (data cable I think)?
Mine got cut by accident.
Hello, the front and back plate are made from plastic or metal ? thank you
the front and back and made from plastic
Marts -
Hello,
i spilled my keyboard, i clean everything, but backlight transparent layer broken, maybe do you know where i can buy this spare parts ?
Thank you.
Sorry for my bad english.
i don't think you can buy parts from logitech. i would say the best place to try is ebay
Marts -
Thank you, i don't know about Logitech, but nothing - ebay, nothing google search result...
But thank you for this your tutorial.
remjok -
only one key is not working what to do ??
What are you using to put back those rubber pads on the bottom? Special Glue?
No, just some double-sided tape is enough for this - The pressure added from the weight of the keyboard will keep it in place, and once it's fully adhered, it won't move because the force is lateral (being recessed) 😁
Be careful NOT to use Isopropylalcohol in the Transparent/Plastic/Plexiglass thing for the Backlight diffusion plate INSIDE the Keyboard. It will absolutely destroy it.
EDIT: It is I believe PETG and not resistant to IPA.
Thanks, that's a big help.
Everything is glued. Clearly don't want you to repair your own keyboard. Never buying logitech again.
I missed two keys I dont know why, "1" and "3" on numerical layout.
Will this have any kind of repair?
I had a tiny coffee spill on left part of my MX Keys Mini keyboard. I Thought I got everything dried off, but seems some made it into the key section. The spill was not over main-board but at end with battery. After this, the keys F1, F2, F3 F4, 1, 2, t, i and 'caps lock' did not function. I thought it was a strange combination and have attempted to open and clean inside keyboard in vain the hope that it is mostly mechanical damage. So far no luck... Can this be a burned electric component, due to shortage at one or more keys with coffee? Wonderful keyboard, but perhaps a little more fragile than its sturdy feeling suggests ...
Where does the other end of the long red cable connected to the small black screw goes?
Hi! Does anyone know what type of glue is used to hold together the plastic back panel and metal plate? Looks like double sided foam tape with paper base but I'm not sure.
Bottom three feet are not blocking any screws or clips, they can remain.
There is a plastic film covering the screw holes, it can be peeled back and replaced.
Cristina Vasco - crwdns2934203:0crwdne2934203:0