crwdns2915892:0crwdne2915892:0
This is a prerequisite-only guide! This guide is part of another procedure and is not meant to be used alone.
crwdns2942213:0crwdne2942213:0
-
-
Before you begin, flip the power switch into the OFF position.
-
-
-
Heat an iOpener and apply it to the mouse feet for one minute.
-
-
-
-
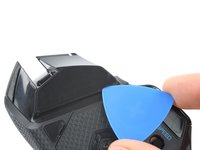
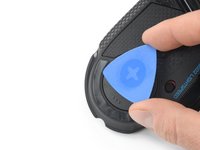
Insert the tip of an opening pick underneath the front foot at the gap in its recess.
-
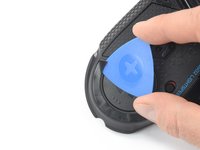
When possible, grab with your fingers and slowly pull to peel it off completely.
-
-
-
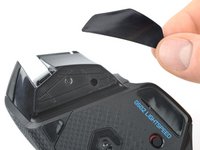
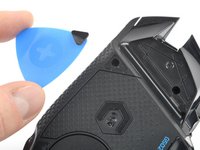
Insert the tip of an opening pick underneath the tiny front right foot at the gap in its recess.
-
-
-
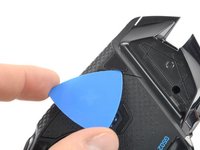
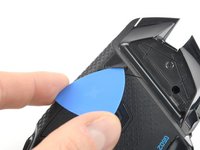
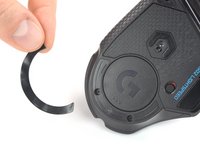
Insert the tip of an opening pick underneath the rear foot starting at the gap in its recess.
-
When possible, grab with your fingers and slowly pull to peel it off completely.
-
Use a spudger to carefully scrape up and remove any remaining adhesive bits.
-
Use isopropyl alcohol and a microfiber cloth to thoroughly clean all adhesive residue from the foot recesses. Allow the surface to completely dry.
-
Remove the feet from their backing and firmly press them into place.
-


To reassemble your device, follow these instructions in reverse order. Apply new adhesive where necessary after cleaning the relevant areas with isopropyl alcohol (>90%).
Repair didn’t go as planned? Try some basic troubleshooting, or ask our Answers community for help.
To reassemble your device, follow these instructions in reverse order. Apply new adhesive where necessary after cleaning the relevant areas with isopropyl alcohol (>90%).
Repair didn’t go as planned? Try some basic troubleshooting, or ask our Answers community for help.

crwdns2915084:0crwdne2915084:0

Tobias Isakeit - Repairability Engineer crwdns2935289:0Tobias Isakeit - Repairability Engineercrwdne2935289:0
Business
crwdns2934841:01crwdne2934841:0
crwdns2935297:01,137crwdne2935297:0