crwdns2915892:0crwdne2915892:0
The buttons on the Little Tikes Tobi 2 Interactive Karaoke Machine serve as the primary interface for user interaction, allowing control over its various functions. These buttons are responsible for essential operations such as adjusting the speed of the machine, modifying the audio volume, starting or stopping playback, and switching between different modes of operation. Each button corresponds to a specific feature, ensuring smooth and intuitive control over the machine's performance.
However, over time, issues may arise where one or more buttons become stuck, unresponsive, or fail to perform their designated functions. This could be caused by dust, debris, mechanical wear, or internal damage. In such cases, this guide provides the necessary steps to identify and troubleshoot these button-related problems, enabling users to restore proper functionality and ensure the machine operates as intended.
Before you begin this repair, make sure your karaoke machine is turned off and the batteries are removed. This repair requires soldering, and this Soldering/desoldering connections guide is a helpful resource. Be careful when soldering as the iron gets extremely hot and can burn. Also, be sure to solder in a well-ventilated area.
crwdns2942213:0crwdne2942213:0
-
-
Use a Phillips screwdriver to remove the single screw that is holding the cover to the battery compartment.
-
Use a spudger to carefully pry off the battery cover.
-
-
-
To easily pop out a battery, use your thumb to push the battery from the flat side down toward the coil and pull the battery outward.
-
Remove all four batteries.
-
-
-
Use a Phillips screwdriver to remove four screws from the base of the device.
-
Remove the bottom of the karaoke machine.
-
-
-
-
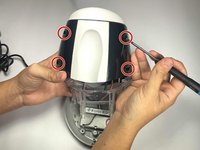
Use a Phillips screwdriver to remove the four screws from the interior of the white base.
-
-
-
Use a Phillips screwdriver to remove the four screws from the exterior black plastic part of the case.
-
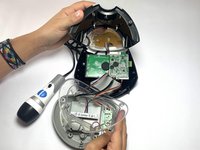
Use a spudger to disassemble the case.
-
-
-
Use a Phillips #0 screwdriver to remove the four screws from the half-circle clear plastic covering the underside of the top of the device.
-
-
-
Remove the three Phillips #0 screws from the back of the circuit board.
-
-
-
Flip the button board over to access the solder points
-
Desolder the wires from the button board to remove it.
-


To reassemble your device, follow these instructions in reverse order. Take your e-waste to an R2 or e-Stewards certified recycler.
To reassemble your device, follow these instructions in reverse order. Take your e-waste to an R2 or e-Stewards certified recycler.

crwdns2915084:0crwdne2915084:0

CSU Los Angeles, Team 5-4, Kershman Fall 2024 crwdns2935289:0CSU Los Angeles, Team 5-4, Kershman Fall 2024crwdne2935289:0
CSULA-KERSHMAN-F24S5G4
crwdns2931471:04crwdne2931471:0
crwdns2935297:06crwdne2935297:0