crwdns2933423:0crwdne2933423:0
Linsay Model F-7HD2CORE Screen Replacement

Linsay Model F-7HD2CORE Screen Replacement

Lindsay Byrnes

crwdns2944107:0crwdnd2944107:0Lindsay Byrnescrwdnd2944107:0crwdnd2944107:0crwdnd2944107:03crwdnd2944107:0crwdne2944107:0

crwdns2944111:0June 19, 2015crwdne2944111:0

15 - 30 crwdns2931279:0crwdne2931279:0
crwdns2937803:0crwdne2937803:0

crwdns2915892:0crwdne2915892:0

crwdns2942287:0crwdne2942287:0

Replacing the screen necessary when it is cracked or shattered. Replacement screens for Linsay tablets can easily be found online. Be sure to use caution when handling broken glass fragments as they can be sharp and cut you.

crwdns2942213:0crwdne2942213:0

crwdns2943213:0crwdne2943213:0

crwdns2943215:0crwdne2943215:0

crwdns2944105:0crwdne2944105:0

crwdns2943227:0crwdne2943227:0
  1. Linsay Model F-7HD2CORE Screen Replacement, Screen: crwdns2935265:01crwdnd2935265:01crwdnd2935265:03crwdne2935265:0 Linsay Model F-7HD2CORE Screen Replacement, Screen: crwdns2935265:01crwdnd2935265:02crwdnd2935265:03crwdne2935265:0 Linsay Model F-7HD2CORE Screen Replacement, Screen: crwdns2935265:01crwdnd2935265:03crwdnd2935265:03crwdne2935265:0
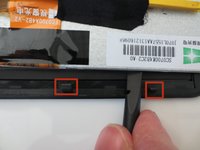
    • Insert your plastic opening tool in between the black and white portions of your device.

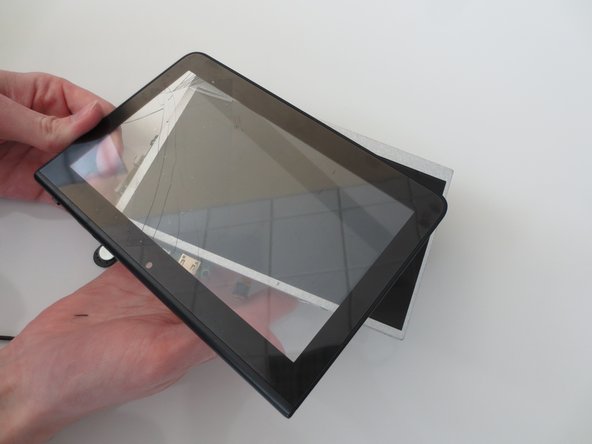
    • Gently pry the top screen from the base of the tablet.

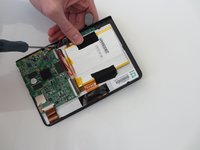
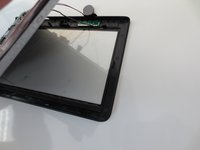
    • Your tablet should now look like the third photo.

  2. Linsay Model F-7HD2CORE Screen Replacement: crwdns2935265:02crwdnd2935265:01crwdnd2935265:02crwdne2935265:0 Linsay Model F-7HD2CORE Screen Replacement: crwdns2935265:02crwdnd2935265:02crwdnd2935265:02crwdne2935265:0
    • Peel the microphone from the back of the device.

  3. Linsay Model F-7HD2CORE Screen Replacement: crwdns2935265:03crwdnd2935265:01crwdnd2935265:01crwdne2935265:0
    • Remove the tape from the indicated copper strip.

  4. Linsay Model F-7HD2CORE Screen Replacement: crwdns2935265:04crwdnd2935265:01crwdnd2935265:02crwdne2935265:0 Linsay Model F-7HD2CORE Screen Replacement: crwdns2935265:04crwdnd2935265:02crwdnd2935265:02crwdne2935265:0
    • Use your 00 phillips head screwdriver to remove the three 4mm phillips screws circled in red.

  5. Linsay Model F-7HD2CORE Screen Replacement: crwdns2935265:05crwdnd2935265:01crwdnd2935265:01crwdne2935265:0
    • Remove the soldered portion of the circuit board on the screen.

    • You will need a soldering kit to reattach this part.

  6. Linsay Model F-7HD2CORE Screen Replacement: crwdns2935265:06crwdnd2935265:01crwdnd2935265:02crwdne2935265:0 Linsay Model F-7HD2CORE Screen Replacement: crwdns2935265:06crwdnd2935265:02crwdnd2935265:02crwdne2935265:0
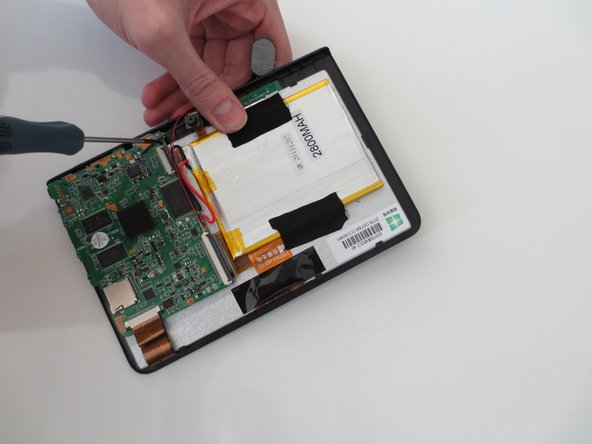
    • Use the blunt end of the spudger to remove the circuit panel and battery from the glass screen portion of the device.

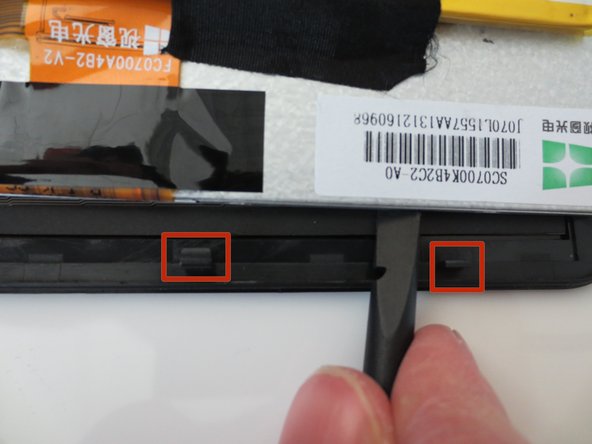
    • There will be several small hooks holding the screen onto the back panel.

  7. Linsay Model F-7HD2CORE Screen Replacement: crwdns2935265:07crwdnd2935265:01crwdnd2935265:02crwdne2935265:0 Linsay Model F-7HD2CORE Screen Replacement: crwdns2935265:07crwdnd2935265:02crwdnd2935265:02crwdne2935265:0
    • Gently pull the two pieces of the tablet apart.

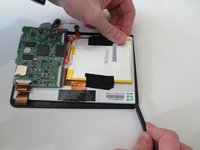
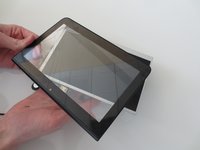
    • Your tablet should now look like image two.

    • You are now ready to attach your new screen!

crwdns2915888:0crwdne2915888:0

To reassemble your device, follow these instructions in reverse order.

crwdns2935229:03crwdne2935229:0

Lindsay Byrnes

crwdns2935283:001/28/15crwdne2935283:0

495 crwdns2915208:0crwdne2915208:0

crwdns2935297:02crwdne2935297:0

crwdns2915084:0crwdne2915084:0

Penn State, Team 1-5, Kaschak Winter 2015 crwdns2935289:0Penn State, Team 1-5, Kaschak Winter 2015crwdne2935289:0

PSU-KASCHAK-W15S1G5

crwdns2931471:03crwdne2931471:0

crwdns2935297:02crwdne2935297:0

crwdns2947410:01crwdne2947410:0

crwdns2917038:0crwdne2917038:0

crwdns2936625:0crwdne2936625:0:

crwdns2936751:024crwdne2936751:0 2

crwdns2936753:07crwdne2936753:0 2

crwdns2936753:030crwdne2936753:0 4

crwdns2942667:0crwdne2942667:0 1,395