crwdns2915892:0crwdne2915892:0
Having issues with your audio in your Lenovo Yoga C930-13IKB laptop? Check out this troubleshooting guide to figure out what’s wrong before using this guide to replace your speakers. If your speakers are damaged or worn out from heavy use, it is a good idea to replace them.
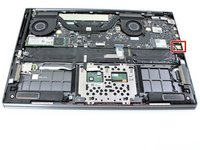
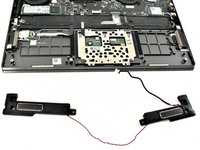
To access the speakers in your laptop, you will need to remove the back cover and the battery, which is outlined for you in the steps below. There are two speakers total, one on either side of the laptop, connected to each other by a wire. Only one of the speakers is plugged directly into the motherboard. For this guide, you will need a plastic opening tool, a T5 Torx screwdriver, and a Phillips #00 screwdriver.
crwdns2942213:0crwdne2942213:0
-
-
Flip the device over so that the underside is facing up.
-
Remove the six 3.5 mm T5 Torx screws.
-
-
-
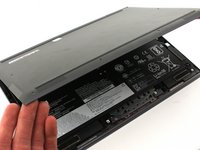
Pry off the back cover using the plastic opening tool.
-
Loosen the back cover in multiple spots using the opening tool, then remove the whole back.
The gap is so small that I wasn’t able to insert anything to pry the cover up. The suction cup tool lifted the cover off easily.
There is a very convenient spot to begin the prying process. Up by the hinge, where the metal back turns in perpendicular to the edge to get around the hinge mechanism, there is a gap between the cover and the rest of the laptop where it can be pried up easily. From there it is easy to run a tool and widen the gap all the way around.
I tried Thomas's suggestion first, and it worked like a charm: the suction cup took it right off.
Instead of pushing the cup against the laptop I "pulled it flat" and placed it against the back, so it'd just suck onto it. (Didn't want to deform the laptop cover)Opening this up again to re-seat the SSD ...and find that Alex's suggestion is also very good. I would start with his suggestion and then move to Thomas's if the back doesn't just jump off.
-
-
-
Carefully lift the cover off with your hands.
-
-
-
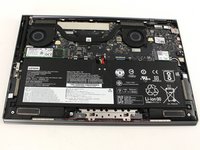
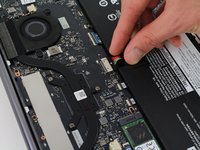
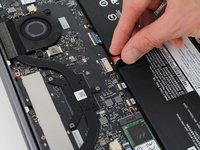
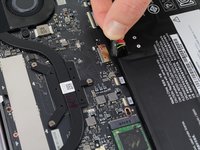
Unplug the battery from the motherboard by pinching the cables with your fingers and tugging out with force.
Pull cables toward yourself.
I was not able to grasp the wires with the battery mounted. Once I removed the battery from the case, the connector was easy to remove
I suggest waiting until you have unscrewed and un-stuck the battery from the laptop before removing the cable. It makes it much easier to get a hold of the wiring harness/plug so as to pull it out.
ALSO, if you're reading this, HIGHLY RECOMMENDED that you stop now and read all of the comments below, including the ones at the very end, after the CONCLUSION section. There's stuff that's not covered in the main steps. -
-
-
-
Unscrew the four 3mm screws with a Phillips screwdriver.
-
-
-
Use your fingers to pry up the clear plastic pull-tab for one of the stretch release adhesives.
-
Grasp the pull-tab and slowly pull away from the battery at a shallow angle. The adhesive strip will stretch to many times its length and slowly release from underneath the battery.
-
Repeat the procedure for the second strip on the opposite side of the battery.
-
Remove the battery with your hands.
There are two clear plastic tabs wrapped around the sides of the battery that connect to the glue strips between the battery and the backlight cover. All you have to do is peel the clear strips from the battery and pull them away. The glue under the battery pulls out like a Command Strip. No need to wreck your backlit cover and possibly the cabling underneath with tools.
Oh man I really wish I would have expanded the comments before continuing; something that took me an hour of painstaking prying could have been taken care of in 30 seconds. USE THE PULL TABS TO REMOVE THE ADHESIVE STRIPS!
Hi Brian,
Thanks for the tips! I’ll amend the guide to include this info.
I still don’t understand Step 6. Also does the new battery stick to the existing adhesive strip?
@BenBorgert - agree 100%!! I would also add that I had to give the cover a nudge towards the hinge (something seemed to click into place) to get the screw holes lined up
Did you replacement battery come with replacement adhesive strips? Mine didn't.
If you want to re-use the existing strips, you'll want to remove them carefully. As noted in the instructions, pull those clear tabs slowly and at a shallow angle. If possible, use one hand to pull and the other to hold the lengthening strip as it emerges. The goal here is to NOT LET THE STRIP SNAP OUT when it breaks free. If it does, it might snap together in a sticky, un-reusable mess.
So, take it slow, gather the excess as it emerges, and then you can stick the strips onto your new battery.
Put them in the same spot on the new one as they were on the old one (just below the top screw-bracket). And when you put the new battery in place, try not to let it stick hard to the laptop. You will need some wiggle to line up the screw holes. More on that below.
FYI, there are two very tiny metal posts in the laptop, immediately below the upper left and right screw holes. These are meant to align with some holes on the screw-brackets on the battery. So there are 3x things that hold the battery in place:
1) the screws
2) the "command strips"
3) the 2x tiny metal posts
When you put the battery in, you'll need to get both of those little posts to thread through the corresponding holes on the screw-brackets on the battery. For me, it was a matter of connecting the battery cable, gently placing the battery into the laptop, being careful NOT to press it into the sticky strip. (I pressed it in the first time and needed to take it out again, because I could not line up the 2xposts or the 4x screw holes. ) So put it in there and hover it above the screw-holes, taking care to line them up as best you can. Line up the 2x posts as well, and thread them through the little holes. Once these are threaded, check to be sure that your screw-holes are lined up and screw it in.
Great instructions. Just replaced battery on my Yoga C930 without any issues although it took a little longer than expected. Thanks for the step by step guide!
-
-
-
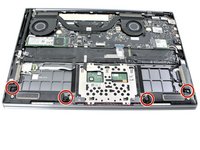
Remove the four 2mm screws that attach the speakers to the laptop body using a Phillips #00 screwdriver.
-
-
-
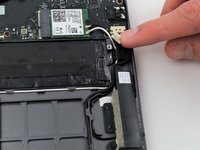
Gently unplug the connector using two fingers.
-
-
-
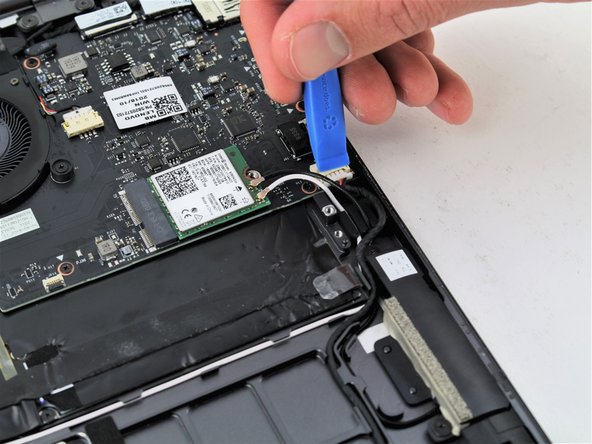
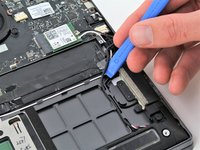
Lift the black wire that connects the speakers to the motherboard from its track using an opening tool.
-
-
-
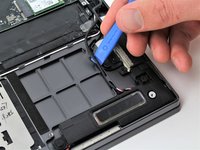
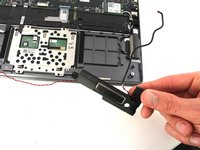
Remove the right speaker using your fingers.
-
Remove the left speaker, which is connected to the right speaker by the black and red wire.
-


To reassemble your device, follow these instructions in reverse order.
To reassemble your device, follow these instructions in reverse order.
crwdns2935221:0crwdne2935221:0
crwdns2935229:02crwdne2935229:0

crwdns2915084:0crwdne2915084:0

Cal Poly, Team S19-G5, White Winter 2020 crwdns2935289:0Cal Poly, Team S19-G5, White Winter 2020crwdne2935289:0
CPSU-WHITE-W20S19G5
crwdns2931471:04crwdne2931471:0
crwdns2935297:016crwdne2935297:0
crwdns2947410:01crwdne2947410:0
What would be the additional steps to replace a right hinge as the speakers are in the hinge?