crwdns2933423:0crwdne2933423:0

Lenovo Yoga 720 Bottom Cover Replacement

crwdns2942213:0crwdne2942213:0

  1. Lenovo Yoga 720 Bottom Cover Replacement, Bottom Cover: crwdns2935265:01crwdnd2935265:01crwdnd2935265:03crwdne2935265:0 Lenovo Yoga 720 Bottom Cover Replacement, Bottom Cover: crwdns2935265:01crwdnd2935265:02crwdnd2935265:03crwdne2935265:0 Lenovo Yoga 720 Bottom Cover Replacement, Bottom Cover: crwdns2935265:01crwdnd2935265:03crwdnd2935265:03crwdne2935265:0
    • Before you begin, be sure to turn off your laptop and discharge the battery down to 25%.

    • Start by flipping the device over so that you see the screws.

    • Remove seven Torx T5 short screws.

    • Remove three Torx T5 long screws.

  2. Lenovo Yoga 720 Bottom Cover Replacement: crwdns2935265:02crwdnd2935265:01crwdnd2935265:03crwdne2935265:0 Lenovo Yoga 720 Bottom Cover Replacement: crwdns2935265:02crwdnd2935265:02crwdnd2935265:03crwdne2935265:0 Lenovo Yoga 720 Bottom Cover Replacement: crwdns2935265:02crwdnd2935265:03crwdnd2935265:03crwdne2935265:0
    crwdns2935267:0crwdne2935267:0
    iFixit Opening Tool
    $1.99
    • Starting from the USB port, use your opening tool to gently pry up the case.

    • Make sure you are prying on the cover itself, not the metal shield around the USB port.

    • Pry along the laptop in the order shown by the arrows.

    • Do NOT pry along the top side, or you risk damaging the casing. Stay with the arrows.

  3. Lenovo Yoga 720 Bottom Cover Replacement: crwdns2935265:03crwdnd2935265:01crwdnd2935265:03crwdne2935265:0 Lenovo Yoga 720 Bottom Cover Replacement: crwdns2935265:03crwdnd2935265:02crwdnd2935265:03crwdne2935265:0 Lenovo Yoga 720 Bottom Cover Replacement: crwdns2935265:03crwdnd2935265:03crwdnd2935265:03crwdne2935265:0
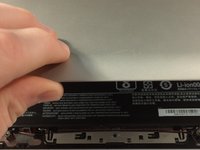
    • Lift the case from the bottom side. NOT the side with the hinges.

    • When you feel resistance, do NOT keep lifting or you will damage the housing.

    • Once you feel resistance, gently pull the case towards you. (away from the hinges.)
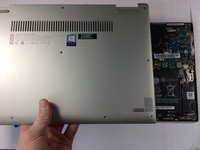
    • Remove the case.

crwdns2915888:0crwdne2915888:0

To reassemble your device, follow these instructions in reverse order.

crwdns2935229:05crwdne2935229:0

Aiden

crwdns2935283:009/19/15crwdne2935283:0

17,834 crwdns2915208:0crwdne2915208:0

crwdns2935297:021crwdne2935297:0

crwdns2947412:02crwdne2947412:0

Can’t seem to find information about this but why should I discharge the laptop to 25% before I do this?

I bought a new wifi card that I will put in.

Björn Ridell - crwdns2934203:0crwdne2934203:0

You should discharge the laptop to minimize the danger of fire and exploding battery if accidentally damages or short circuit occur during handling the accumulator. Fully charged accumulators will react more violently when short-circuited or damaged.

Georg Gebauet -

crwdns2917038:0crwdne2917038:0

crwdns2936625:0crwdne2936625:0:

crwdns2936751:024crwdne2936751:0 0

crwdns2936753:07crwdne2936753:0 3

crwdns2936753:030crwdne2936753:0 44

crwdns2942667:0crwdne2942667:0 7,649