crwdns2915892:0crwdne2915892:0
Follow this guide to replace or remove the battery in your Lenovo YOGA 730-15IKB. The battery powers the computer when the charger is not plugged in. It is a wise idea to unplug the battery before touching any component inside the computer to avoid hurting the laptop or yourself.
If your computer is running out of battery quickly or will not power on when it is not plugged in, you might need to replace your battery. See the troubleshooting page for more advice.
crwdns2942213:0crwdne2942213:0
-
-
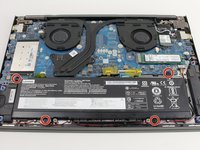
Flip the laptop over so you can see the underside.
-
Remove the ten 7mm T5 Torx screws.
-
-
-
Pry up the bottom cover with an opening tool.
-
Start at the front edge of the cover and make your way along the sides.
-
-
-
-
Pull the bottom cover up and away from the back hinges.
-
-
crwdns2935267:0crwdne2935267:0Tweezers$4.99
-
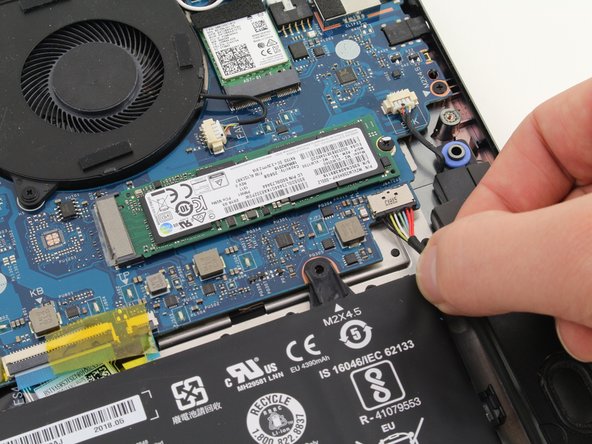
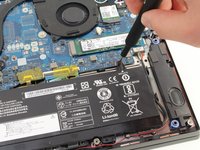
Disconnect the battery from the motherboard by gently pulling the battery cable using your fingers or a pair of tweezers.
-
-
-
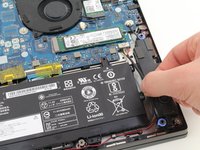
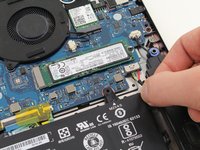
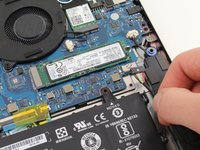
Remove the four 4mm Phillips #1 screws securing the battery.
-
-
-
Lift the battery up and out of the chassis.
-


To reassemble your device, follow these instructions in reverse order.
For optimal performance, after completing this guide, calibrate your newly installed battery.
Take your e-waste to an R2 or e-Stewards certified recycler.
Repair didn’t go as planned? Try some basic troubleshooting, or ask our Answers community for help.
crwdns2935221:0crwdne2935221:0
crwdns2935229:012crwdne2935229:0

crwdns2915084:0crwdne2915084:0

Cal Poly, Team S1-G6, White Winter 2020 crwdns2935289:0Cal Poly, Team S1-G6, White Winter 2020crwdne2935289:0
CPSU-WHITE-W20S1G6
crwdns2931471:03crwdne2931471:0
crwdns2935297:027crwdne2935297:0