crwdns2915892:0crwdne2915892:0
If you are having display issues, you may find that you need to replace the screen. You can utilizes this guide to give you step by step instructions on how to replace the screen on your device.
crwdns2942213:0crwdne2942213:0
-
-
Open the device so that it is laying flat
-
-
-
Pry the bottom right corner of the screen’s border and gently peel off the adhesive screen cover
-
-
-
-
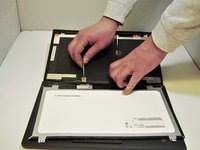
Unscrew the screws from each corner of the screen
-
-
-
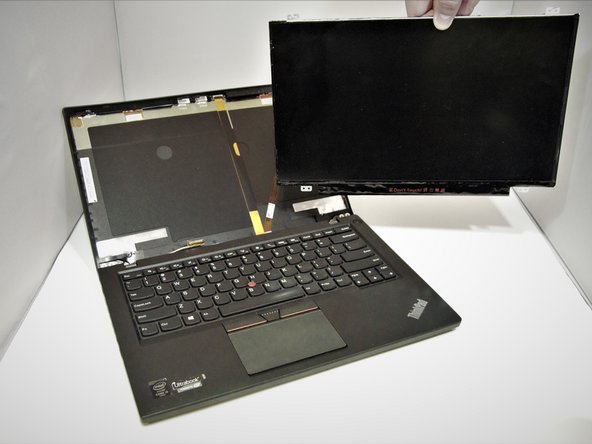
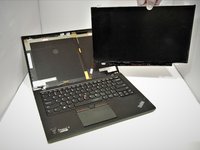
Slowly lean the computer forward so that the screen gently falls into your hand
-
-
-
Unplug the cord that connects the screen to the rest of the computer
-


To reassemble your device, follow these instructions in reverse order.
To reassemble your device, follow these instructions in reverse order.
crwdns2935221:0crwdne2935221:0
crwdns2935229:06crwdne2935229:0
crwdns2915084:0crwdne2915084:0

Eastern Washington University, Team S2-G3, Munoz Winter 2019 crwdns2935289:0Eastern Washington University, Team S2-G3, Munoz Winter 2019crwdne2935289:0
EWU-MUNOZ-W19S2G3
crwdns2931471:05crwdne2931471:0
crwdns2935297:06crwdne2935297:0
crwdns2947412:04crwdne2947412:0
there is a step where you remove a simple harness which requires a spudger to de-clip it from the main frame of the laptop, but I gotta say that this walkthrough REALLY was the big difference maker for me in feeling like I could do this job. THANK YOU!!!!!
Correct you are... it important to point that because you can damage it with too much presure trying to get the screen out. Cause I was like, hold up! My screen didnt just flop out like his after removing the four screws that held the screen in place. Luckily, while applying lite pressure trying to get the screen out, the plastic frame popped apart, and I was like okay! Ole boy didnt mention this. So yeah. Please remove that plastic frame before you remove the screen.
Uno!
Just confirming the missing step: it happens after the unscrewing. Thanks.
There really needs to be a note covering removal of BOTH the external battery - and ALSO the internal battery (which means removing the back of the case (simple retained screws) and unplugging the battery inside.
These steps are vital as the battery provides a constant live power rail to the screen even when turned off. Without disabling both batteries there is a risk that, when detaching or attaching the new screen to the cable, a short can happen which can blow a fuse on the motherboard - breaking the backlight.