crwdns2915892:0crwdne2915892:0
This replacement guide will inform users how to properly remove the battery, located on the bottom center of the Lenovo ThinkPad X280 inside the back panel of the device.
The battery is used to power on and off the device.
If you are experiencing poor battery life, a battery overheating, and/or an inability to connect to Bluetooth or WIFI networks, your device may need a battery replacement.
Removing the battery will completely shut down the device and prevent it from working properly. It is important to note that removing a battery while it’s too hot can induce injury or spark a flame. To prevent injury, allow your device to cool down before removing the battery from the device and store it in an appropriate place. For more information on how to store it, you can review this guide.
crwdns2942213:0crwdne2942213:0
-
-
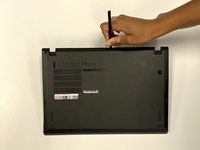
Close the device and flip it over to expose the back panel.
-
-
-
Use a Phillips #1 screwdriver to unscrew the five captive screws on the back panel until a small pop is heard.
-
-
-
-
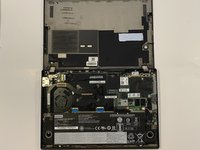
Gently wedge an opening tool or spudger under the back panel, and loosen the clips around the perimeter until the back panel comes off.
-
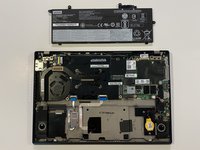
Remove the back cover.
-
-
-
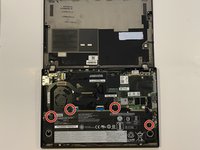
Using the Phillips #1 screwdriver, remove the four 5 mm screws that are holding the battery down.
-
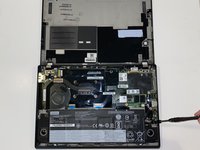
Remove the battery.
-


To reassemble your device, follow these instructions in reverse order.
To reassemble your device, follow these instructions in reverse order.
crwdns2935221:0crwdne2935221:0
crwdns2935229:08crwdne2935229:0
crwdns2915084:0crwdne2915084:0

University of Alabama, Team 1-3, Bedsole Fall 2021 crwdns2935289:0University of Alabama, Team 1-3, Bedsole Fall 2021crwdne2935289:0
UA-BEDSOLE-F21S1G3
crwdns2931471:04crwdne2931471:0
crwdns2935297:08crwdne2935297:0
crwdns2947412:02crwdne2947412:0
but what about the batteries connection to the mobo?
edit: nvm, i assumed it was a cable not just a connector
I'll chime in with Matthew Gould:
The last step, "Remove the battery", could stand expansion. It took me some time to figure out that the edge of the battery with the connector simply lifts up rather than sliding out toward the user (fixer? repairer?). One more picture showing that action would help.
The rest of the process, including purchasing the battery from ifixit, was like butter.
Having said that, I am so thankful for ifixit!