crwdns2933423:0crwdne2933423:0

Lenovo ThinkPad X270 SSD Replacement

crwdns2942213:0crwdne2942213:0

  1. Lenovo ThinkPad X270 SSD Replacement, Prepare your laptop for disassembly: crwdns2935265:01crwdnd2935265:01crwdnd2935265:02crwdne2935265:0 Lenovo ThinkPad X270 SSD Replacement, Prepare your laptop for disassembly: crwdns2935265:01crwdnd2935265:02crwdnd2935265:02crwdne2935265:0
    • Allow your laptop's battery to drain below 25% before starting this repair—a charged battery may catch fire if damaged.

    • Unplug all cables and fully shut down your laptop.

  2. Lenovo ThinkPad X270 SSD Replacement, Remove the micro SIM card tray: crwdns2935265:02crwdnd2935265:01crwdnd2935265:03crwdne2935265:0 Lenovo ThinkPad X270 SSD Replacement, Remove the micro SIM card tray: crwdns2935265:02crwdnd2935265:02crwdnd2935265:03crwdne2935265:0 Lenovo ThinkPad X270 SSD Replacement, Remove the micro SIM card tray: crwdns2935265:02crwdnd2935265:03crwdnd2935265:03crwdne2935265:0
    • A SIM eject tool or bit isn't long enough to eject the tray.

    • Insert a straightened paper clip into the micro SIM card tray hole on the right edge of the laptop.

    • Press the paper clip firmly into the hole to eject the tray.

    • Remove the tray.

    • When reinserting the tray, slide the arms of the tray into the rectangular metal slot.

  3. Lenovo ThinkPad X270 SSD Replacement, Battery information: crwdns2935265:03crwdnd2935265:01crwdnd2935265:02crwdne2935265:0 Lenovo ThinkPad X270 SSD Replacement, Battery information: crwdns2935265:03crwdnd2935265:02crwdnd2935265:02crwdne2935265:0
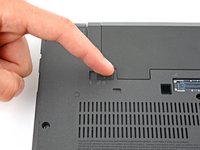
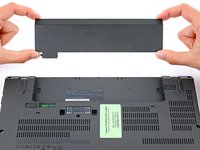
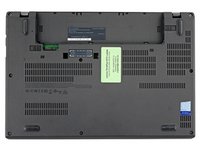
    • Lay your laptop upside down to access the external battery.

    • Two sliding tabs secure the battery.

  4. Lenovo ThinkPad X270 SSD Replacement, Release the left tab: crwdns2935265:04crwdnd2935265:01crwdnd2935265:02crwdne2935265:0 Lenovo ThinkPad X270 SSD Replacement, Release the left tab: crwdns2935265:04crwdnd2935265:02crwdnd2935265:02crwdne2935265:0
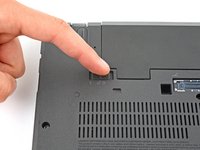
    • Slide the left tab, labeled 1, to the unlocked position—it'll click into place and release the left side of the battery.

  5. Lenovo ThinkPad X270 SSD Replacement, Remove the battery: crwdns2935265:05crwdnd2935265:01crwdnd2935265:03crwdne2935265:0 Lenovo ThinkPad X270 SSD Replacement, Remove the battery: crwdns2935265:05crwdnd2935265:02crwdnd2935265:03crwdne2935265:0 Lenovo ThinkPad X270 SSD Replacement, Remove the battery: crwdns2935265:05crwdnd2935265:03crwdnd2935265:03crwdne2935265:0
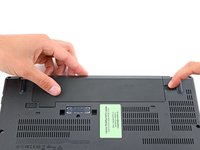
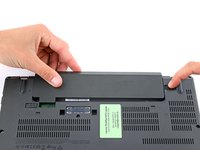
    • Hold the right tab, labeled 2, in the unlocked position and slide the battery out of its recess.

    • During reassembly, slide the battery into its recess until both tabs engage.

    • Never reuse a deformed or damaged battery—it's a fire hazard. Replace it with a new battery.

  6. Lenovo ThinkPad X270 SSD Replacement, Unfasten the back cover: crwdns2935265:06crwdnd2935265:01crwdnd2935265:02crwdne2935265:0 Lenovo ThinkPad X270 SSD Replacement, Unfasten the back cover: crwdns2935265:06crwdnd2935265:02crwdnd2935265:02crwdne2935265:0
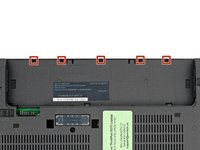
    • Use a Phillips screwdriver to loosen the eight captive screws securing the back cover.

    • Don't try to completely remove the screws—they're secured to the back cover with delicate, plastic clips.

  7. Lenovo ThinkPad X270 SSD Replacement, Insert an opening pick: crwdns2935265:07crwdnd2935265:01crwdnd2935265:03crwdne2935265:0 Lenovo ThinkPad X270 SSD Replacement, Insert an opening pick: crwdns2935265:07crwdnd2935265:02crwdnd2935265:03crwdne2935265:0 Lenovo ThinkPad X270 SSD Replacement, Insert an opening pick: crwdns2935265:07crwdnd2935265:03crwdnd2935265:03crwdne2935265:0
    • Plastic clips secure the back cover to the frame. You'll hear and feel the clips release.

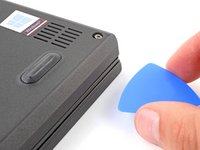
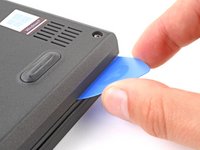
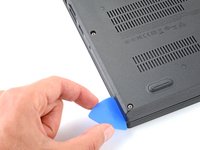
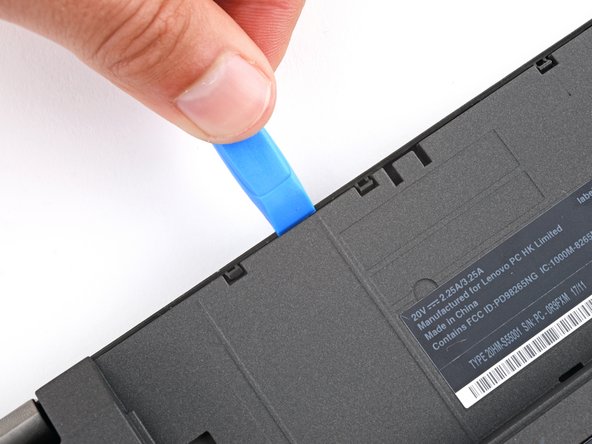
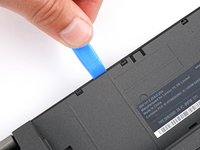
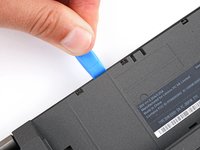
    • Insert the flat side of an opening pick between the bottom right edge of the back cover and frame.

    • Pry up the back cover to release the bottom right clips.

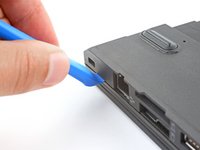
    • Leave the pick inserted in the bottom right corner.

  8. Lenovo ThinkPad X270 SSD Replacement, Release the bottom edge clips: crwdns2935265:08crwdnd2935265:01crwdnd2935265:03crwdne2935265:0 Lenovo ThinkPad X270 SSD Replacement, Release the bottom edge clips: crwdns2935265:08crwdnd2935265:02crwdnd2935265:03crwdne2935265:0 Lenovo ThinkPad X270 SSD Replacement, Release the bottom edge clips: crwdns2935265:08crwdnd2935265:03crwdnd2935265:03crwdne2935265:0
    • During the next two steps, position your pick downward at a 45-degree angle to help release the clips.

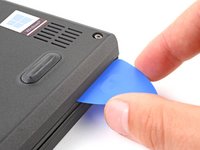
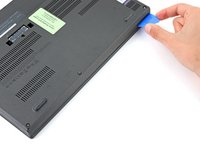
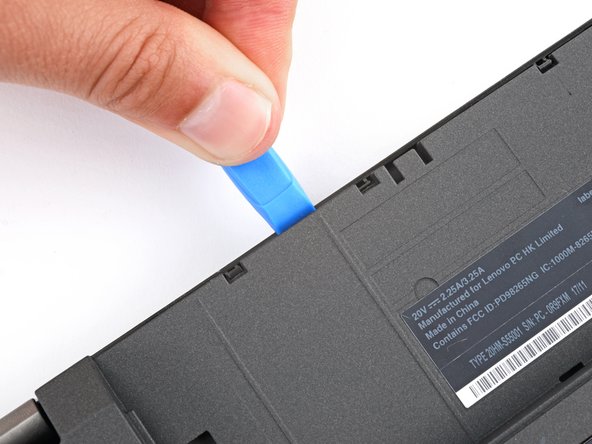
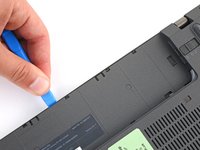
    • Slide the pick to the bottom left corner to release the bottom clips.

  9. Lenovo ThinkPad X270 SSD Replacement, Release the left edge clips: crwdns2935265:09crwdnd2935265:01crwdnd2935265:02crwdne2935265:0 Lenovo ThinkPad X270 SSD Replacement, Release the left edge clips: crwdns2935265:09crwdnd2935265:02crwdnd2935265:02crwdne2935265:0
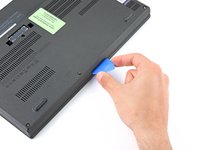
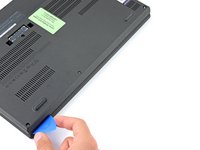
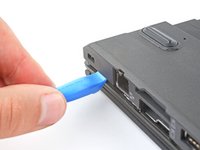
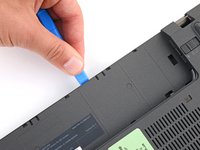
    • Insert your pick in the bottom left corner and slide the pick to the first USB port to release the left clips.

  10. Lenovo ThinkPad X270 SSD Replacement, Release the top corner clips: crwdns2935265:010crwdnd2935265:01crwdnd2935265:03crwdne2935265:0 Lenovo ThinkPad X270 SSD Replacement, Release the top corner clips: crwdns2935265:010crwdnd2935265:02crwdnd2935265:03crwdne2935265:0 Lenovo ThinkPad X270 SSD Replacement, Release the top corner clips: crwdns2935265:010crwdnd2935265:03crwdnd2935265:03crwdne2935265:0
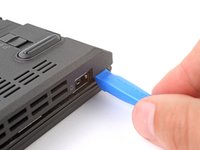
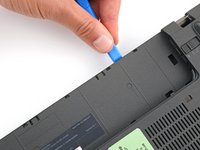
    • Insert an opening tool between the top left corner of the back cover and frame.

    • Pry the back cover up to release the clips securing its top left corner.

    • Repeat the process on the top right corner.

  11. Lenovo ThinkPad X270 SSD Replacement, Release the top edge clips: crwdns2935265:011crwdnd2935265:01crwdnd2935265:03crwdne2935265:0 Lenovo ThinkPad X270 SSD Replacement, Release the top edge clips: crwdns2935265:011crwdnd2935265:02crwdnd2935265:03crwdne2935265:0 Lenovo ThinkPad X270 SSD Replacement, Release the top edge clips: crwdns2935265:011crwdnd2935265:03crwdnd2935265:03crwdne2935265:0
    • Five clips secure the top edge of the back cover.

    • Insert an opening tool in the gap between the back cover and frame, next to one of the clips.

    • Push the opening tool into the gap until the clip releases.

  12. Lenovo ThinkPad X270 SSD Replacement: crwdns2935265:012crwdnd2935265:01crwdnd2935265:03crwdne2935265:0 Lenovo ThinkPad X270 SSD Replacement: crwdns2935265:012crwdnd2935265:02crwdnd2935265:03crwdne2935265:0 Lenovo ThinkPad X270 SSD Replacement: crwdns2935265:012crwdnd2935265:03crwdnd2935265:03crwdne2935265:0
    • Push the opening tool between the back cover and frame at different points along the top edge to release the remaining clips.

  13. Lenovo ThinkPad X270 SSD Replacement, Remove the back cover: crwdns2935265:013crwdnd2935265:01crwdnd2935265:03crwdne2935265:0 Lenovo ThinkPad X270 SSD Replacement, Remove the back cover: crwdns2935265:013crwdnd2935265:02crwdnd2935265:03crwdne2935265:0 Lenovo ThinkPad X270 SSD Replacement, Remove the back cover: crwdns2935265:013crwdnd2935265:03crwdnd2935265:03crwdne2935265:0
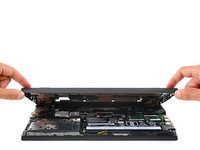
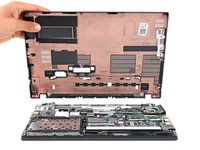
    • Remove the back cover.

    • During reassembly, lay the back cover on the frame and press firmly around the perimeter to engage all the clips.

  14. Lenovo ThinkPad X270 SSD Replacement, Disconnect the internal battery: crwdns2935265:014crwdnd2935265:01crwdnd2935265:03crwdne2935265:0 Lenovo ThinkPad X270 SSD Replacement, Disconnect the internal battery: crwdns2935265:014crwdnd2935265:02crwdnd2935265:03crwdne2935265:0 Lenovo ThinkPad X270 SSD Replacement, Disconnect the internal battery: crwdns2935265:014crwdnd2935265:03crwdnd2935265:03crwdne2935265:0
  15. Lenovo ThinkPad X270 SSD Replacement, Unfasten the SSD enclosure: crwdns2935265:015crwdnd2935265:01crwdnd2935265:02crwdne2935265:0 Lenovo ThinkPad X270 SSD Replacement, Unfasten the SSD enclosure: crwdns2935265:015crwdnd2935265:02crwdnd2935265:02crwdne2935265:0
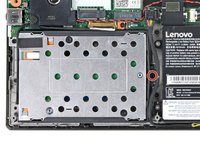
    • Use a Phillips screwdriver to remove the 3.7 mm‑long screw securing the SSD enclosure to the frame.

  16. Lenovo ThinkPad X270 SSD Replacement, Reposition the SSD enclosure: crwdns2935265:016crwdnd2935265:01crwdnd2935265:02crwdne2935265:0 Lenovo ThinkPad X270 SSD Replacement, Reposition the SSD enclosure: crwdns2935265:016crwdnd2935265:02crwdnd2935265:02crwdne2935265:0
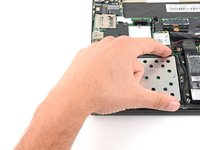
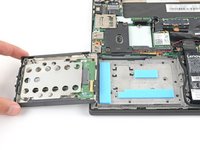
    • Gently lay the SSD enclosure over the left edge of the laptop.

  17. Lenovo ThinkPad X270 SSD Replacement, Move the speaker cable: crwdns2935265:017crwdnd2935265:01crwdnd2935265:02crwdne2935265:0 Lenovo ThinkPad X270 SSD Replacement, Move the speaker cable: crwdns2935265:017crwdnd2935265:02crwdnd2935265:02crwdne2935265:0
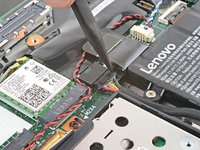
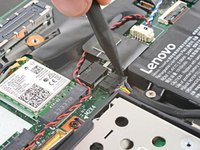
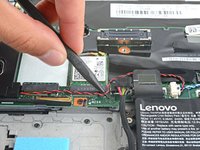
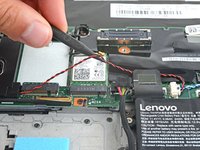
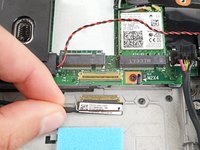
    • Use a spudger or your fingers to reposition the black and red speaker cable so you can access the SSD cable's socket on the motherboard.

  18. Lenovo ThinkPad X270 SSD Replacement, Disconnect the SSD cable: crwdns2935265:018crwdnd2935265:01crwdnd2935265:03crwdne2935265:0 Lenovo ThinkPad X270 SSD Replacement, Disconnect the SSD cable: crwdns2935265:018crwdnd2935265:02crwdnd2935265:03crwdne2935265:0 Lenovo ThinkPad X270 SSD Replacement, Disconnect the SSD cable: crwdns2935265:018crwdnd2935265:03crwdnd2935265:03crwdne2935265:0
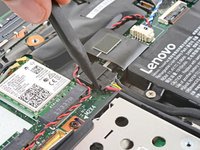
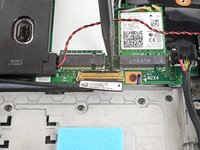
    • Insert the point of a spudger under the metal locking clip that snaps around the perimeter of the SSD cable’s socket.

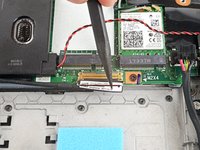
    • Swing the clip up and over the socket.

    • Gently pull the SSD cable straight out of its socket.

  19. Lenovo ThinkPad X270 SSD Replacement, Unfasten the SSD cover: crwdns2935265:019crwdnd2935265:01crwdnd2935265:02crwdne2935265:0 Lenovo ThinkPad X270 SSD Replacement, Unfasten the SSD cover: crwdns2935265:019crwdnd2935265:02crwdnd2935265:02crwdne2935265:0
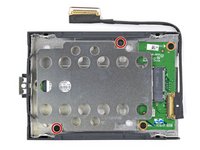
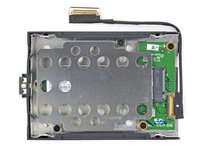
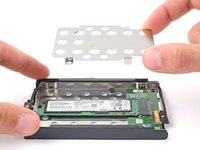
    • Lay the SSD enclosure upside down on your work surface.

    • Use a Phillips screwdriver to remove the two 3.7 mm‑long screws securing the SSD cover.

  20. Lenovo ThinkPad X270 SSD Replacement, Remove the SSD cover: crwdns2935265:020crwdnd2935265:01crwdnd2935265:02crwdne2935265:0 Lenovo ThinkPad X270 SSD Replacement, Remove the SSD cover: crwdns2935265:020crwdnd2935265:02crwdnd2935265:02crwdne2935265:0
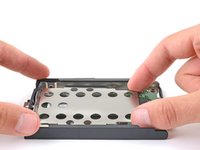
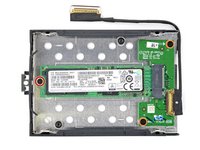
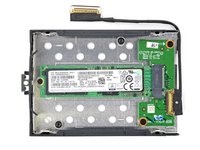
    • Remove the SSD cover.

  21. Lenovo ThinkPad X270 SSD Replacement, Unfasten the SSD: crwdns2935265:021crwdnd2935265:01crwdnd2935265:02crwdne2935265:0 Lenovo ThinkPad X270 SSD Replacement, Unfasten the SSD: crwdns2935265:021crwdnd2935265:02crwdnd2935265:02crwdne2935265:0
    • Use a Phillips screwdriver to remove the 3.1 mm‑long screw securing the SSD to its enclosure.

  22. Lenovo ThinkPad X270 SSD Replacement, Remove the SSD: crwdns2935265:022crwdnd2935265:01crwdnd2935265:03crwdne2935265:0 Lenovo ThinkPad X270 SSD Replacement, Remove the SSD: crwdns2935265:022crwdnd2935265:02crwdnd2935265:03crwdne2935265:0 Lenovo ThinkPad X270 SSD Replacement, Remove the SSD: crwdns2935265:022crwdnd2935265:03crwdnd2935265:03crwdne2935265:0
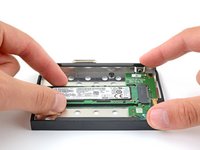
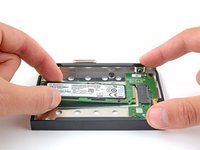
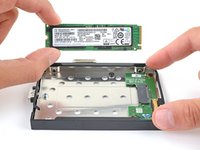
    • Hold the SSD enclosure down firmly against your workspace with one hand and pull the SSD straight out of its socket with your other hand.

    • Don't pull up at a sharp angle, as this could damage the SSD and its socket.

crwdns2915888:0crwdne2915888:0

To reassemble your device, follow these instructions in reverse order.

Check your repair by running hardware tests with Lenovo Diagnostics.

Take your e-waste to an R2 or e-Stewards certified recycler.

Repair didn’t go as planned? Try some basic troubleshooting, or ask our Answers community for help.

crwdns2935229:02crwdne2935229:0

Spencer Day

crwdns2935283:009/14/22crwdne2935283:0

53,748 crwdns2915208:0crwdne2915208:0

crwdns2935297:0394crwdne2935297:0

crwdns2915084:0crwdne2915084:0

iFixit crwdns2935289:0iFixitcrwdne2935289:0

Staff

crwdns2931471:0135crwdne2931471:0

crwdns2935297:017,207crwdne2935297:0

crwdns2944067:00crwdne2944067:0

crwdns2917038:0crwdne2917038:0

crwdns2936625:0crwdne2936625:0:

crwdns2936751:024crwdne2936751:0 14

crwdns2936753:07crwdne2936753:0 86

crwdns2936753:030crwdne2936753:0 343

crwdns2942667:0crwdne2942667:0 2,731