crwdns2915892:0crwdne2915892:0
In this guide, we show you how to uninstall and reinstall RAM, or Random Access Memory on your Lenovo ThinkPad T490. This critical component helps devices in storing files and keeping them in “memory.” It serves as a temporary storage for your computer’s operating system, software programs, etc. The more of it you have, the better for the long-term.
crwdns2942213:0crwdne2942213:0
-
-
Remove the screws from the base plate using a Philips #00 screwdriver to access the motherboard.
-
-
-
Once the screws are off, gently fit the iFixit Opening Tool under the base plate to pry it open.
-
Fully remove the base plate so you can access the RAM.
-
-
-
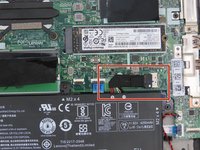
Locate the RAM module.
-
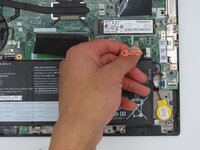
Locate the laptop's battery cable.
-
-
-
To disconnect the battery, tug the black tab away from the socket as shown. This will separate the connector from the socket.
-
-
-
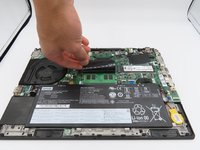
Flip up the black flap that is covering the RAM stick.
-
Once the black flap is out of the way, hold the RAM stick on both sides and gently pull directly backward to remove it from its slot.
-
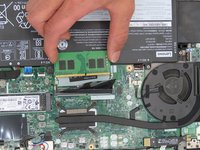
Slide the replacement RAM stick in and place the black flap back over it to begin reassembling your device.
-


To reassemble your device, follow the above steps in reverse order.
Take your e-waste to an R2 or e-Stewards certified recycler.
Repair didn’t go as planned? Try some basic troubleshooting or ask our Answers community for help.
To reassemble your device, follow the above steps in reverse order.
Take your e-waste to an R2 or e-Stewards certified recycler.
Repair didn’t go as planned? Try some basic troubleshooting or ask our Answers community for help.
crwdns2935221:0crwdne2935221:0
crwdns2935229:04crwdne2935229:0
crwdns2915084:0crwdne2915084:0

University of Kentucky, Team 1-3, Martin Spring 2024 crwdns2935289:0University of Kentucky, Team 1-3, Martin Spring 2024crwdne2935289:0
UKY-MARTIN-S24S1G3
crwdns2931471:04crwdne2931471:0
crwdns2935297:06crwdne2935297:0