crwdns2933423:0crwdne2933423:0

Lenovo IdeaPad S145-14IWL Hard Drive Replacement

crwdns2942213:0crwdne2942213:0

  1. Lenovo IdeaPad S145-14IWL Hard Drive Replacement, Lower Case: crwdns2935265:01crwdnd2935265:01crwdnd2935265:03crwdne2935265:0 Lenovo IdeaPad S145-14IWL Hard Drive Replacement, Lower Case: crwdns2935265:01crwdnd2935265:02crwdnd2935265:03crwdne2935265:0 Lenovo IdeaPad S145-14IWL Hard Drive Replacement, Lower Case: crwdns2935265:01crwdnd2935265:03crwdnd2935265:03crwdne2935265:0
    • Use a Phillips #0 screwdriver to remove the ten screws that secure the lower case.

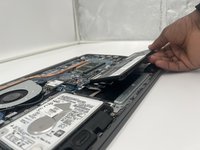
    • Insert an opening tool into the gap between the lower case and chassis.

    • Pry around the perimeter of the device until the lower case fully releases.

    • Remove the lower case.

  2. Lenovo IdeaPad S145-14IWL Hard Drive Replacement, Lenovo IdeaPad S145-14IWL Battery Disconnection: crwdns2935265:02crwdnd2935265:01crwdnd2935265:01crwdne2935265:0
    • Use angled tweezers to gently pull the battery connector directly out of its socket.

  3. Lenovo IdeaPad S145-14IWL Hard Drive Replacement, Battery: crwdns2935265:03crwdnd2935265:01crwdnd2935265:03crwdne2935265:0 Lenovo IdeaPad S145-14IWL Hard Drive Replacement, Battery: crwdns2935265:03crwdnd2935265:02crwdnd2935265:03crwdne2935265:0 Lenovo IdeaPad S145-14IWL Hard Drive Replacement, Battery: crwdns2935265:03crwdnd2935265:03crwdnd2935265:03crwdne2935265:0
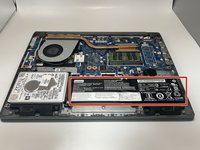
    • Use a Phillips #0 screwdriver to remove the screws securing the battery.

    • Lift the battery up and out of the chassis.

  4. Lenovo IdeaPad S145-14IWL Hard Drive Replacement, Hard Drive: crwdns2935265:04crwdnd2935265:01crwdnd2935265:03crwdne2935265:0 Lenovo IdeaPad S145-14IWL Hard Drive Replacement, Hard Drive: crwdns2935265:04crwdnd2935265:02crwdnd2935265:03crwdne2935265:0 Lenovo IdeaPad S145-14IWL Hard Drive Replacement, Hard Drive: crwdns2935265:04crwdnd2935265:03crwdnd2935265:03crwdne2935265:0
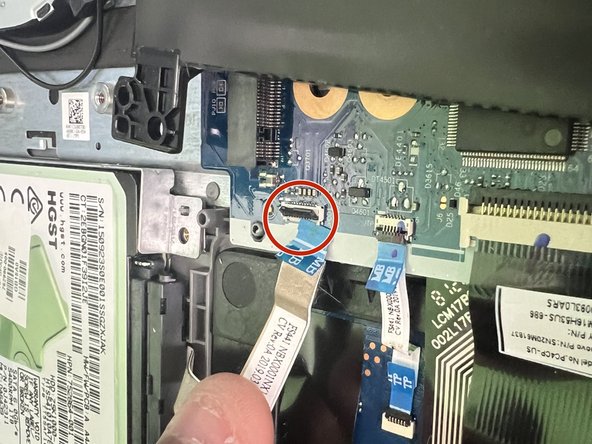
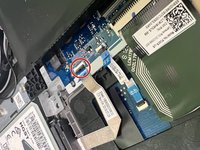
    • Flip up the black ZIF locking flap that secures the hard drive ribbon cable.

    • Disconnect the ribbon cable.

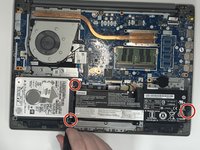
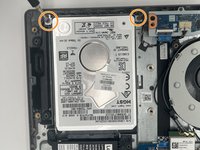
    • Use a Phillips screwdriver to remove the screws that secure the hard drive.

    • Remove the hard drive.

crwdns2915888:0crwdne2915888:0

To reassemble your device, follow the above steps in reverse order.
Take your e-waste to an R2 or e-Stewards certified recycler.
Repair didn’t go as planned? Try some basic troubleshooting.

crwdns2935229:02crwdne2935229:0

Folorunso Olorundare

crwdns2935283:008/28/24crwdne2935283:0

144 crwdns2915208:0crwdne2915208:0

crwdns2935295:0crwdne2935295:0

crwdns2915084:0crwdne2915084:0

University of North Texas, Team 6-7, Kilpatrick Fall 2024 crwdns2935289:0University of North Texas, Team 6-7, Kilpatrick Fall 2024crwdne2935289:0

UNT-KILPATRICK-F24S6G7

crwdns2931471:04crwdne2931471:0

crwdns2935297:05crwdne2935297:0

crwdns2947412:00crwdne2947412:0

crwdns2917038:0crwdne2917038:0

crwdns2936625:0crwdne2936625:0:

crwdns2936751:024crwdne2936751:0 1

crwdns2936753:07crwdne2936753:0 8

crwdns2936753:030crwdne2936753:0 27

crwdns2942667:0crwdne2942667:0 138