crwdns2915892:0crwdne2915892:0
This guide will detail the steps necessary to remove the keyboard from the Lenovo Essential G560 laptop. Please note that this is not an easy process and may take a bit of patience, especially when reinstalling or installing the new keyboard.
crwdns2942213:0crwdne2942213:0
-
-
Turn off the computer.
-
Disconnect the charging cable from the computer.
-
Flip the computer upside down.
-
-
-
Locate the two switches that lock the battery. Push the right-hand switch outward into the "unlocked" position.
-
-
-
Push and hold the left hand switch outward in the "unlocked" position, then gently slide the battery away from the computer.
-
-
-
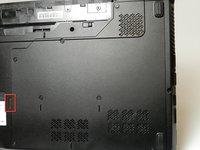
Remove the seven 5.3 mm Phillips #1 screws holding the back panel in place.
a few of my screws are not coming out
Same here. I was able to easily remove the 2 middle screws but the rest were just wiggling in place and not coming out at all.
I have the exact same problem. I dont know if it is because of the screws or if it is because I am an 11 year old.
-
-
-
-
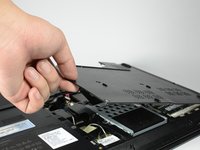
Pull the back panel off using the highlighted tab. The tab should give you enough leverage to pull the panel off smoothly.
I was having the same problem as the 11 year old from the previous step, and contrary to this note I just stuck my screwdriver under that tab and pried it off. It worked. It wasn’t even hard.
-
-
-
The computer should be open with many of the internal components shown. You can now access the hard drive, the RAM, and the keyboard.
-
-
-
Remove the two 5.3 mm Phillips #1 screws from the underside of the laptop computer.
-
Remove the 4.4 mm Phillips #1 screw located next to the Fan Assembly.
-
-
-
Flip the computer over.
-
Using the plastic opening tool, push in the four small, plastic tabs located at the top of the keyboard.
-
-
-
Remove the keyboard by gently pulling the top loose, and then lifting the keyboard out.
-
-
-
Lift the keyboard up from the bezel.
-
Push the gray latch on the keyboard cable ZIF connector forward to unlock it.
-
Carefully pull the keyboard cable from its socket.
This step need more detailed explanation
(with additional pictures) because it
crucial.
Anthony
Excellent. Fixed thank you
-
To reassemble your device, follow these instructions in reverse order.
To reassemble your device, follow these instructions in reverse order.
crwdns2935221:0crwdne2935221:0
crwdns2935229:013crwdne2935229:0
crwdns2947412:02crwdne2947412:0
Thank you frndzz
Thank you frndz


