crwdns2933423:0crwdne2933423:0

Kindle Touch Motherboard Replacement

crwdns2942213:0crwdne2942213:0

  1. Kindle Touch Motherboard Replacement, Back Cover: crwdns2935265:01crwdnd2935265:01crwdnd2935265:03crwdne2935265:0 Kindle Touch Motherboard Replacement, Back Cover: crwdns2935265:01crwdnd2935265:02crwdnd2935265:03crwdne2935265:0 Kindle Touch Motherboard Replacement, Back Cover: crwdns2935265:01crwdnd2935265:03crwdnd2935265:03crwdne2935265:0
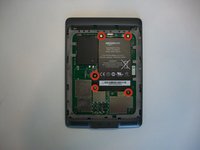
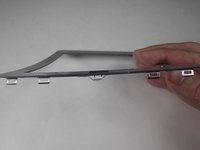
    • Use the plastic opening tool to undo the six plastic clips around the bottom of the back panel of the Kindle.

    • Don't pry the clips on the top half of the back panel.

    Wear work gloves as the tool can easily slip and stab you in the hand.

    BRUCE - crwdns2934203:0crwdne2934203:0

    The clips aren't all the same; the side clips are slide-locks rather than press-locks.

    Use the Opening Tool to unclip the clips along the bottom edge. This will allow the lid to slide towards the top, releasing the side clips and allowing the lid to be lifted off.

    When reassembling, slide the lid upwards while pressing the sides to re-engage the side clips, then press the bottom edge to lock it into place.

    jimf - crwdns2934203:0crwdne2934203:0

  2. Kindle Touch Motherboard Replacement: crwdns2935265:02crwdnd2935265:01crwdnd2935265:02crwdne2935265:0 Kindle Touch Motherboard Replacement: crwdns2935265:02crwdnd2935265:02crwdnd2935265:02crwdne2935265:0
    • Slide the back panel downward, toward the charging port. This will release the clips on the top half.

    • Once the top clips release, gently lift the back panel away.

    There are four tabs on each side.The two nearest the top are open at the top, hence they slide out (back towards the power connector end.

    This is important in the reassembly stage:

    1. Align the back cover about 0.75 cm away from the top

    2. Hold the top half of the cover flat against the unit, and flex the cover away from the case a little at the bottom

    3. Slide the top and the first two clips parallel to the case

    4. snap the remaining bottom clips in place

    John Haywood - crwdns2934203:0crwdne2934203:0

  3. Kindle Touch Motherboard Replacement, Battery: crwdns2935265:03crwdnd2935265:01crwdnd2935265:03crwdne2935265:0 Kindle Touch Motherboard Replacement, Battery: crwdns2935265:03crwdnd2935265:02crwdnd2935265:03crwdne2935265:0 Kindle Touch Motherboard Replacement, Battery: crwdns2935265:03crwdnd2935265:03crwdnd2935265:03crwdne2935265:0
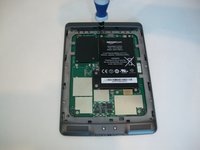
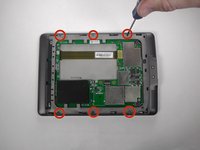
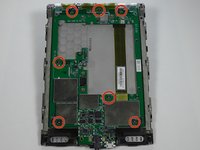
    • Use a Phillips #00 screwdriver to remove the five screws.

  4. Kindle Touch Motherboard Replacement: crwdns2935265:04crwdnd2935265:01crwdnd2935265:03crwdne2935265:0 Kindle Touch Motherboard Replacement: crwdns2935265:04crwdnd2935265:02crwdnd2935265:03crwdne2935265:0 Kindle Touch Motherboard Replacement: crwdns2935265:04crwdnd2935265:03crwdnd2935265:03crwdne2935265:0
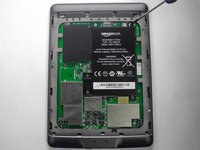
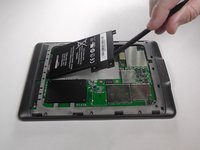
    • Using the flat end of your spudger, gently pry the battery up and remove it.

  5. Kindle Touch Motherboard Replacement, Remove the 3G Board: crwdns2935265:05crwdnd2935265:01crwdnd2935265:03crwdne2935265:0 Kindle Touch Motherboard Replacement, Remove the 3G Board: crwdns2935265:05crwdnd2935265:02crwdnd2935265:03crwdne2935265:0 Kindle Touch Motherboard Replacement, Remove the 3G Board: crwdns2935265:05crwdnd2935265:03crwdnd2935265:03crwdne2935265:0
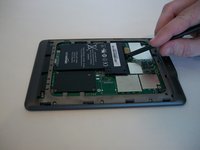
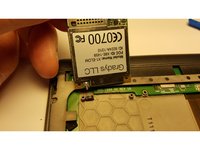
    • Remove the indicated four 2 mm screws with a Phillips #00 screwdriver. (Units with the 3G assembly have Phillips #000 screws.)

    • Next, gently lift the 3G assembly with a Spudger or your fingers.

    • This Kindle Touch is the WiFi only model and comes with a plastic placeholder instead of the 3G assembly.

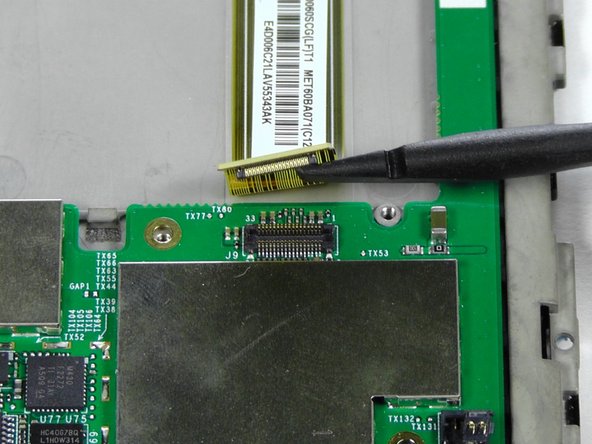
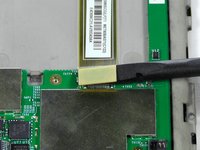
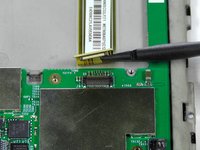
    • Disconnect the antenna lead by carefully prying it off the 3G board with a plastic tool.

    The 3G model has an antenna connector near the top left on the underside.

    Chad Wade Day, Jr. - crwdns2934203:0crwdne2934203:0

  6. Kindle Touch Motherboard Replacement, Bezel: crwdns2935265:06crwdnd2935265:01crwdnd2935265:02crwdne2935265:0 Kindle Touch Motherboard Replacement, Bezel: crwdns2935265:06crwdnd2935265:02crwdnd2935265:02crwdne2935265:0
    • Using a Phillips #00 screwdriver, remove the six 4 mm screws to access the front plate.

  7. Kindle Touch Motherboard Replacement: crwdns2935265:07crwdnd2935265:01crwdnd2935265:03crwdne2935265:0 Kindle Touch Motherboard Replacement: crwdns2935265:07crwdnd2935265:02crwdnd2935265:03crwdne2935265:0 Kindle Touch Motherboard Replacement: crwdns2935265:07crwdnd2935265:03crwdnd2935265:03crwdne2935265:0
    • Use the plastic opening tool to pry the bezel from the top and sides

    • The bottom of the bezel will be glued, so be careful when sliding the clips out.

    • The clips can be easily bent, so do not try to force them out. If you do bend some, they can be bent back.

  8. Kindle Touch Motherboard Replacement, Rear Casing: crwdns2935265:08crwdnd2935265:01crwdnd2935265:01crwdne2935265:0
    • Use your Phillips #00 srewdriver to remove the indicated screws.

    • There are three pairs of screws that are each different. The screws on the top corners are 4 mm #00 Phillips screws, the screws on the bottom corners are 2 mm #00 Phillips screws, and the black bottom center screws are 6 mm #00 Phillips screws.

  9. Kindle Touch Motherboard Replacement: crwdns2935265:09crwdnd2935265:01crwdnd2935265:02crwdne2935265:0 Kindle Touch Motherboard Replacement: crwdns2935265:09crwdnd2935265:02crwdnd2935265:02crwdne2935265:0
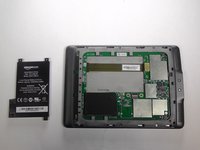
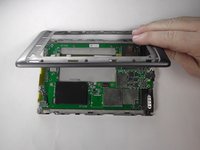
    • With the screws removed, gently remove the case from the internals.

  10. Kindle Touch Motherboard Replacement, Motherboard: crwdns2935265:010crwdnd2935265:01crwdnd2935265:03crwdne2935265:0 Kindle Touch Motherboard Replacement, Motherboard: crwdns2935265:010crwdnd2935265:02crwdnd2935265:03crwdne2935265:0 Kindle Touch Motherboard Replacement, Motherboard: crwdns2935265:010crwdnd2935265:03crwdnd2935265:03crwdne2935265:0
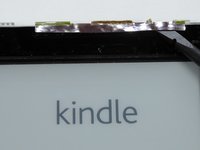
    • With the screen facing you, use your heated iOpener or other heating element to loosen the glue holding the WiFi unit to the screen. After 30 seconds, remove the heating element.

    • After the glue is loosened, use a thin tool, like a Spudger or small plastic opening tool, to separate the WiFi unit from the screen.

  11. Kindle Touch Motherboard Replacement: crwdns2935265:011crwdnd2935265:01crwdnd2935265:02crwdne2935265:0 Kindle Touch Motherboard Replacement: crwdns2935265:011crwdnd2935265:02crwdnd2935265:02crwdne2935265:0
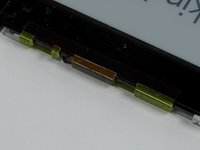
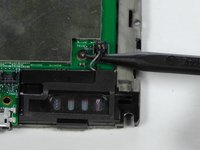
    • With the motherboard facing you, use the pointy end of your Spudger to gently separate the two speaker's connectors.

    • This connector type requires being lifted out of place, not pulled. Accidentally pulling may damage the wires.

    • During reassembly, make sure the speaker's connectors are not pushed behind the motherboard.

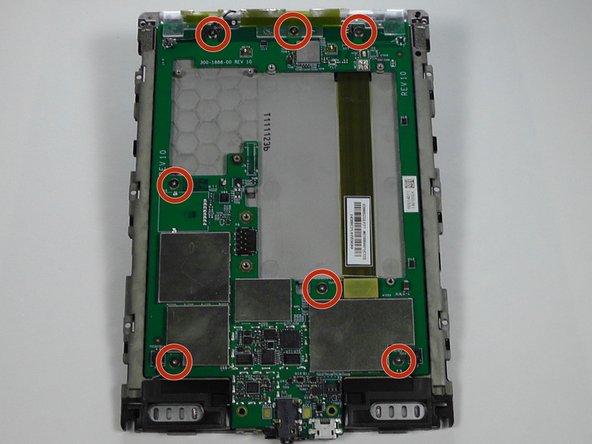
    • Use your #00 Phillips Screwdriver to remove the seven 2 mm screws.

  12. Kindle Touch Motherboard Replacement: crwdns2935265:012crwdnd2935265:01crwdnd2935265:03crwdne2935265:0 Kindle Touch Motherboard Replacement: crwdns2935265:012crwdnd2935265:02crwdnd2935265:03crwdne2935265:0 Kindle Touch Motherboard Replacement: crwdns2935265:012crwdnd2935265:03crwdnd2935265:03crwdne2935265:0
    • Use a Spudger to separate the display's connector from the motherboard.

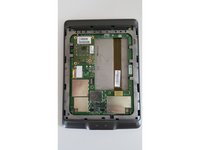
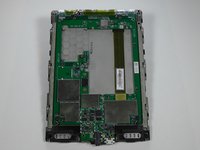
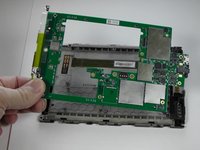
    • Gently remove the motherboard from the display support.

crwdns2915888:0crwdne2915888:0

To reassemble your device, follow these instructions in reverse order.

crwdns2935229:05crwdne2935229:0

Adam Yerly

crwdns2935283:001/20/15crwdne2935283:0

1,982 crwdns2915208:0crwdne2915208:0

crwdns2935297:07crwdne2935297:0

crwdns2915084:0crwdne2915084:0

USF Tampa, Team 19-5, Blackwell Winter 2015 crwdns2935289:0USF Tampa, Team 19-5, Blackwell Winter 2015crwdne2935289:0

USFT-BLACKWELL-W15S19G5

crwdns2931471:03crwdne2931471:0

crwdns2935297:08crwdne2935297:0

crwdns2947410:01crwdne2947410:0

Thank you so.much. saved my.kindle

Stephane di Bari - crwdns2934203:0crwdne2934203:0

crwdns2917038:0crwdne2917038:0

crwdns2936625:0crwdne2936625:0:

crwdns2936751:024crwdne2936751:0 3

crwdns2936753:07crwdne2936753:0 13

crwdns2936753:030crwdne2936753:0 38

crwdns2942667:0crwdne2942667:0 4,765