crwdns2933423:0crwdne2933423:0
crwdns2947577:0crwdnd2947577:0crwdne2947577:0

Keychron K10 Max Wireless Battery Replacement

crwdns2942213:0crwdne2942213:0

  1. Keychron K10 Max Wireless Battery Replacement, Keycap: crwdns2935265:01crwdnd2935265:01crwdnd2935265:03crwdne2935265:0 Keychron K10 Max Wireless Battery Replacement, Keycap: crwdns2935265:01crwdnd2935265:02crwdnd2935265:03crwdne2935265:0 Keychron K10 Max Wireless Battery Replacement, Keycap: crwdns2935265:01crwdnd2935265:03crwdnd2935265:03crwdne2935265:0
    • Lay the keyboard face down on the workspace.

    • Use a 2.5 mm hex screwdriver to remove the eight 4.5 mm screws from the back case.

    • Carefully separate the front frame from the keyboard and set it aside.

    • There is a clear shield that sits right above the arrow keys. This shield is to diffuse the LEDs from the keyboard, and it can fall out easily. Just remember to put it back if it does when reassembly.

  2. Keychron K10 Max Wireless Battery Replacement: crwdns2935265:02crwdnd2935265:01crwdnd2935265:02crwdne2935265:0 Keychron K10 Max Wireless Battery Replacement: crwdns2935265:02crwdnd2935265:02crwdnd2935265:02crwdne2935265:0
    • Slide the keycap puller over the keycap until it grips underneath.

    • Pull straight upward to remove the keycap.

    • Sometimes the mechanical switch itself comes with the keycap. Just remove the switch from the button and reinstall the switch.

  3. Keychron K10 Max Wireless Battery Replacement, USB-C Charging PCB: crwdns2935265:03crwdnd2935265:01crwdnd2935265:03crwdne2935265:0 Keychron K10 Max Wireless Battery Replacement, USB-C Charging PCB: crwdns2935265:03crwdnd2935265:02crwdnd2935265:03crwdne2935265:0 Keychron K10 Max Wireless Battery Replacement, USB-C Charging PCB: crwdns2935265:03crwdnd2935265:03crwdnd2935265:03crwdne2935265:0
    • Remove the 19 keycaps to access the screws underneath.

    • The photo shows the only keycaps that need to be removed. Mechanical switches do not need to be removed for this repair.

    • Use a Phillips #1 screwdriver to remove the thirteen 7.5 mm screws.

    • Carefully lift the number pad side of the keyboard plate

    • Do not fully lift or remove the plate yet. A ribbon cable is still connected underneath.

  4. Keychron K10 Max Wireless Battery Replacement: crwdns2935265:04crwdnd2935265:01crwdnd2935265:03crwdne2935265:0 Keychron K10 Max Wireless Battery Replacement: crwdns2935265:04crwdnd2935265:02crwdnd2935265:03crwdne2935265:0 Keychron K10 Max Wireless Battery Replacement: crwdns2935265:04crwdnd2935265:03crwdnd2935265:03crwdne2935265:0
    • Use the wide end of a spudger to push on the connector tab to slide it out of its socket.

    • Do not pull on the cable wires. Pulling on the wires may separate them from the plastic connector and permanently damage the cable.

  5. Keychron K10 Max Wireless Battery Replacement: crwdns2935265:05crwdnd2935265:01crwdnd2935265:02crwdne2935265:0 Keychron K10 Max Wireless Battery Replacement: crwdns2935265:05crwdnd2935265:02crwdnd2935265:02crwdne2935265:0
    • Use the point of a spudger to push on alternating sides of the battery connector to "walk" it out of its socket on the I/O charging board.

    • If that doesn't work, use a pair of tweezers to firmly grip the sides of the connector and pull straight away from the socket. Hold the tweezers closer to the connector to get a better grip.

    • If you're having trouble, try rocking the connector side-to-side to loosen it.

    • Avoid using pliers with sharp teeth. They can slip and cut the battery wires, permanently damaging the connector.

  6. Keychron K10 Max Wireless Battery Replacement: crwdns2935265:06crwdnd2935265:01crwdnd2935265:03crwdne2935265:0 Keychron K10 Max Wireless Battery Replacement: crwdns2935265:06crwdnd2935265:02crwdnd2935265:03crwdne2935265:0 Keychron K10 Max Wireless Battery Replacement: crwdns2935265:06crwdnd2935265:03crwdnd2935265:03crwdne2935265:0
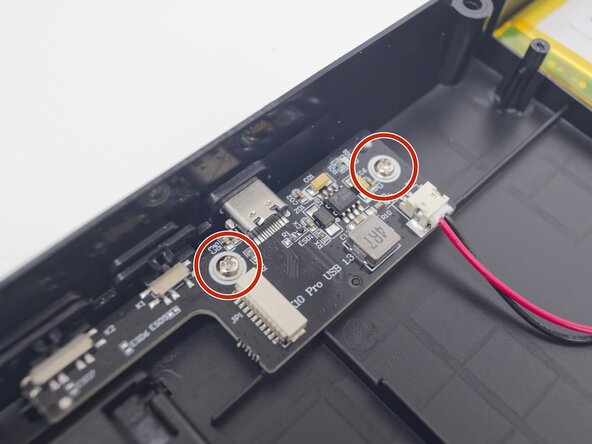
    • Remove the two 4.0 mm Phillips #1 screws securing the I/O charging port board.

    • Carefully slide the charging PCB out of the frame.

  7. Keychron K10 Max Wireless Battery Replacement, Battery: crwdns2935265:07crwdnd2935265:01crwdnd2935265:03crwdne2935265:0 Keychron K10 Max Wireless Battery Replacement, Battery: crwdns2935265:07crwdnd2935265:02crwdnd2935265:03crwdne2935265:0 Keychron K10 Max Wireless Battery Replacement, Battery: crwdns2935265:07crwdnd2935265:03crwdnd2935265:03crwdne2935265:0
    • Do not bend, puncture, crush, or aggressively pry against the battery. A damaged lithium-ion battery can leak, overheat, or catch fire.

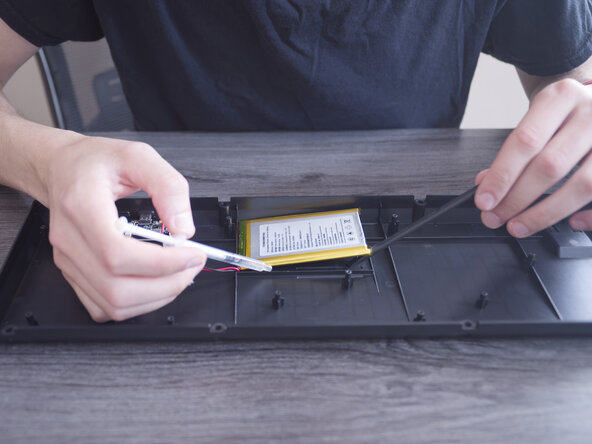
    • The battery is held down with a simple adhesive that covers the entire bottom of the battery. Use isopropyl alcohol with a syringe to loosen the adhesive.

    • Tilt the frame slightly to help the isopropyl alcohol flow underneath the battery. Once you get an edge lifted off slightly, start applying more isopropyl alcohol under the battery.

    • Be slow and patient while removing the battery. Just keep applying small amounts of isopropyl alcohol to weaken the adhesive, and give it time to soak in before prying.

    • Do not force the battery loose, as bending or puncturing a lithium-ion battery can cause it to leak, overheat, or catch fire.

    • Once the battery is removed, place it adhesive side up so it does not stick to the work surface

    • If the adhesive remains intact, it may be reused during reassembly.

crwdns2915888:0crwdne2915888:0

To reassemble your device, follow these instructions in reverse order. Take your e-waste to an R2 or e-Stewards certified recycler.

Richard Witkowski

crwdns2935283:003/23/26crwdne2935283:0

595 crwdns2915208:0crwdne2915208:0

crwdns2935297:05crwdne2935297:0

crwdns2935287:0crwdne2935287:0

Purdue University Northwest, Team 7-8, Dieterle Spring 2026 crwdns2935289:0Purdue University Northwest, Team 7-8, Dieterle Spring 2026crwdne2935289:0

PNW-DIETERLE-S26S7G8

crwdns2931471:03crwdne2931471:0

crwdns2935297:05crwdne2935297:0

crwdns2947412:00crwdne2947412:0

crwdns2917038:0crwdne2917038:0

crwdns2936625:0crwdne2936625:0:

crwdns2936751:024crwdne2936751:0 3

crwdns2936753:07crwdne2936753:0 10

crwdns2936753:030crwdne2936753:0 17

crwdns2942667:0crwdne2942667:0 25