crwdns2915892:0crwdne2915892:0
The hot plate in the Keurig K-Duo is designed to keep the coffee warm after brewing. Over time, these hot plates can fail due to wear, misuse, or electrical issues. You may need to replace the hot plate if your freshly brewed coffee gets cold over a short period of time.
Here is a guide showing the steps on how to replace the hot plate so your coffee stays warm.
In this process, the skilled use of applying thermal paste is required.
crwdns2942213:0crwdne2942213:0
-
-
Turn the Keurig K-Duo upside down so the power cord is visible and facing you.
-
-
-
At the top left hand corner, remove the single Phillips #1 screw that secures the plastic panel.
-
Remove the plastic panel.
-
-
-
-
Remove the four Phillips #1 screws from each of the four tabs.
-
Pull off all four tabs which secure the hot plate in place.
-
-
-
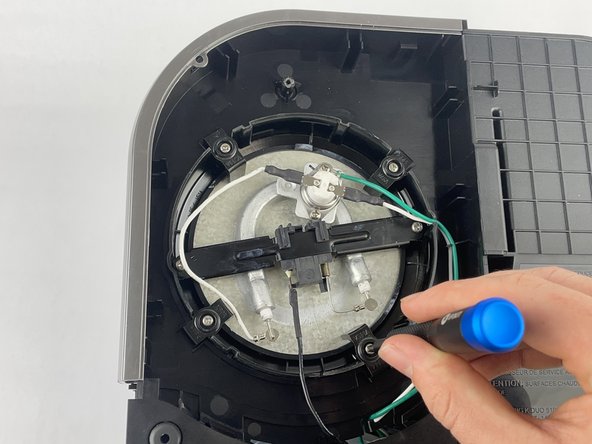
Remove two more Phillips #1 screws from the electrical heating element.
-
-
-
Carefully remove the electrical heating element from the hot plate.
-
Remove the hot plate by tilting one side over and pulling it straight out.
-


To reassemble your device, follow the above steps in reverse order.
Take your e-waste to an R2 or e-Stewards certified recycler.
Repair didn’t go as planned? Try some basic troubleshooting or ask our Answers community for help.
To reassemble your device, follow the above steps in reverse order.
Take your e-waste to an R2 or e-Stewards certified recycler.
Repair didn’t go as planned? Try some basic troubleshooting or ask our Answers community for help.

crwdns2915084:0crwdne2915084:0

Cuesta, Team 10-3, Krynen Fall 2024 crwdns2935289:0Cuesta, Team 10-3, Krynen Fall 2024crwdne2935289:0
CUESTA-KRYNEN-F24S10G3
crwdns2931471:04crwdne2931471:0
crwdns2935297:010crwdne2935297:0