crwdns2933423:0crwdne2933423:0
crwdns2947577:0crwdnd2947577:0crwdne2947577:0

Jazz UltraTab C855 Battery Replacement

crwdns2942213:0crwdne2942213:0

  1. Jazz UltraTab C855 Battery Replacement, Back Cover: crwdns2935265:01crwdnd2935265:01crwdnd2935265:01crwdne2935265:0
    crwdns2952109:0crwdne2952109:0

    crwdns2917038:0crwdne2917038:0

  2. Jazz UltraTab C855 Battery Replacement: crwdns2935265:02crwdnd2935265:01crwdnd2935265:01crwdne2935265:0
    • Pry the back case off using the blue Plastic Opening Tools. Work one along the seem until you can get your fingers under to pull it apart.

    crwdns2952109:0crwdne2952109:0

    crwdns2917038:0crwdne2917038:0

  3. Jazz UltraTab C855 Battery Replacement, Battery: crwdns2935265:03crwdnd2935265:01crwdnd2935265:01crwdne2935265:0
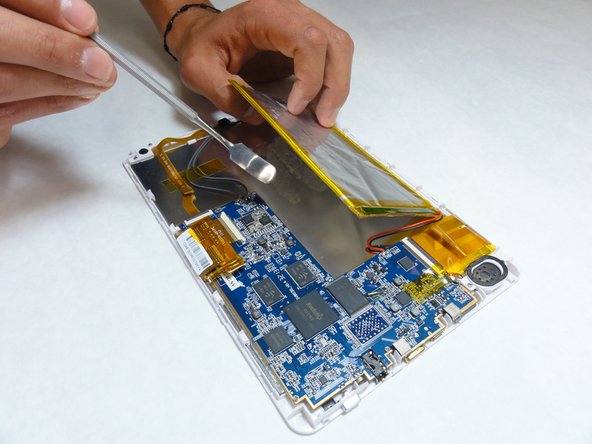
    • Remove the yellow tape from the sides of the battery, and the surrounding components.

    crwdns2952109:0crwdne2952109:0

    crwdns2917038:0crwdne2917038:0

  4. Jazz UltraTab C855 Battery Replacement: crwdns2935265:04crwdnd2935265:01crwdnd2935265:01crwdne2935265:0
    • Cut the pos(+) and neg (-) wires that connect the battery to the device using wire cutters.

    • Cut the wires towards the middle. During installation of your new battery these wires will be stripped back and soldered or crimped to reattach.

    crwdns2952109:0crwdne2952109:0

    crwdns2917038:0crwdne2917038:0

  5. Jazz UltraTab C855 Battery Replacement: crwdns2935265:05crwdnd2935265:01crwdnd2935265:01crwdne2935265:0
    • Using a plastic opening tool or spudger, slowly pry the battery away from the board.

    • The battery is secured to the device with adhesive.

    • Metal spudgers can puncture an unprotected battery, potentially causing a fire. When working with electronics, it's important to choose a tool that's ESD-safe to avoid accidental damage to the device. The regular black nylon spudger or a plastic opening tool should be used whenever possible.

    crwdns2952109:0crwdne2952109:0

    crwdns2917038:0crwdne2917038:0

  6. Jazz UltraTab C855 Battery Replacement: crwdns2935265:06crwdnd2935265:01crwdnd2935265:01crwdne2935265:0
    • Use a two sided adhesive to secure the new battery in place.

    • Solder or crimp the wires back together to reattach to the motherboard.

    • Replace any yellow tape that you removed at the beginning to secure the wires back in place.

    crwdns2952109:0crwdne2952109:0

    crwdns2917038:0crwdne2917038:0

crwdns2915888:0crwdne2915888:0

To reassemble your device, follow these instructions in reverse order.

crwdns2935221:0crwdne2935221:0

Cory Hodge

crwdns2935283:009/14/15crwdne2935283:0

201 crwdns2915208:0crwdne2915208:0

crwdns2935297:02crwdne2935297:0

crwdns2935287:0crwdne2935287:0

IUPUI, Team 1-3, Baechle Fall 2015 crwdns2935289:0IUPUI, Team 1-3, Baechle Fall 2015crwdne2935289:0

IUPUI-BAECHLE-F15S1G3

crwdns2931471:05crwdne2931471:0

crwdns2935297:010crwdne2935297:0

crwdns2947410:01crwdne2947410:0

Very good instructions.....but where do I buy the repkacement battery from?

fremontmyers - crwdns2934203:0crwdne2934203:0 crwdns2950251:0crwdne2950251:0

crwdns2917038:0crwdne2917038:0

crwdns2936625:0crwdne2936625:0:

crwdns2936751:024crwdne2936751:0 0

crwdns2936753:07crwdne2936753:0 6

crwdns2936753:030crwdne2936753:0 19

crwdns2942667:0crwdne2942667:0 756