crwdns2915892:0crwdne2915892:0
How to disassemble the JBL Charge 2 for a motherboard replacement.
crwdns2942213:0crwdne2942213:0
-
-
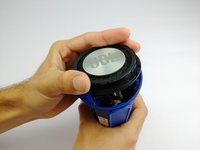
Remove the screen cover from the speaker using a metal spudger.
-
-
-
Using a Phillips #1 screwdriver (PH1), remove the (4) four 8mm screws.
-
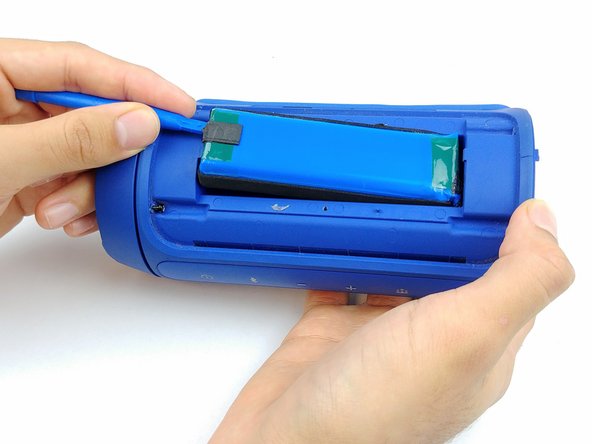
Remove the end cap of the device. Repeat the same process to remove the other end cap.
To remove the battery, only the cap and passive radiator containing the battery terminal needs to be removed.
-
-
-
To remove the end diaphragms, use a Phillips #1 screwdriver (PH1) and remove the (4) four 6mm screws.
-
Twist off the end cap and remove them from the device.
It’s not recommended to twist the radiator as there alignment pins on the body of the device. This can be pried away by hand or with a plastic spudger tool
-
-
-
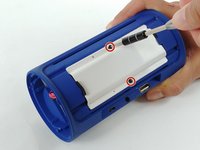
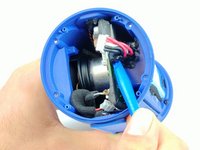
Use a Phillips #1 screwdriver (PH1) to remove the (2) two screws from the battery cover.
-
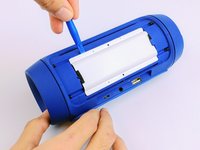
Pry away the plastic battery cover with a plastic spudger.
-
-
-
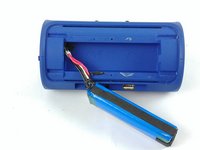
Disconnect the battery connector with a plastic opening tool and wiggle the connector free.
-
-
-
Scrape the battery wire sealant off with a plastic opening tool, and ensure it is free of the body of the speaker and wires.
-
Slide the battery free.
-
-
-
-
Remove the opposite screen cover using a metal spudger
-
-
-
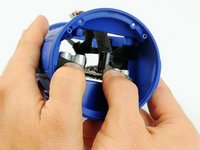
Use the Phillips #1 screwdriver (PH1) to remove the (8) eight screws.
-
Pull out the speakers from the device.
-
-
-
Disconnect the wiring from the speaker by using the fine tip pry tool.
-
Remove the speakers from the device.
-
-
-
Use a spudger to disconnect the gold antenna connector from the main circuit board.
Thanks for including this pic! My unit had somehow dislodged that large cubic capacitor labeled 100 on top and I couldn’t find any references to aligning it when reattaching and didn’t want to short it out. Connected mine as shown, put it back together, good as new! Thx again for the great pics and clear notes
-
-
-
Disconnect the microphone connector using the plastic opening tool.
-
-
-
Use a plastic opening tool to disconnect the 3.5 mm headphone connector.
-
-
-
Disconnect micro-b connector with a plastic opening tool.
-
-
-
Remove the connector to the USB connector using a plastic opening tool.
-
-
-
Remove the speaker wires from the control panel by prying off with a plastic opening tool.
-
-
-
Next, disconnect the control-panel ribbon by prying out the grey plastic tab using a plastic opening tool. The ribbon should freely come out afterwards.
-
-
-
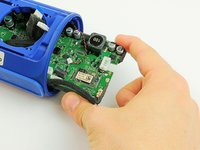
Remove the motherboard from the device.
-


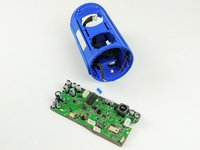
To reassemble your device, follow these instructions in reverse order.
To reassemble your device, follow these instructions in reverse order.
crwdns2935221:0crwdne2935221:0
crwdns2935229:05crwdne2935229:0
crwdns2915084:0crwdne2915084:0

USF Tampa, Team S2-G4, Passmore Fall 2017 crwdns2935289:0USF Tampa, Team S2-G4, Passmore Fall 2017crwdne2935289:0
USFT-PASSMORE-F17S2G4
crwdns2931471:04crwdne2931471:0
crwdns2935297:08crwdne2935297:0
crwdns2947412:02crwdne2947412:0
Guten Tag
Vielen Dank für die prima Anleitung!
Ich habe den Fehler bei meinem Charge 2+ gefunden. Das Bauteil mit der 100 drauf ist außen mehrfach gerissen. Was ist das für ein Bauteil und kann ich das bestellen?
Liebe Grüße
Stefan
Hello i have a problem with component 100 but i don't now what is ? someone can help me thanks and from were can i order ?
Please note BOTH screen covers should be removed for the battery replacement
Shane Phillips - crwdns2934203:0crwdne2934203:0
Only the rear screen need be removed. There will be the battery housing(black plastic piece), remove 5 black screws with #1 Phillips. Gently working from side to side with spudger tool dislodge battery housing. Gently unplug battery connector, and remove battery housing. Remove 1 black Phillips screw and remove cover. Remove battery.
1STEIN69 - crwdns2934203:0crwdne2934203:0