crwdns2915892:0crwdne2915892:0
Questi sono i video che mi hanno aiutato durante i quattro smontaggi che ho effettuato per vari motivi e che vi consiglio di guardare assieme alle note che ho scritto in questa guida in base alla mia esperienza.
-
-
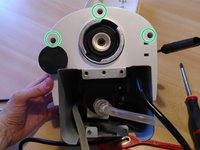
Prima di procedere allo smontaggio rimuovere il filtro del caffè (cerchio verde) e il pomello del vapore (cerchio azzurro): tirare con (tanta) forza verso l'alto.
-
Staccare dalla corrente la macchina e posizionarla su un piano con diversi stracci: l'acqua contenuta nei tubi verrà persa durante lo smontaggio.
-
-
-
[vista posteriore] Una volta rimosso il serbatoio trasparente dell'acqua si possono svitare le due viti alla base (cerchio verde) e le due viti in cima (cerchio rosso) che permetteranno la rimozione del coperchio metallico superiore più avanti.
-
[vista inferiore] Svitare le quattro viti a sezione esagonale (cerchio azzurro) e le due viti a croce (cerchio verde) dalla base.
-
Una volta rimossa la base nera si possono rimuovere i tubi di plastica che portano l'acqua dal nostro serbatoio alla caldaia. Tirare con forza i tubi (cerchi blu)
-
-
-
-
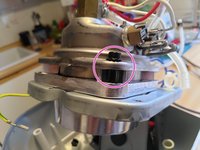
Una volta rimossa la base si può iniziare a rimuovere il coperchio. Dalla parte inferiore svitare le tre viti (cerchio verde).
-
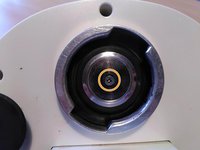
Rimuovere il filtro metallico dell'acqua erogata (cerchio arancione)
-
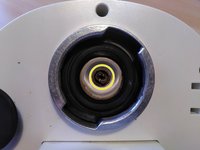
Rimuovere la valvola che fa scendere l'acqua dal serbatoio interno con un cacciavite piatto (cerchio giallo) - questa operazione si può fare anche senza smontare la base in caso di necessità di sostituzione del singolo pezzo.
-
-
-
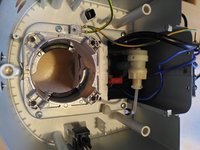
Rimuovere parzialmente il coperchio e rimuovere il cavo giallo/verde (terra) dal coperchio (cerchio verde) semplicemente tirandolo
-
Svitare la vite (cerchio viola) per rimuovere liberare il modulo con i tre bottoni (accensione, caffè, vapore)
-
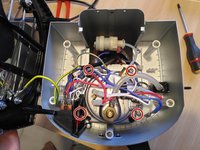
Rimuovere le clip metalliche (cerchio giallo) per liberare il tubo rigido che porta l'acqua dal serbatorio esterno alla caldaia
-
Allentare le clip metalliche (cerchio blu) che fissano il tubo morbido che collega la caldaia (in basso) all'uscita del vapore (a destra). Farle scorrere sul tubo morbido e rimuovere il tubo
-
-
-
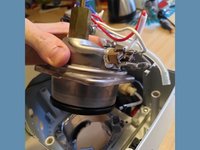
Rimuovere le viti a croce (cerchi rossi - Philips) che fissano la caldaia al corpo principale
-
Una volta rimossa la caldaia è possibile aprirla svitando le 4 viti a sezione esagonale poste sui quattro angoli (cerchio viola - Allen). Questo passaggio è utile per rimuovere il calcare accumulato nella caldaia.
Was für einen Schrsubenxieher brauch ich ? Ich bekomme die Schreiben nicht auf
-
-
-
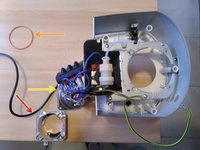
Una volta smontata la caldaia si possono sostituire i pezzi necessari: pezzo inferiore (freccia rossa), guaina (freccia arancione), pezzo superiore (freccia gialla)
We’ll written. I got as far as the internals removal before finding this and reassembled. Thanks, will have another go following your excellent procedure.
Vielen Dank für die Beschreibung.
Ich habe eine Frage zum Erhitzer: Ich möchte die Wasserzufuhr und die Dichtung im Erhitzer tauschen. Ich habe alle Schritte befolgt, bekomme den Behälter jedoch nicht geöffnet, um die Teile auszutauschen.
Kann es sein, dass er stark verkalkt ist, oder muss ich noch etwas lösen – obwohl ich eigentlich nichts mehr sehe, was ich noch lösen könnte?
Vielen Dank für die Unterstützung!
Thank you for the instructions.
I have a question about the heater: I want to replace the water supply and the gasket inside the heater. I have followed all the steps, but I can't open the container to replace the parts.
Could it be that it is heavily calcified, or is there something else I need to loosen – even though I don’t see anything left to unscrew?
Thank you for your support!
-


Per rimontare il dispositivo, segui queste istruzioni in ordine inverso.
Per rimontare il dispositivo, segui queste istruzioni in ordine inverso.
crwdns2935221:0crwdne2935221:0
crwdns2935229:012crwdne2935229:0
crwdns2947412:016crwdne2947412:0
Great, clear instructions and easy to follow. I've been looking to into this machine, and tons of scale in the boiler. works fine now! Cheers
Muss man vor dem zerlegen eig den (wenn vorhanden) Boiler oder Erhitzer entleeren, dass kein restwasser entweicht beim auf-den-Kopf-stellen? Wenn ja, wie geht das? Danke schon mal für den obigen, ausführlichen Bericht!
Hi, I think you can empty the boiler (the one depicted in step 6) before disassemblying the coffee machine. Just try to remove the water container (the one on the back of the machine) and try to "make a coffee". The machine should try to empty the residual water in the tubes, but probably some water will remain inside the boiler.
Either way you can open the boiler (step 6) on a sink so that the residual water won't wet your working space.
VooBee -
Guten Tag, wie bekommt man das Ventil aus der Maschine um es auszutauschen? Ich bekomme es einfach nicht hin. Muss dafür der Erhitzer ausgebaut werden?
Hello,
if you are referring to the valve in step 3 - yellow circle - you can remove it with a flat screwdriver but it's not necessary if you don't need to replace that specific valve.
VooBee -
leider greift der torx scglüssel nicht für die Bodenplattenschrauben. Hat jemand einen Tipp???
Hello,
if you are referring to the hexagonal screws in step 2: yes, they are the worst! I had to drill one of those to push it so that it broke the small plastic base on which it stood. Of course you can't do it to all the 4 screws or you will have a non stable base!
VooBee -
Passen Inbusschlüssel?
Do Allen keys fit?
VauWeh -
Hi, vielen Dank für die sehr gute Anleitung. Hat alles so Step by Step funktioniert. Ich habe den Assy Boiler (fully) ausgetauscht. Ich habe nur leider ein Problem und kann den Grund nicht finden: nach dem Zusammenbau läuft das Wasser nicht unten durch das Sieb in die Tasse, sondern das Wasser kommt irgendwo oben heraus. Habe die Maschine schon zweimal auseinander und wieder zusammen gebaut, immer wieder das gleiche Problem. Vielen Dank für einen Tipp, was ich ggf. falsch gemacht habe.
Hi. The only thing I can think of are those metal clips that tighten the water pipes (step 4, blue circle). Did you put them back on? Are they loose?
VooBee -
Thanks so much. It is so clear, I followed the steps and succeeded in doing a good job for my machine, but unfortunately, I did not succeed in getting the wires back in their proper location. Can anybody help? jak.jak45@yahoo.com
Hi, step 4 and 5 shows the right way the electrical wires are connected, but the only electrical wire I removed is the yellow/green one (ground).
Did you remove any other electrical wire?
VooBee -
Hi. I’ve recently used your excellent guide to replace a pump in a De’Longhi Icona machine. I got stuck at step 4 removing the keypad module. On my UK machine (ECOV310.AZ) there are two screws, not one. Otherwise, an excellent guide. Thank you.
Grytr
Welchen Schraubenzieher brauche ich denn ?
Hi, in the descriptions I wrote the type of screws I found: cross (Philips) and hexagonal (Allen).
I don't remember the exact size for each of the screws, but I used only one Philips screwdriver and one Allen key.
VooBee -
Thank you so much for your tutorial. Very well organized and helpful. I was sble to replace the OPV and get my crema back. Belisimo!