crwdns2915892:0crwdne2915892:0
Use this guide to replace the old battery in your Huawei P9 Lite.
crwdns2942213:0crwdne2942213:0
-
-
Use an opening pick to unclip the rear cover, starting from the bottom corner.
-
Work your way around counterclockwise and carefully pry the plastic tabs open one by one.
-
-
-
Twist the opening pick to lever the back cover away and loosen it from the adhesive.
Most of the adhesive is around the fingerprint cell and on the battery itself. You can slowly pull the back cover from its side but make sure not to break it. Push the mediator or a longer piece of plastic under the back cover to slowly destroy the adhesive.
Slowly, slowly wins the day. Nicolas is right and comes off a charm. The most nerve wracking part of this longish repair.
-
-
-
When the back cover is freed from the adhesive you can pop it off by hand completely.
Hi! Im so sad! At the begginig of the operation i ve broken the white seal/connector that in one side is connected to the board and the other side is "glued" to the battery. Can someone help me? how can i solve this?? There is no image displayed on the screen. but there is vibration, sound, notifications... can someone help me please???
What you broke is handling the NFC, and doesn’t have anything to do with the display. You probably damaged the ribbon right below the battery, since that’s what links the display to the motherboard.
Polaris -
Oups ! L’antenne NFC était solidement collée à l’intérieur de la coque et j’ai donc déchiré sa nappe en ouvrant la coque. Heureusement, je n’utilise pas les fonctions NFC et, à part cela, tout a l’air de fonctionner normalement.
-
-
-
-
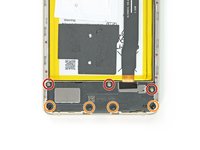
On the bottom of the phone remove the following screws:
-
Three 2.9 mm Phillips #00 screws
-
Four 3.8 mm Phillips #00 screws
-
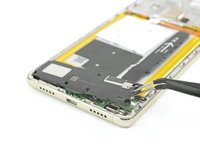
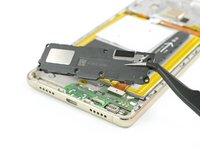
Now you can grab the loudspeaker unit and take it out.
-
-
-
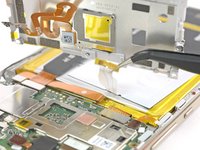
Remove the nine Phillips #00 screws that secure the metal shield plate.
Qu’est ce qu’un “indicateur d’eau”?
Une petite pastille qui change de couleur au contact de l’eau. Les fabricants s’en servent pour nullifier la garantie : si ta pastille indique que de l’eau s’est infiltré, tu devra payer ta réparation.
Polaris -
Are all the screws the same size ?
yes they are
Adam M -
-
-
-
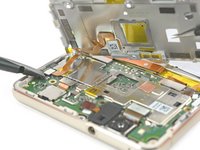
Use a spudger to disconnect the fingerprint sensor from the motherboard.
-
Peel the NFC antenna cable off of the metal plate.
can we just remove NFC antenna and dont want to install int back?
Note there are two plastic tabs at the top of the shield plate. Unlock them with a mediator, the plate will come easily after that.
Buongiorno,
va sostituita l'intera piastra metallica contenente il sensore impronte e la fotocamera, oppure il sensore é estraibile dalla piastra?
Grazie
LUIGI
Yes, it is possible to remove just the fingerprint sensor from the motherboard shield. Remove the small metal plate on the inside of the shield covering the sensor and push the fingerprint sensor through from the other side.
Grazie mille.
-
-
-
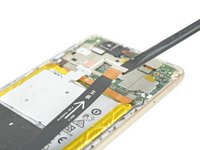
Disconnect the motherboard flex cable on both ends and take it away.
-
-
-
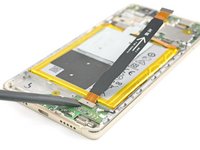
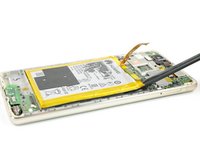
Peel off the NFC antenna from the battery.
-
Unplug the battery connector.
The NFC Antenna is delicate. If you are just replacing the batter then i had to use a bit of heat to soften the adhesive before gently peeling it away from the battery. The adhesive is quite stubborn.
-
-
crwdns2935267:0crwdne2935267:0Tesa 61395 Tape$5.99
-
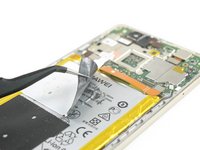
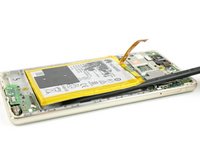
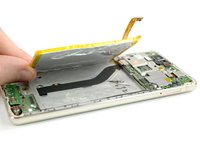
Slide the spudger under the battery at the place shown in the picture and pry it loose slowly.
-
When reassembling your phone replace old adhesive with double-sided tape or pre-cut adhesive strips.
Bonjour j'ai réalisé toutes les etapes mais mon telephone ne se charge plus.que faire ?
Bonjour ! Alors deux options sont possibles :
1) la batterie était complètement vide et cela prend du temps avant que le téléphone s’allume et affiche que la batterie est en train de charger.
2) vérifiez que les connexions des nappes à l’intérieur, surtout celle de cette étape. Cette nappe relie en effet le circuit inférieur au supérieur, fait donc le lien entre la batterie et le port de recharge.
Bonne chance !
Claire (iFixit EU)
Super !
J’ai réussi. Le plus pénible sont les différents endroits collés.
Particulièrement sous la batterie… et l’antenne NFC ! Qu’on ne peut pas recoller ! (jai mis du scotch, j’espère que ça ira…)
A priori, le sèche-cheveux aide un peu pour ramollir la colle sous la batterie.
J’ai pu aussi enlever de la colle en soulevant l’autre côté (doucement). Prendre son temps est essentiel ^^
Par contre pas remis de l’adhésif dessous comme indiqué.
The battery i removed yesterday had way more adhesive on the under side than in the above pic. I ended up having to get the old battery fairly warm before the adhesive would release. A tip if you are doing this is to use an old credit card cut in to narrow strips and insert them in to the gap where the adhesive release. That way the battery shouldn’t re-stick before you remove it.
-


To reassemble your device, follow these instructions in reverse order.
To reassemble your device, follow these instructions in reverse order.
crwdns2935221:0crwdne2935221:0
crwdns2935229:089crwdne2935229:0

crwdns2915084:0crwdne2915084:0

Tobias Isakeit - Repairability Engineer crwdns2935289:0Tobias Isakeit - Repairability Engineercrwdne2935289:0
Business
crwdns2934841:01crwdne2934841:0
crwdns2935297:01,134crwdne2935297:0
crwdns2947412:026crwdne2947412:0
There is an extra step where you need to remove the cover of the board at the top of the phone in order to remove the NFC antenna which is not described in this guide. Better watch this https://www.youtube.com/watch?v=ADZiL7JK...
Thanks Costas for the hint. We added the missing step.
Very very thanks!
Cercando di rimouorere l'adesivo dell'nfc si è rotto, posso assembrale il telefono senza nfc, ovviamente invalidando questa funzione?
Si, hai ragione: si può riassemblare il telefono senza l’antenna NFC perdendo questa funzione…
Helpful but now the fingerprint sensor and NFC don’t work, double checked the connector has been replaced correctly any idea on what might have gone wrong?
Maybe you want to check that the fingerprint sensor connector is properly seated and that the cable is not nicked or ripped. Same goes for the NFC antenna. Check the wiring of the antenna and that the contact pads and springs on the mother board meet.
This was very helpful, my phone works perfectly fine.
About removing the battery from the casing ... use fishing braided line. that works better :) Battery extracted without destruction.
Great tutorial. Worked like a charm for me. I definitely recommend buying the iFixit kit. Couldn't have done it without it.
Muchísimas gracias por tu detallada explicación.
Hello.
These black stickers are left on the battery, what they are used for and whether they need to be changed. I have a new battery without its.
Tutoriel à la fois simple, précis et très explicite. Je l’ai suivi pas à pas et je n’ai eu aucun soucis.
Vraiment merci beaucoup.
Dopo sostituzione batteria display non funziona. Cosa sarà successo e come ripristinare funzionamento? Grazie infinite a chi mi saprà aiutare.
Prova a controllare che il connettore sia connesso correttamente
Emilio -
I completed the procedure without removing the audio board as described in step 4. I just disconnected the other end of the cable from the mother board and completed the other steps, it worked just fine.
Ciao, dopo aver cambiato la batteria il microfono inferiore non funziona. Avete qualche suggerimento? Qualche aiuto? Grazie
The battery was glued very firmly. Therefore, when it was removed, it was bent and became hot.
Perfetto, ma dopo aver sostituito la batteria non mi funziona più il GPS ! Qualcuno sa aiutarmi ?
Bonsoir est-ce qu’on est vraiment obliger d'utiliser ruban adhésif double-face tesa ?
You can use any brand. Just make sure the tape is not too thick (so nothing you’d use for fixing down a carpet ;)
If the remaining adhesive is still sticky enough you might get away with re-using it. Having a rattling battery in your phone is somewhat annoying so you better fix it somehow.
Many thanks, helped me a lot!
A million thanks !!!
You’re welcome :)
Comment enlever la batterie
Puedo poner otra batería diferente?
What could you use instead of an opening pick??
Alfredo - crwdns2934203:0crwdne2934203:0
Like, could a guitar pick wor? Or anything else?
Alfredo - crwdns2934203:0crwdne2934203:0
A guitar pick will also do.
Tobias Isakeit -
what can still be used besides guitar pick
Tarshia Thompson - crwdns2934203:0crwdne2934203:0
I had a hard time to open the back cover by opening pick. Then I used little, really little knife at first, and I continue to opening back cover using opening pick.
Andy B - crwdns2934203:0crwdne2934203:0
Heating up aroud the finger sensor to loosen the square adhesive tape ..
Hishamchohan - crwdns2934203:0crwdne2934203:0
If you do not have any picks, You can also adapt an old credit or utility card by cutting it in to thirds. Then with some fine emery or sand paper, rub a sharp point on the one edge of the card. This will help you get access to the clips that hold the rear cover on. The one i did yesterday had quite a lot of adhesive around the edge & around the finger print sensor. Another tip with an old credit card is to cut it in to narrow strips to insert in to where you have separated the cover from the frame to stop it getting stuck to the adhesive again.
gazza667 - crwdns2934203:0crwdne2934203:0