crwdns2933423:0crwdne2933423:0

crwdns2942213:0crwdne2942213:0

  1. crwdns2935201:0crwdne2935201:0 crwdns2935203:0crwdne2935203:0

    : crwdns2935265:01crwdnd2935265:01crwdnd2935265:01crwdne2935265:0
    • Apply a heated iOpener to the rear glass to loosen the adhesive underneath. Apply the iOpener for at least two minutes.

  2. crwdns2935201:0crwdne2935201:0 crwdns2935203:0crwdne2935203:0

    : crwdns2935265:02crwdnd2935265:01crwdnd2935265:03crwdne2935265:0 : crwdns2935265:02crwdnd2935265:02crwdnd2935265:03crwdne2935265:0 : crwdns2935265:02crwdnd2935265:03crwdnd2935265:03crwdne2935265:0
    • Since the rear glass of the Huawei P40 Pro is curved, we highly recommend to slice the adhesive with a softer plastic tool like the iMac opening wheel before working with opening picks to prevent the rear glass from shattering.

    • Secure a suction handle to the bottom edge of the rear glass, as close to the curved edge as possible.

    • If your rear glass is badly cracked, covering it with a layer of clear packing tape may allow the suction cup to adhere. Alternatively, very strong tape may be used instead of the suction cup. If all else fails, you can superglue the suction cup to the rear glass.

    • Lift the back cover with the suction handle to create a small gap between the back cover and the frame.

    • In case you have trouble creating a gap, apply more heat to further soften the adhesive. Follow the iOpener instructions to avoid overheating.

    • Insert an iMac opening wheel into the gap.

    • Slide the opening wheel to the bottom left corner to slice the adhesive.

  3. crwdns2935201:0crwdne2935201:0 crwdns2935203:0crwdne2935203:0

    : crwdns2935265:03crwdnd2935265:01crwdnd2935265:02crwdne2935265:0 : crwdns2935265:03crwdnd2935265:02crwdnd2935265:02crwdne2935265:0
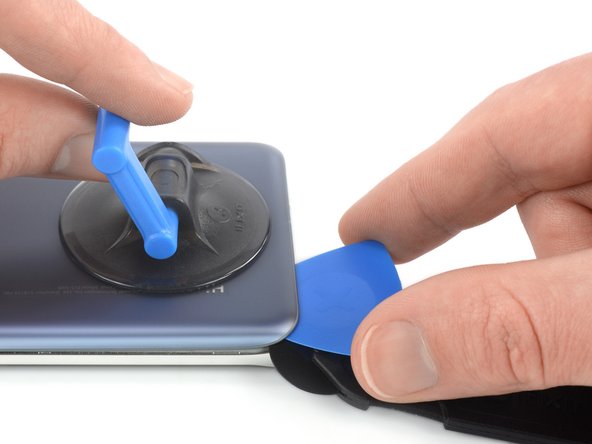
    • Insert an opening pick into the gap between rear glass and frame at the bottom left corner of your phone to prevent the adhesive from resealing.

  4. crwdns2935201:0crwdne2935201:0 crwdns2935203:0crwdne2935203:0

    : crwdns2935265:04crwdnd2935265:01crwdnd2935265:03crwdne2935265:0 : crwdns2935265:04crwdnd2935265:02crwdnd2935265:03crwdne2935265:0 : crwdns2935265:04crwdnd2935265:03crwdnd2935265:03crwdne2935265:0
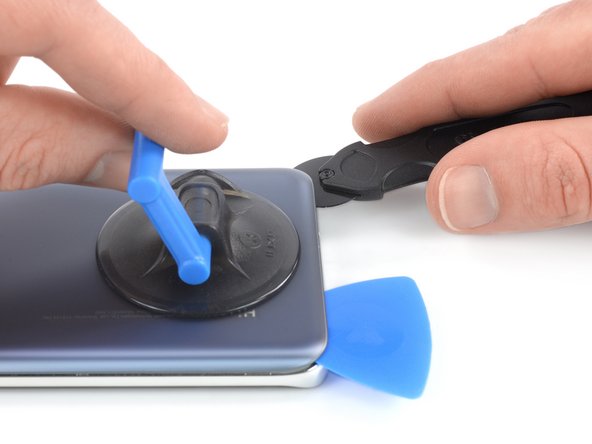
    • Reinsert the opening wheel at the bottom edge of the rear glass.

    • Slide the opening wheel to the bottom right corner to slice the adhesive.

    • Insert an opening pick underneath the bottom right corner of the rear glass, next to the opening wheel to prevent the adhesive from resealing.

  5. crwdns2935201:0crwdne2935201:0 crwdns2935203:0crwdne2935203:0

    : crwdns2935265:05crwdnd2935265:01crwdnd2935265:03crwdne2935265:0 : crwdns2935265:05crwdnd2935265:02crwdnd2935265:03crwdne2935265:0 : crwdns2935265:05crwdnd2935265:03crwdnd2935265:03crwdne2935265:0
    • If the adhesive becomes hard to cut, it has most likely cooled down. Use your iOpener to reheat it.

    • Insert the opening wheel underneath the bottom left corner of the rear glass.

    • Slide the opening wheel along the left edge of your Huawei P40 Pro to cut the adhesive.

    • Insert an opening pick underneath the top left corner of the rear glass, next to the opening wheel to prevent the adhesive from resealing.

  6. crwdns2935201:0crwdne2935201:0 crwdns2935203:0crwdne2935203:0

    : crwdns2935265:06crwdnd2935265:01crwdnd2935265:03crwdne2935265:0 : crwdns2935265:06crwdnd2935265:02crwdnd2935265:03crwdne2935265:0 : crwdns2935265:06crwdnd2935265:03crwdnd2935265:03crwdne2935265:0
    • Insert the opening wheel underneath the top left corner of the rear glass.

    • Slide the opening wheel along the top edge of your phone to cut the adhesive.

    • Insert an opening pick underneath the top right corner of the rear glass, next to the opening wheel to prevent the adhesive from resealing

  7. crwdns2935201:0crwdne2935201:0 crwdns2935203:0crwdne2935203:0

    : crwdns2935265:07crwdnd2935265:01crwdnd2935265:02crwdne2935265:0 : crwdns2935265:07crwdnd2935265:02crwdnd2935265:02crwdne2935265:0
    • Insert the opening wheel underneath the top right corner of the rear glass.

    • Slide the opening wheel along the right edge of your phone to cut the remaining adhesive.

  8. crwdns2935201:0crwdne2935201:0 crwdns2935203:0crwdne2935203:0

    : crwdns2935265:08crwdnd2935265:01crwdnd2935265:03crwdne2935265:0 : crwdns2935265:08crwdnd2935265:02crwdnd2935265:03crwdne2935265:0 : crwdns2935265:08crwdnd2935265:03crwdnd2935265:03crwdne2935265:0
    • Remove the rear glass.

crwdns2935217:0crwdne2935217:0

crwdns2935229:02crwdne2935229:0

Dominik Schnabelrauch

crwdns2935283:011/23/16crwdne2935283:0

236,308 crwdns2915208:0crwdne2915208:0

crwdns2935297:0682crwdne2935297:0

crwdns2915084:0crwdne2915084:0

iFixit crwdns2935289:0iFixitcrwdne2935289:0

Staff

crwdns2931471:0119crwdne2931471:0

crwdns2935297:021,464crwdne2935297:0

crwdns2947410:01crwdne2947410:0

crwdns2917038:0crwdne2917038:0

crwdns2936625:0crwdne2936625:0:

crwdns2936751:024crwdne2936751:0 3

crwdns2936753:07crwdne2936753:0 23

crwdns2936753:030crwdne2936753:0 95

crwdns2942667:0crwdne2942667:0 6,591