crwdns2933423:0crwdne2933423:0

Huawei Mate 8 Charging Board Replacement

crwdns2942213:0crwdne2942213:0

  1. Huawei Mate 8 Charging Board Replacement, Back Cover: crwdns2935265:01crwdnd2935265:01crwdnd2935265:02crwdne2935265:0 Huawei Mate 8 Charging Board Replacement, Back Cover: crwdns2935265:01crwdnd2935265:02crwdnd2935265:02crwdne2935265:0
    • Switch off your phone and remove the SIM card tray.

  2. Huawei Mate 8 Charging Board Replacement: crwdns2935265:02crwdnd2935265:01crwdnd2935265:01crwdne2935265:0
    • Remove the Torx T2 screws from the bottom of the phone

  3. Huawei Mate 8 Charging Board Replacement: crwdns2935265:03crwdnd2935265:01crwdnd2935265:02crwdne2935265:0 Huawei Mate 8 Charging Board Replacement: crwdns2935265:03crwdnd2935265:02crwdnd2935265:02crwdne2935265:0
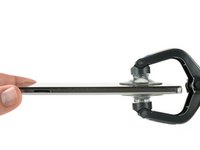
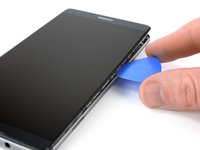
    • Use an iSclack or a suction handle in the bottom area of your phone to separate the display unit from the rear panel.

  4. Huawei Mate 8 Charging Board Replacement: crwdns2935265:04crwdnd2935265:01crwdnd2935265:03crwdne2935265:0 Huawei Mate 8 Charging Board Replacement: crwdns2935265:04crwdnd2935265:02crwdnd2935265:03crwdne2935265:0 Huawei Mate 8 Charging Board Replacement: crwdns2935265:04crwdnd2935265:03crwdnd2935265:03crwdne2935265:0
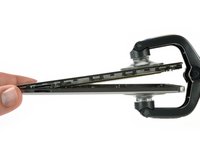
    • Use an opening pick to fully separate the clips, releasing the phone.

    • Do not fully remove the rear case. The fingerprint sensor cable is still connected to the back cover.

    • Open the phone like a book from the SIM tray side.

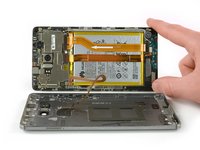
    • Use a spudger, to disconnect the fingerprint sensor cable.

  5. Huawei Mate 8 Charging Board Replacement, Daughterboard interconnect cable: crwdns2935265:05crwdnd2935265:01crwdnd2935265:03crwdne2935265:0 Huawei Mate 8 Charging Board Replacement, Daughterboard interconnect cable: crwdns2935265:05crwdnd2935265:02crwdnd2935265:03crwdne2935265:0 Huawei Mate 8 Charging Board Replacement, Daughterboard interconnect cable: crwdns2935265:05crwdnd2935265:03crwdnd2935265:03crwdne2935265:0
    • Remove the liquid indicator sticker.

    • Remove the Phillips #00 screw that holds down the metal shield.

    • The metal shield is tightly held in place. If you try to remove it without holding it down on one side, it'll break easily.

    • Use a spudger to remove the metal shield.

  6. Huawei Mate 8 Charging Board Replacement: crwdns2935265:06crwdnd2935265:01crwdnd2935265:03crwdne2935265:0 Huawei Mate 8 Charging Board Replacement: crwdns2935265:06crwdnd2935265:02crwdnd2935265:03crwdne2935265:0 Huawei Mate 8 Charging Board Replacement: crwdns2935265:06crwdnd2935265:03crwdnd2935265:03crwdne2935265:0
    • Use the flat end of a spudger to disconnect the display, daughterboard interconnect, and battery cables.

  7. Huawei Mate 8 Charging Board Replacement: crwdns2935265:07crwdnd2935265:01crwdnd2935265:01crwdne2935265:0
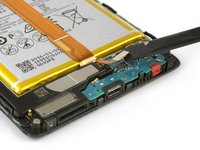
    • Remove the Phillips #00 screw that holds down the interconnect cable bracket.

  8. Huawei Mate 8 Charging Board Replacement: crwdns2935265:08crwdnd2935265:01crwdnd2935265:02crwdne2935265:0 Huawei Mate 8 Charging Board Replacement: crwdns2935265:08crwdnd2935265:02crwdnd2935265:02crwdne2935265:0
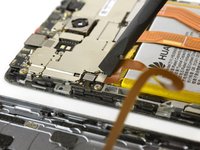
    • Lift the coaxial connector off of its socket to allow access to the daughterboard interconnect cable bracket.

    • Remove the bracket.

  9. Huawei Mate 8 Charging Board Replacement: crwdns2935265:09crwdnd2935265:01crwdnd2935265:01crwdne2935265:0
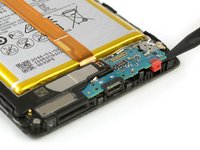
    • Use a spudger to disconnect the interconnect cable.

    • Remove the interconnect cable.

  10. Huawei Mate 8 Charging Board Replacement, Charging Board: crwdns2935265:010crwdnd2935265:01crwdnd2935265:03crwdne2935265:0 Huawei Mate 8 Charging Board Replacement, Charging Board: crwdns2935265:010crwdnd2935265:02crwdnd2935265:03crwdne2935265:0 Huawei Mate 8 Charging Board Replacement, Charging Board: crwdns2935265:010crwdnd2935265:03crwdnd2935265:03crwdne2935265:0
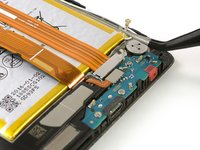
    • Remove the two Phillips #00 screws.

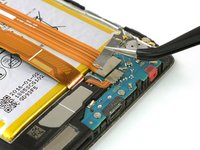
    • Use the flat end a spudger to disconnect the loudspeaker flex connector.

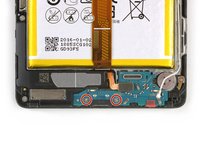
    • Use the pointy end of a spudger to pry out the daughterboard.

    • Remove the daughterboard.

crwdns2915888:0crwdne2915888:0

To reassemble your device, follow these instructions in reverse order.

crwdns2935229:03crwdne2935229:0

Theo Mat

crwdns2935283:011/12/17crwdne2935283:0

12.782 crwdns2915208:0crwdne2915208:0

crwdns2935297:014crwdne2935297:0

crwdns2944067:03crwdne2944067:0

Step 5 Daughterboard interconnect cable

Is step above Really required? Any issues if skip straight to step 7

LCW - crwdns2934203:0crwdne2934203:0

Hello LCW,

you can jump straight to Step 7 but you should definitely disconnect your battery when working on your phone. However you can achieve that by only removing the metal shield and keep the display and interconnect cable plugged in. It’s just a bit of a fumbling.

Dominik Schnabelrauch -

Hi. I replaced the battery, but Huawei Mate 8 still does not charge.

Is there a charging IC that I need to replace?

Is the charging IC on the charging board, or on the motherboard?

If it is on the motherboard, where is it, and is it possible to change?

CHOONG Wee Hong - crwdns2934203:0crwdne2934203:0

crwdns2917038:0crwdne2917038:0

crwdns2936625:0crwdne2936625:0:

crwdns2936751:024crwdne2936751:0 0

crwdns2936753:07crwdne2936753:0 1

crwdns2936753:030crwdne2936753:0 12

crwdns2942667:0crwdne2942667:0 2,121