crwdns2933423:0crwdne2933423:0

How to Remove the Top Panel in Your LG Front Load Washing Machine

crwdns2942213:0crwdne2942213:0

  1. How to Remove the Top Panel in Your LG Front Load Washing Machine, Safety Precautions: crwdns2935265:01crwdnd2935265:01crwdnd2935265:02crwdne2935265:0 How to Remove the Top Panel in Your LG Front Load Washing Machine, Safety Precautions: crwdns2935265:01crwdnd2935265:02crwdnd2935265:02crwdne2935265:0
    • Before you begin your repair, perform the following:

    • Turn off the main water supply

    • Unplug your washer

    • Disconnect all water connections at the rear of your washer

  2. How to Remove the Top Panel in Your LG Front Load Washing Machine, Unfasten the top panel: crwdns2935265:02crwdnd2935265:01crwdnd2935265:03crwdne2935265:0 How to Remove the Top Panel in Your LG Front Load Washing Machine, Unfasten the top panel: crwdns2935265:02crwdnd2935265:02crwdnd2935265:03crwdne2935265:0 How to Remove the Top Panel in Your LG Front Load Washing Machine, Unfasten the top panel: crwdns2935265:02crwdnd2935265:03crwdnd2935265:03crwdne2935265:0
    • Remove the screw(s) securing the top panel brackets to the back panel.

    • You don't need to remove the screws securing the brackets to the top panel.

  3. How to Remove the Top Panel in Your LG Front Load Washing Machine, Remove the top panel: crwdns2935265:03crwdnd2935265:01crwdnd2935265:02crwdne2935265:0 How to Remove the Top Panel in Your LG Front Load Washing Machine, Remove the top panel: crwdns2935265:03crwdnd2935265:02crwdnd2935265:02crwdne2935265:0
    • Slide the top panel towards the rear of the device to disconnect its clips.

  4. How to Remove the Top Panel in Your LG Front Load Washing Machine: crwdns2935265:04crwdnd2935265:01crwdnd2935265:02crwdne2935265:0 How to Remove the Top Panel in Your LG Front Load Washing Machine: crwdns2935265:04crwdnd2935265:02crwdnd2935265:02crwdne2935265:0
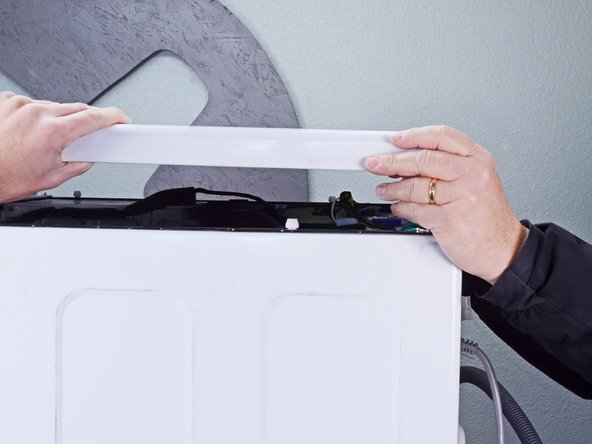
    • Tilt the top panel upward to completely disconnect it from the chassis.

    • Remove the top panel.

crwdns2915888:0crwdne2915888:0

To reassemble your device, follow these instructions in reverse order.

Take your e-waste to an R2 or e-Stewards certified recycler.

Repair didn’t go as planned? Ask our Answers community for help.

Bill Gilbert

crwdns2935283:006/30/22crwdne2935283:0

30,088 crwdns2915208:0crwdne2915208:0

crwdns2935297:0213crwdne2935297:0

crwdns2915084:0crwdne2915084:0

iFixit crwdns2935289:0iFixitcrwdne2935289:0

Staff

crwdns2931471:0136crwdne2931471:0

crwdns2935297:017,410crwdne2935297:0

crwdns2944067:00crwdne2944067:0

crwdns2917038:0crwdne2917038:0

crwdns2936625:0crwdne2936625:0:

crwdns2936751:024crwdne2936751:0 2

crwdns2936753:07crwdne2936753:0 19

crwdns2936753:030crwdne2936753:0 124

crwdns2942667:0crwdne2942667:0 1,827