crwdns2933423:0crwdne2933423:0

How to Remove the Front Panel in Your Whirlpool WRS315SDHW Refrigerator

crwdns2942213:0crwdne2942213:0

  1. How to Remove the Front Panel in Your Whirlpool WRS315SDHW Refrigerator, Safety precautions: crwdns2935265:01crwdnd2935265:01crwdnd2935265:01crwdne2935265:0
    • Before you begin your repair, perform the following:

    • Turn off your main water supply

    • Unplug your device

  2. How to Remove the Front Panel in Your Whirlpool WRS315SDHW Refrigerator, Open the doors: crwdns2935265:02crwdnd2935265:01crwdnd2935265:03crwdne2935265:0 How to Remove the Front Panel in Your Whirlpool WRS315SDHW Refrigerator, Open the doors: crwdns2935265:02crwdnd2935265:02crwdnd2935265:03crwdne2935265:0 How to Remove the Front Panel in Your Whirlpool WRS315SDHW Refrigerator, Open the doors: crwdns2935265:02crwdnd2935265:03crwdnd2935265:03crwdne2935265:0
    • Depending on your repair, open one or both doors.

  3. How to Remove the Front Panel in Your Whirlpool WRS315SDHW Refrigerator, Unfasten the front panel: crwdns2935265:03crwdnd2935265:01crwdnd2935265:03crwdne2935265:0 How to Remove the Front Panel in Your Whirlpool WRS315SDHW Refrigerator, Unfasten the front panel: crwdns2935265:03crwdnd2935265:02crwdnd2935265:03crwdne2935265:0 How to Remove the Front Panel in Your Whirlpool WRS315SDHW Refrigerator, Unfasten the front panel: crwdns2935265:03crwdnd2935265:03crwdnd2935265:03crwdne2935265:0
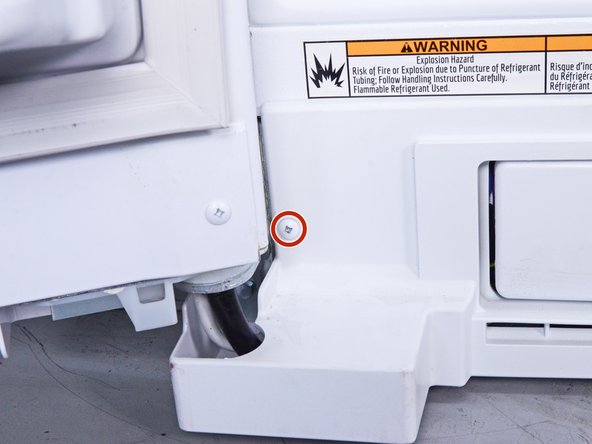
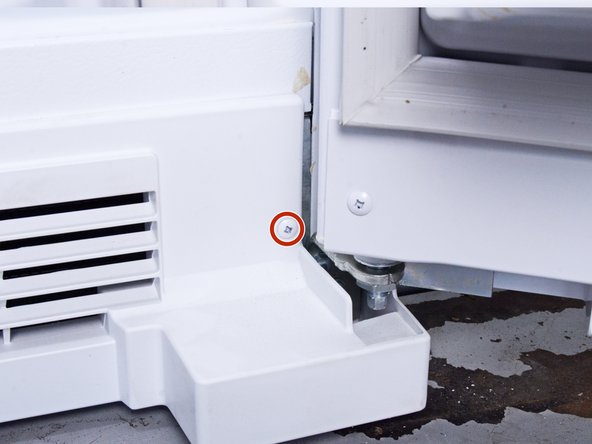
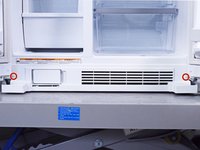
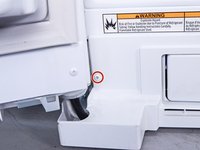
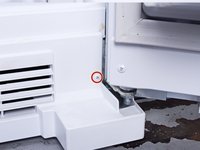
    • Use a Phillips driver to remove the two 15.2 mm-long screws securing the front panel.

  4. How to Remove the Front Panel in Your Whirlpool WRS315SDHW Refrigerator, Remove the front panel: crwdns2935265:04crwdnd2935265:01crwdnd2935265:03crwdne2935265:0 How to Remove the Front Panel in Your Whirlpool WRS315SDHW Refrigerator, Remove the front panel: crwdns2935265:04crwdnd2935265:02crwdnd2935265:03crwdne2935265:0 How to Remove the Front Panel in Your Whirlpool WRS315SDHW Refrigerator, Remove the front panel: crwdns2935265:04crwdnd2935265:03crwdnd2935265:03crwdne2935265:0
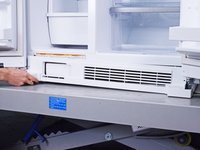
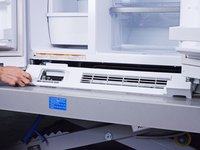
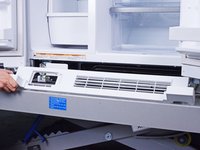
    • Pull the front panel straight off the chassis and remove it.

    • You may have to slightly open the water filter door to remove the front panel completely.

crwdns2915888:0crwdne2915888:0

To reassemble your device, follow these instructions in reverse order.

Take your e-waste to an R2 or e-Stewards certified recycler.

Repair didn’t go as planned? Ask our Answers community for help.

crwdns2935227:0crwdne2935227:0

nicO

crwdns2935283:004/14/15crwdne2935283:0

15,927 crwdns2915208:0crwdne2915208:0

crwdns2935297:089crwdne2935297:0

crwdns2947412:00crwdne2947412:0

crwdns2917038:0crwdne2917038:0

crwdns2936625:0crwdne2936625:0:

crwdns2936751:024crwdne2936751:0 0

crwdns2936753:07crwdne2936753:0 2

crwdns2936753:030crwdne2936753:0 5

crwdns2942667:0crwdne2942667:0 217