crwdns2933423:0crwdne2933423:0

How to Remove a Blob from an AnkerMake M5 3D Printer

crwdns2942213:0crwdne2942213:0

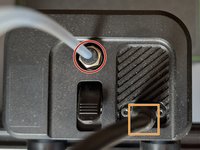
  1. How to Remove a Blob from an AnkerMake M5 3D Printer, Prepare to Remove Extruder Housing: crwdns2935265:01crwdnd2935265:01crwdnd2935265:03crwdne2935265:0 How to Remove a Blob from an AnkerMake M5 3D Printer, Prepare to Remove Extruder Housing: crwdns2935265:01crwdnd2935265:02crwdnd2935265:03crwdne2935265:0 How to Remove a Blob from an AnkerMake M5 3D Printer, Prepare to Remove Extruder Housing: crwdns2935265:01crwdnd2935265:03crwdnd2935265:03crwdne2935265:0
    • Press down on the black collar while pulling up on the PTFE tubing.

    • Using a 1.5mm hex wrench, remove the two screws on either side of the USB-C cable.

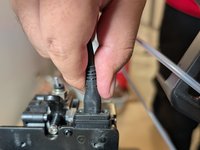
  2. How to Remove a Blob from an AnkerMake M5 3D Printer, Remove the USB-C Cable: crwdns2935265:02crwdnd2935265:01crwdnd2935265:02crwdne2935265:0 How to Remove a Blob from an AnkerMake M5 3D Printer, Remove the USB-C Cable: crwdns2935265:02crwdnd2935265:02crwdnd2935265:02crwdne2935265:0
    • Pull straight up on the USB-C cable.

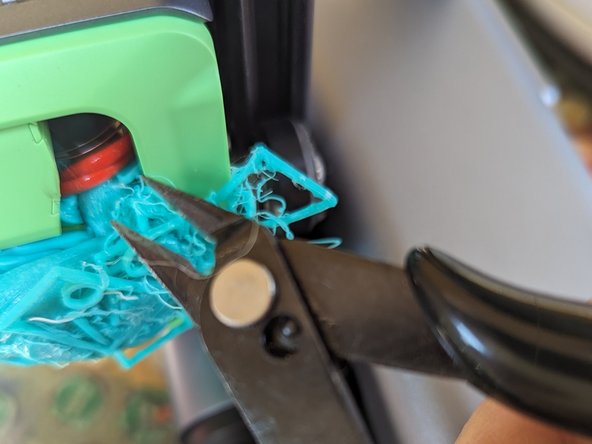
  3. How to Remove a Blob from an AnkerMake M5 3D Printer, Clear Blob Chunks to Remove Extruder Housing Trim: crwdns2935265:03crwdnd2935265:01crwdnd2935265:03crwdne2935265:0 How to Remove a Blob from an AnkerMake M5 3D Printer, Clear Blob Chunks to Remove Extruder Housing Trim: crwdns2935265:03crwdnd2935265:02crwdnd2935265:03crwdne2935265:0 How to Remove a Blob from an AnkerMake M5 3D Printer, Clear Blob Chunks to Remove Extruder Housing Trim: crwdns2935265:03crwdnd2935265:03crwdnd2935265:03crwdne2935265:0
    • Use clippers to remove the blobs in order to remove the extruder housing rim.

  4. How to Remove a Blob from an AnkerMake M5 3D Printer, Clean Heater Block After Blob Has Melted Off: crwdns2935265:04crwdnd2935265:01crwdnd2935265:02crwdne2935265:0 How to Remove a Blob from an AnkerMake M5 3D Printer, Clean Heater Block After Blob Has Melted Off: crwdns2935265:04crwdnd2935265:02crwdnd2935265:02crwdne2935265:0
    • Plug the printer back in.

    • Power on the printer and heat the nozzle to 250°C for a few minutes to soften the blob. In many cases, the heat will melt off the blob if the extruder housing is removed.

  5. How to Remove a Blob from an AnkerMake M5 3D Printer, Clean Thermal Sleeve: crwdns2935265:05crwdnd2935265:01crwdnd2935265:02crwdne2935265:0 How to Remove a Blob from an AnkerMake M5 3D Printer, Clean Thermal Sleeve: crwdns2935265:05crwdnd2935265:02crwdnd2935265:02crwdne2935265:0
    • Once heated, turn off and unplug the printer. Carefully wiggle off the softened filament blob.

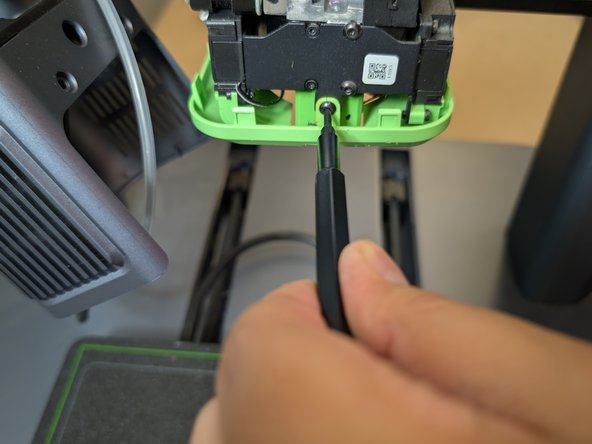
  6. How to Remove a Blob from an AnkerMake M5 3D Printer, Remove the Trim Screws: crwdns2935265:06crwdnd2935265:01crwdnd2935265:02crwdne2935265:0 How to Remove a Blob from an AnkerMake M5 3D Printer, Remove the Trim Screws: crwdns2935265:06crwdnd2935265:02crwdnd2935265:02crwdne2935265:0
    • Use the Phillips #00 Screwdriver to remove the screws from the housing of the nozzle.

  7. How to Remove a Blob from an AnkerMake M5 3D Printer, Remove Extruder Housing Trim: crwdns2935265:07crwdnd2935265:01crwdnd2935265:02crwdne2935265:0 How to Remove a Blob from an AnkerMake M5 3D Printer, Remove Extruder Housing Trim: crwdns2935265:07crwdnd2935265:02crwdnd2935265:02crwdne2935265:0
    • After the screws have been removed, the housing comes off by pulling down.

  8. How to Remove a Blob from an AnkerMake M5 3D Printer, Look for Electrical Damage and Wires to Avoid: crwdns2935265:08crwdnd2935265:01crwdnd2935265:03crwdne2935265:0 How to Remove a Blob from an AnkerMake M5 3D Printer, Look for Electrical Damage and Wires to Avoid: crwdns2935265:08crwdnd2935265:02crwdnd2935265:03crwdne2935265:0 How to Remove a Blob from an AnkerMake M5 3D Printer, Look for Electrical Damage and Wires to Avoid: crwdns2935265:08crwdnd2935265:03crwdnd2935265:03crwdne2935265:0
    • For any remaining blob pieces, use a heated craft knife and clippers.

    • Be careful to avoid any electrical wiring for the fans and thermistor.

  9. How to Remove a Blob from an AnkerMake M5 3D Printer, The Blob is Removed! Inspect the Parts: crwdns2935265:09crwdnd2935265:01crwdnd2935265:03crwdne2935265:0 How to Remove a Blob from an AnkerMake M5 3D Printer, The Blob is Removed! Inspect the Parts: crwdns2935265:09crwdnd2935265:02crwdnd2935265:03crwdne2935265:0 How to Remove a Blob from an AnkerMake M5 3D Printer, The Blob is Removed! Inspect the Parts: crwdns2935265:09crwdnd2935265:03crwdnd2935265:03crwdne2935265:0
    • Now that the blob has been removed, it it time to clean the thermal sleeve.

    • The thermal sleeve may be embedded in the blob, and removing it might damage it. In that case install a new one.

  10. How to Remove a Blob from an AnkerMake M5 3D Printer, Print a Test Object to Ensure the Printer Works: crwdns2935265:010crwdnd2935265:01crwdnd2935265:01crwdne2935265:0
    • With the blob removed, inspect the nozzle for tightness and alignment. Adjust if necessary.

    • If the nozzle appears to be clear, create a test object to ensure that the nozzle is clean and in good condition.

  11. How to Remove a Blob from an AnkerMake M5 3D Printer, Assess Damaged Parts: crwdns2935265:011crwdnd2935265:01crwdnd2935265:02crwdne2935265:0 How to Remove a Blob from an AnkerMake M5 3D Printer, Assess Damaged Parts: crwdns2935265:011crwdnd2935265:02crwdnd2935265:02crwdne2935265:0
    • Some parts might have cosmetic damage.

    • Some parts might have functional damage. They can be replaced or reprinted, such as these orange fan ducts.

  12. How to Remove a Blob from an AnkerMake M5 3D Printer, Reassembled Extruder: crwdns2935265:012crwdnd2935265:01crwdnd2935265:01crwdne2935265:0
    • Now the nozzle is clean and ready for use again.

crwdns2935217:0crwdne2935217:0

crwdns2935227:0crwdne2935227:0

Adolfo Fabian

crwdns2935283:010/23/24crwdne2935283:0

232 crwdns2915208:0crwdne2915208:0

crwdns2935295:0crwdne2935295:0

crwdns2915084:0crwdne2915084:0

CSU Los Angeles, Team 4-26, Harris Fall 2024 crwdns2935289:0CSU Los Angeles, Team 4-26, Harris Fall 2024crwdne2935289:0

CSULA-HARRIS-F24S4G26

crwdns2931471:02crwdne2931471:0

crwdns2935297:03crwdne2935297:0

crwdns2947412:00crwdne2947412:0

crwdns2917038:0crwdne2917038:0

crwdns2936625:0crwdne2936625:0:

crwdns2936751:024crwdne2936751:0 1

crwdns2936753:07crwdne2936753:0 18

crwdns2936753:030crwdne2936753:0 102

crwdns2942667:0crwdne2942667:0 580