crwdns2915892:0crwdne2915892:0
This guide will show how to adjust the browning dial in a Black and Decker TR1278B toaster.
crwdns2942213:0crwdne2942213:0
-
-
Remove the carriage lever by pulling it away from the toaster.
-
-
-
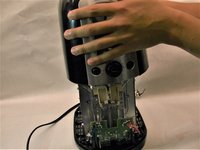
Turn the toaster upside down.
-
Unscrew all four 4mm screws on the bottom using a Phillip's head #2 (PH2) screwdriver.
-
Or a slightly different model has six screws that require an allen wrench (hex key). Ones that have a ball end will not work. I had to use one that had more of a Star of David, pointy pattern to it.
my screws are completely stripped, you can even see it in this image on the left
Philips screws would be much better so one can apply more controlled pressure. Screws are also made of cheep metal and strip out easily. Be careful.
I was able to get the screws out with a Grabit Speed Out bit.
-
-
-
Detach the bottom from the front cover using the plastic opening tool.
Watch out for opposite side (front end) 2 folding metal clamps that hold the front end and must be lifted up at least partially before the next step of lifting the whole cover.
Note also that opening with plastic tool here requires a bit of “force”. I came at it from the side with a thinner plastic tool to help (not unlike trying to remove a tight bike tire from a wheel rim)
Watch for two folding metal clamps holding the front end. They must be at least partially lifted up before the next step of lifting the cover. Note also that inserting the plastic tool requires some “force”. I came at it a bit more from the side with a thinner plastic tool (cafeteria plastic knife) to help lifting and insert the main plastic tool, not unlike trying to remove a tight tire from a bicycle wheel.
WEAR GLASSES! For more recent edition (2022 perhaps?) there is a plastic piece that would not budge with the pry-tool: ended up shooting up into my lip as I detached the two halves
-
-
-
-
Turn the toaster right side up.
-
Lift the front cover.
-
-
-
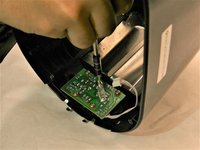
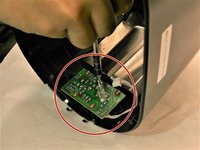
Detach the bundled cable connector from the toaster by carefully pulling it away from the circuit board.
This seems incompete. What next after detachingthe bundled cable connector?
-
-
-
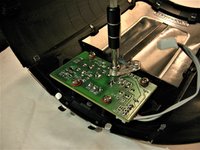
Unscrew the circuit behind the browning dial on the front cover.
-
-
-
Turn the knob on the circuit board left or right to adjust the browning dial.
-


To reassemble your device, follow these instructions in reverse order.
To reassemble your device, follow these instructions in reverse order.
crwdns2915084:0crwdne2915084:0

USF Tampa, Team 8-1, Eyestone Spring 2017 crwdns2935289:0USF Tampa, Team 8-1, Eyestone Spring 2017crwdne2935289:0
USFT-EYESTONE-S17S8G1
crwdns2931471:03crwdne2931471:0
crwdns2935297:05crwdne2935297:0
crwdns2947410:01crwdne2947410:0
In step 9 you are missing the plastic piece that goes into the hole next to the cancel button to index the position of the knob. No screws go in that spot.
Pulling requires a bit of force as the plastic lever is elastically squeezed over the metal tab and the tab as a little “step” that is visible from below the tab that needs to come out.
Dan G - crwdns2934203:0crwdne2934203:0