crwdns2933423:0crwdne2933423:0

HP Spectre 13 4003dx x360 Display Assembly Replacement

crwdns2942213:0crwdne2942213:0

  1. HP Spectre 13 4003dx x360 Display Assembly Replacement, Battery: crwdns2935265:01crwdnd2935265:01crwdnd2935265:02crwdne2935265:0 HP Spectre 13 4003dx x360 Display Assembly Replacement, Battery: crwdns2935265:01crwdnd2935265:02crwdnd2935265:02crwdne2935265:0
    crwdns2935267:0crwdne2935267:0
    Magnetic Project Mat
    $19.95
    • Before you begin, be sure to turn off your laptop and discharge the battery down to 25%.

    • Turn the computer upside down.

    • Use the T5 Torx Screwdriver to remove the eight 3.3 mm screws.

    • Make sure to use the magnetic project mat to help you keep track of the small screws.

  2. HP Spectre 13 4003dx x360 Display Assembly Replacement: crwdns2935265:02crwdnd2935265:01crwdnd2935265:02crwdne2935265:0 HP Spectre 13 4003dx x360 Display Assembly Replacement: crwdns2935265:02crwdnd2935265:02crwdnd2935265:02crwdne2935265:0
    • Use an opening tool to pry up and loosen the back case from the laptop.

    • If the back case doesn't loosen easily, there may be screws hidden underneath the rubber feet. Carefully pry a foot up and remove any hidden screws.

    • Remove the back case.

  3. HP Spectre 13 4003dx x360 Display Assembly Replacement: crwdns2935265:03crwdnd2935265:01crwdnd2935265:02crwdne2935265:0 HP Spectre 13 4003dx x360 Display Assembly Replacement: crwdns2935265:03crwdnd2935265:02crwdnd2935265:02crwdne2935265:0
    • Remove the four 2mm Phillips #00 screws securing the battery.

    • The screw locations are marked by small white arrows on the battery.

  4. HP Spectre 13 4003dx x360 Display Assembly Replacement: crwdns2935265:04crwdnd2935265:01crwdnd2935265:03crwdne2935265:0 HP Spectre 13 4003dx x360 Display Assembly Replacement: crwdns2935265:04crwdnd2935265:02crwdnd2935265:03crwdne2935265:0 HP Spectre 13 4003dx x360 Display Assembly Replacement: crwdns2935265:04crwdnd2935265:03crwdnd2935265:03crwdne2935265:0
    • Peel off the adhesive on the left side of the battery holding the speaker wire down.

    • Move the battery slightly to gain access to the battery plug, located on the left edge of the battery.

    • Carefully unplug the battery by pulling the connector towards the battery.

    • Pull parallel to the battery, not straight up.

    • Remove the battery.

    • It is normal for your battery to flex and bend a bit where the wider section meets the narrower section.

    Super article qui rend bien service et sécurise ce remplacement !

    Peut-être quelques précisions après avoir remplacé cette batterie :

    - Côtés extrêmes gauche et droite en haut, 2 vis plus longs que les autres. Un tournevis Torx T5 est plus approprié que le 4 car 2 vis étaient bien scellés.

    Il vaut mieux soulever le capot côté charnière en commençant par cet endroit mais en finalisant par l’avant de l’appareil. En effet, le côté charnière du PC en contient également sous le capot gênant la sortie de cette partie arrière.

    Le tournevis cruciforme 2,5 est plus approprié que le 2.

    Merci pour vos astuces :-)

    Patrice BONNEFOY - crwdns2934203:0crwdne2934203:0

    Bonjour

    J'arrive à dégager la partie avant du couvercle mais ça bloque juste sous les pieds arrière.. et je n'ose pas forcer…. avez vous une astuce ????

    BAIGUE RENE - crwdns2934203:0crwdne2934203:0

    Bonjour, Il faut vérifier qu'il n'y a plus de vis qui maintient la pièce. Attention, sur certains modèles de PC portables il peut y avoir des vis sous le caoutchouc des pieds du pc.

    Brendan -

  5. HP Spectre 13 4003dx x360 Display Assembly Replacement, Display Assembly: crwdns2935265:05crwdnd2935265:01crwdnd2935265:03crwdne2935265:0 HP Spectre 13 4003dx x360 Display Assembly Replacement, Display Assembly: crwdns2935265:05crwdnd2935265:02crwdnd2935265:03crwdne2935265:0 HP Spectre 13 4003dx x360 Display Assembly Replacement, Display Assembly: crwdns2935265:05crwdnd2935265:03crwdnd2935265:03crwdne2935265:0
    • Remove the two 2mm Phillips #00 screws from the fan.

    • Disconnect the fan from the motherboard.

  6. HP Spectre 13 4003dx x360 Display Assembly Replacement: crwdns2935265:06crwdnd2935265:01crwdnd2935265:03crwdne2935265:0 HP Spectre 13 4003dx x360 Display Assembly Replacement: crwdns2935265:06crwdnd2935265:02crwdnd2935265:03crwdne2935265:0 HP Spectre 13 4003dx x360 Display Assembly Replacement: crwdns2935265:06crwdnd2935265:03crwdnd2935265:03crwdne2935265:0
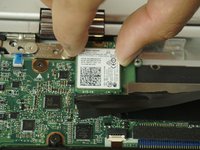
    • Using minimal force, disconnect both WiFi antennae cables.

    • Remove the single Phillips #00 screw that secures the WiFi card.

    • Slide the WiFi card up until it is completely removed.

    • Do not pull up on the wireless module while it is still seated. You may inadvertently damage it.

  7. HP Spectre 13 4003dx x360 Display Assembly Replacement: crwdns2935265:07crwdnd2935265:01crwdnd2935265:02crwdne2935265:0 HP Spectre 13 4003dx x360 Display Assembly Replacement: crwdns2935265:07crwdnd2935265:02crwdnd2935265:02crwdne2935265:0
    • Remove the four hinge screw with a Phillips #00 screwdriver.

  8. HP Spectre 13 4003dx x360 Display Assembly Replacement: crwdns2935265:08crwdnd2935265:01crwdnd2935265:02crwdne2935265:0 HP Spectre 13 4003dx x360 Display Assembly Replacement: crwdns2935265:08crwdnd2935265:02crwdnd2935265:02crwdne2935265:0
    • Grip the black tape and pull up to unplug.

  9. HP Spectre 13 4003dx x360 Display Assembly Replacement: crwdns2935265:09crwdnd2935265:01crwdnd2935265:01crwdne2935265:0
    • Separate the display assembly from the body of the computer.

    • As a result of the orientation of the hinges, you may need to rotate open the laptop to around 270 degrees to clear them.

crwdns2915888:0crwdne2915888:0

To reassemble your device, follow these instructions in reverse order.

crwdns2935229:07crwdne2935229:0

Ethan Plumer

crwdns2935283:001/29/18crwdne2935283:0

605 crwdns2915208:0crwdne2915208:0

crwdns2935297:02crwdne2935297:0

crwdns2915084:0crwdne2915084:0

USF Tampa, Team S5-G4, Passmore Spring 2018 crwdns2935289:0USF Tampa, Team S5-G4, Passmore Spring 2018crwdne2935289:0

USFT-PASSMORE-S18S5G4

crwdns2931471:03crwdne2931471:0

crwdns2935297:08crwdne2935297:0

crwdns2947412:02crwdne2947412:0

You forgot to mention that some people may have to remove the heatsink like I did before the screen will come off.

Wargaming Super Noob - crwdns2934203:0crwdne2934203:0

Anyone have any tips on reconnecting the WIFI antennas? I finally gave up and just decided to get a USB dongle… worked out well otherwise. I did also have to remove the heatsink like Wargaming Super Noob mentioned.

David Bergeron - crwdns2934203:0crwdne2934203:0

crwdns2917038:0crwdne2917038:0

crwdns2936625:0crwdne2936625:0:

crwdns2936751:024crwdne2936751:0 2

crwdns2936753:07crwdne2936753:0 5

crwdns2936753:030crwdne2936753:0 26

crwdns2942667:0crwdne2942667:0 10,235