crwdns2933423:0crwdne2933423:0

HP Pavilion x2 10-n113dx Screen Replacement

crwdns2942213:0crwdne2942213:0

  1. HP Pavilion x2 10-n113dx Screen Replacement, Battery: crwdns2935265:01crwdnd2935265:01crwdnd2935265:03crwdne2935265:0 HP Pavilion x2 10-n113dx Screen Replacement, Battery: crwdns2935265:01crwdnd2935265:02crwdnd2935265:03crwdne2935265:0 HP Pavilion x2 10-n113dx Screen Replacement, Battery: crwdns2935265:01crwdnd2935265:03crwdnd2935265:03crwdne2935265:0
    • Before starting, please turn off your laptop.

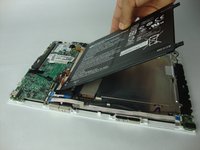
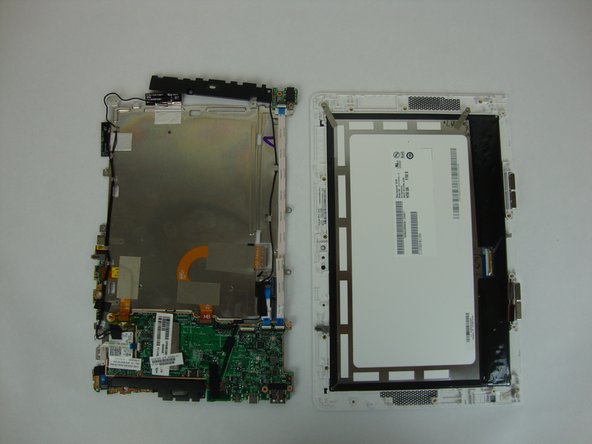
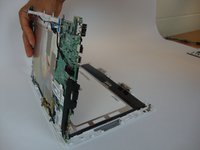
    • Using the blue plastic opening tool or a flat bladed tool, carefully slide the blade in between the display panel and gently slide to prop open the assembly.

  2. HP Pavilion x2 10-n113dx Screen Replacement: crwdns2935265:02crwdnd2935265:01crwdnd2935265:02crwdne2935265:0 HP Pavilion x2 10-n113dx Screen Replacement: crwdns2935265:02crwdnd2935265:02crwdnd2935265:02crwdne2935265:0
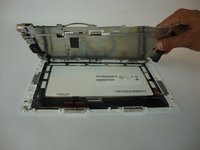
    • Gently lift and remove the display panel from the assembly.

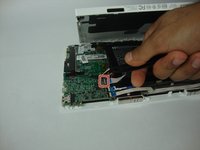
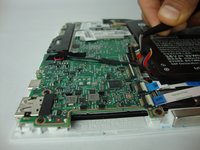
    • Remove the translucent yellow tape that covers the battery connector on the mainboard.

    • The tape will be in the way for a future step.

  3. HP Pavilion x2 10-n113dx Screen Replacement: crwdns2935265:03crwdnd2935265:01crwdnd2935265:03crwdne2935265:0 HP Pavilion x2 10-n113dx Screen Replacement: crwdns2935265:03crwdnd2935265:02crwdnd2935265:03crwdne2935265:0 HP Pavilion x2 10-n113dx Screen Replacement: crwdns2935265:03crwdnd2935265:03crwdnd2935265:03crwdne2935265:0
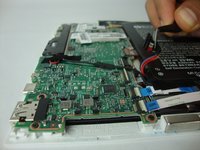
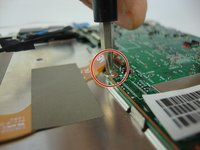
    • Flip up the small white colored locking flap using the tip of a spudger or your fingernail. Then the ribbon cable can be removed easily without much effort.

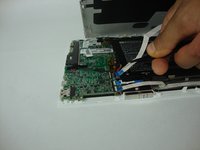
    • Carefully disconnect the white ribbon cable from the mainboard.

  4. HP Pavilion x2 10-n113dx Screen Replacement: crwdns2935265:04crwdnd2935265:01crwdnd2935265:03crwdne2935265:0 HP Pavilion x2 10-n113dx Screen Replacement: crwdns2935265:04crwdnd2935265:02crwdnd2935265:03crwdne2935265:0 HP Pavilion x2 10-n113dx Screen Replacement: crwdns2935265:04crwdnd2935265:03crwdnd2935265:03crwdne2935265:0
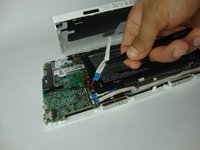
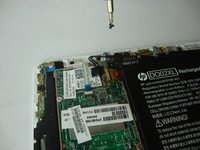
    • Carefully disconnect the battery cable from its connector on the mainboard.

  5. HP Pavilion x2 10-n113dx Screen Replacement: crwdns2935265:05crwdnd2935265:01crwdnd2935265:03crwdne2935265:0 HP Pavilion x2 10-n113dx Screen Replacement: crwdns2935265:05crwdnd2935265:02crwdnd2935265:03crwdne2935265:0 HP Pavilion x2 10-n113dx Screen Replacement: crwdns2935265:05crwdnd2935265:03crwdnd2935265:03crwdne2935265:0
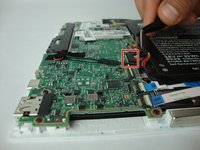
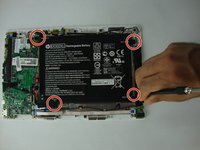
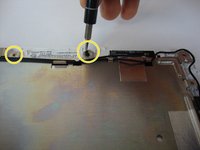
    • Using the Phillips #0 screwdriver, carefully remove the 4 corner screws that hold the battery to the display panel.

    • 3 screws are 3.12 mm head, 2.40 mm length, and 1 screw is 5.85mm head, 2.5mm length.

    • Remove the battery from the device.

  6. HP Pavilion x2 10-n113dx Screen Replacement, Screen: crwdns2935265:06crwdnd2935265:01crwdnd2935265:03crwdne2935265:0 HP Pavilion x2 10-n113dx Screen Replacement, Screen: crwdns2935265:06crwdnd2935265:02crwdnd2935265:03crwdne2935265:0 HP Pavilion x2 10-n113dx Screen Replacement, Screen: crwdns2935265:06crwdnd2935265:03crwdnd2935265:03crwdne2935265:0
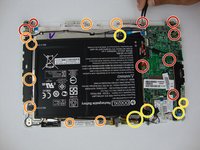
    • Using the Phillips #0 screwdriver, carefully remove the 21 screws that hold the screen to the display panel. 3.32 mm head, 3.99 mm length (RED) , 2.82 head 3.5 mm length (YELLOW), and 4.15 mm head, 2.35 mm length (BLUE).

    • 3.32 mm head, 3.99 mm length.

    • 2.82 head 3.5 mm length.

    • 4.15 mm head, 2.35 mm length.

  7. HP Pavilion x2 10-n113dx Screen Replacement: crwdns2935265:07crwdnd2935265:01crwdnd2935265:03crwdne2935265:0 HP Pavilion x2 10-n113dx Screen Replacement: crwdns2935265:07crwdnd2935265:02crwdnd2935265:03crwdne2935265:0 HP Pavilion x2 10-n113dx Screen Replacement: crwdns2935265:07crwdnd2935265:03crwdnd2935265:03crwdne2935265:0
    • Very carefully lift the circuit board in order to keep everything attached. Be careful with any cables that may still be connected.

crwdns2915888:0crwdne2915888:0

To reassemble your device, follow these instructions in reverse order.

crwdns2935229:05crwdne2935229:0

David Zambrano

crwdns2935283:009/28/17crwdne2935283:0

822 crwdns2915208:0crwdne2915208:0

crwdns2935297:05crwdne2935297:0

crwdns2915084:0crwdne2915084:0

USF Tampa, Team S13-G4, Boczar Fall 2017 crwdns2935289:0USF Tampa, Team S13-G4, Boczar Fall 2017crwdne2935289:0

USFT-BOCZAR-F17S13G4

crwdns2931471:04crwdne2931471:0

crwdns2935297:05crwdne2935297:0

crwdns2944067:04crwdne2944067:0

where can i get the replacement screen for this model

Umer Muhammad Anwar - crwdns2934203:0crwdne2934203:0

where can i get the replacement screen for this model?

Umer Muhammad Anwar - crwdns2934203:0crwdne2934203:0

where can i get the replacement screen

Olumuyiwa Oyenuche - crwdns2934203:0crwdne2934203:0

This guide is bad. He takes the same screws out twice. There is more than 21 screws. Do not follow this guide you will end up breaking something.

matthewcomley - crwdns2934203:0crwdne2934203:0

crwdns2917038:0crwdne2917038:0

crwdns2936625:0crwdne2936625:0:

crwdns2936751:024crwdne2936751:0 1

crwdns2936753:07crwdne2936753:0 2

crwdns2936753:030crwdne2936753:0 23

crwdns2942667:0crwdne2942667:0 5,993