crwdns2915892:0crwdne2915892:0
This guide will show you how to remove the keyboard, in case you need to replace it.
crwdns2942213:0crwdne2942213:0
-
-
Lay the computer face-down on a flat surface. Orient the computer to match the image.
-
Locate the battery release switch, as indicated in the image by the red rectangle. Slide the switch from right to left, and remove the battery.
-
-
-
Remove the two 11.0mm screws at the corners on either side of the battery compartment.
-
Remove the three 6.0mm screws.
-
Remove the two 5.0mm screws.
-
Remove the 6.0mm screw in the middle of the battery compartment.
-
-
-
Turn the computer over and open the screen. This provides access to the screen hinges.
-
The keyboard switch cover is attached to the computer with a series of snaps. With a flathead screwdriver, pry up the switch cover until it pops free.
-
-
-
-
Be careful not to bend the keyboard switch cover too far when removing it.
-
-
-
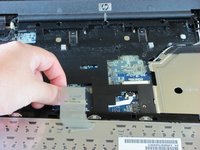
Next, remove the keyboard. Push on the keyboard frame above the function keys and slide the keyboard toward the screen.
-
-
-
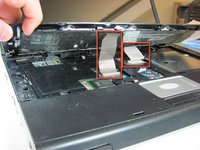
Carefully lift the trackpad-side edge of the keyboard to reveal the LED and keyboard cable connectors.
-
Detach the cable connectors from the computer by gripping each cable connector close to the computer contact point and pulling up gently.
When reassembling, you need to push the little tabs next to the connector up before connecting the cable.
-
-
-
Lay the keyboard face down.
-
Remove the four 3.00mm screws that attach the keyboard to the keyboard frame.
-
-
-
Lift the keyboard off the keyboard frame.
-


To reassemble your device, follow these instructions in reverse order.
To reassemble your device, follow these instructions in reverse order.
crwdns2935221:0crwdne2935221:0
crwdns2935229:06crwdne2935229:0
crwdns2915084:0crwdne2915084:0

Cal Poly, Team 21-34, Regan Fall 2010 crwdns2935289:0Cal Poly, Team 21-34, Regan Fall 2010crwdne2935289:0
CPSU-REGAN-F10S21G34
crwdns2931471:04crwdne2931471:0
crwdns2935297:011crwdne2935297:0
crwdns2947412:02crwdne2947412:0
Hey is keyboard replacement same or very similiar procedure with hp dv8000?
Brilliant. This is the best tutorial out there. Many thanks indeed!!!!