crwdns2915892:0crwdne2915892:0
Follow this guide to replace the motherboard of your HP Envy x360 15m-bq021dx. A motherboard is the “heart” of the computer. It is also known as the primary printed circuit board. This engages all of the computer’s components, allowing the computer to operate. This guide will show in-depth details on how to safely remove a motherboard.
crwdns2942213:0crwdne2942213:0
-
-
On the back panel of the device, remove the four (4) M2.5xL6 screws at the top of the photo using a Phillips #0 screwdriver.
-
Unscrew the three (3) screws at the bottom of the photo using a T5 Torx screwdriver.
-
-
-
To remove the back cover, use the black spudger to lift up on the edges of the cover.
-
Use a suction cup to assist in lifting the back cover
-
-
-
Use the Philips #0 screwdriver to remove six (6) M2.0x3.2 screws from battery.
There are 7 red highlight circles showing on the image.
Okay, I see the seventh screw is addressed in the next step, #4. Shouldn’t the image in Step 3 show just the six screws the instructions is referring to>
-
-
-
Using the Philips #0 screwdriver, remove the final screw from the battery connected to the SSD storage unit.
Why is this seventh screw separate from the other six in the prior step?
-
-
-
-
Lift and pull the front of the battery up and out (away from the connector) to remove.
-
-
-
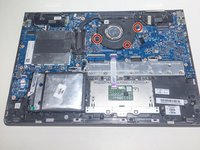
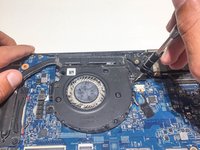
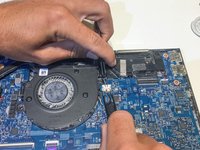
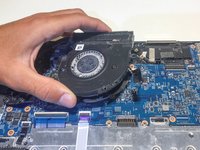
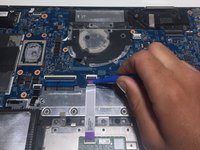
Using a Philips #0 screwdriver, remove the three M2x4 screws located around the cooling fan as shown in this picture.
-
-
crwdns2935267:0crwdne2935267:0Tweezers$4.99
-
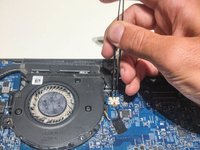
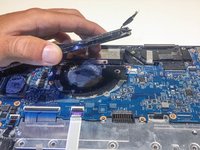
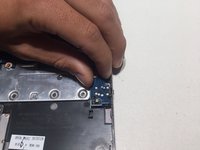
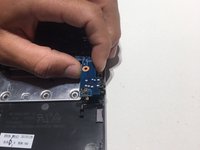
Remove the connector clip with the tweezers.
The fan connector on the one I was working on was in a different location, below the fan near the battery connector
-
-
-
Remove the four spring loaded screws with a Philips #1 screwdriver.
-
-
-
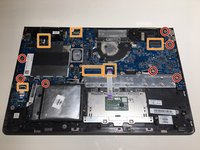
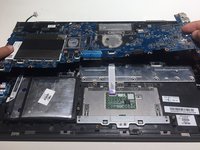
Using a Phillips #1, remove the seven M2.0x3.2 screws.
-
Undo the six connections using the blue opening tool.
There’s a few errors/omissions here. There is no screw where the red circle notes on the bottom right, it is actually top left and not circled in red. There is also a connector on the top right that needs to be disconnected just to the right of the LCD connector highlighted in the orange box. Finally, I needed to disconnect the wifi cables and remove the screw affixing the card to the case in order to remove the board (the wifi card connects to a slot beneath the board, rather stupidly).
The connector on the top right mentioned in my previous post is for the speakers
-
-
-
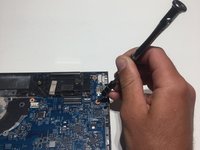
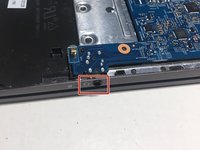
Carefully remove the aux port from the frame of the computer as shown.
Don’t do this, just lift the board from the left side and lift it away to the left
-
-
-
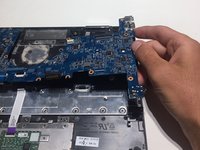
Pull the mother board up and away from frame of the computer.
-


To reassemble your device, follow these instructions in reverse order.
To reassemble your device, follow these instructions in reverse order.
crwdns2935221:0crwdne2935221:0
crwdns2935229:02crwdne2935229:0
crwdns2915084:0crwdne2915084:0

University of Alabama, Team S2-G6, Bedsole Fall 2019 crwdns2935289:0University of Alabama, Team S2-G6, Bedsole Fall 2019crwdne2935289:0
UA-BEDSOLE-F19S2G6
crwdns2931471:04crwdne2931471:0
crwdns2935297:06crwdne2935297:0
crwdns2947410:01crwdne2947410:0
hi so i was woundering about the start button , mine is broken , is there a way to start uo the pc and can i hook up a poer button some how to start it up thanks
In the second step the photo looks like the laptop is still in the same position as the first step, which means, according to the first image, the second image shows someone removing the four screws at the top of the laptop. To be accurate to the text in Step 2, the barcode would appear at the top of the image.
lkmemphis - crwdns2934203:0crwdne2934203:0