crwdns2915892:0crwdne2915892:0
If your HP Elitebook x360 1040 G5 laptop is constantly malfunctioning by not turning on, randomly shutting down, or notice it's not detecting components and ports, it's time to replace the motherboard.
A motherboard houses the CPU, handles power distribution, provides input/output ports, controls data flow, and connects RAM, storage, GPU, and many other parts.
Before beginning, make sure to power off the device and disconnect from any power source.
crwdns2942213:0crwdne2942213:0
-
-
Use the T5 Torx screwdriver to remove the six 4 mm screws from the underside of the laptop.
-
-
-
Pry open the lower case from where it meets the laptop base.
-
Remove the lower case from the work area.
-
-
-
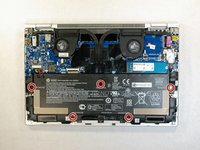
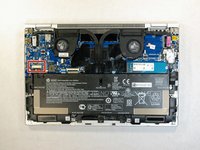
Use the Phillips 1 screwdriver to remove the five 3mm Phillips screws from the battery assembly.
-
-
-
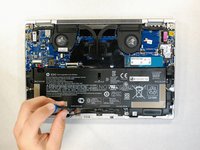
Carefully remove the power supply connector by pulling on both sides of its head.
-
Lift the battery from its position, removing it from the device.
-
-
-
-
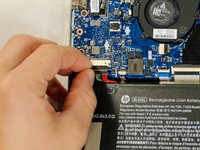
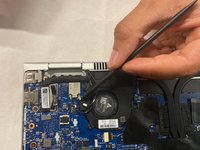
With the battery removed, begin by removing the two coaxial connectors located near the hinge using an ESD-safe spudger.
-
To do this, slide the tip of the spudger under the wire until it is snug against the connector. Then, pry straight up from the board.
-
-
-
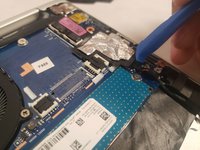
Remove the three white and two brown ribbon cables located on the bottom of the motherboard.
-
Use a spudger to carefully push on each side of the connector in order to release the cable.
-
-
-
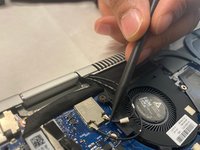
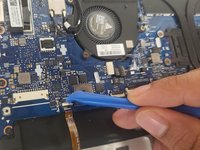
Remove sliding connector located near the bottom right corner of the motherboard.
-
Gently push on each side of the connector using a spudger until it is free.
-
-
-
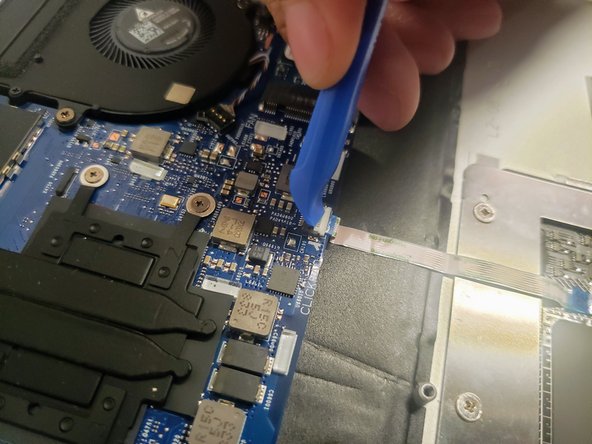
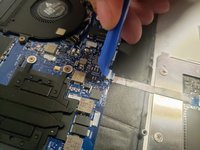
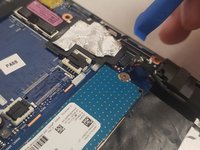
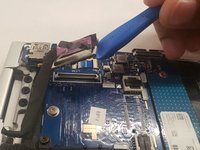
Remove the foil protector from the right side of the motherboard by gently peeling it back with the opening tool.
-
Remove the ribbon connector underneath using the spudger.
-
-
-
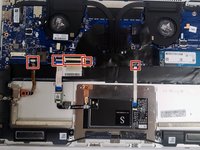
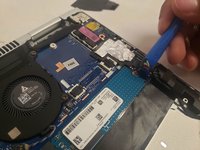
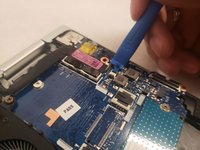
Remove the two flat connectors located on both sides of the motherboard near the fans.
-
Gently pry the connector straight up from the motherboard using a spudger or opening tool.
-
-
-
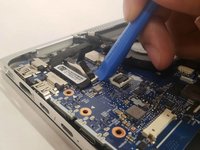
Remove the five M2 X 3mm screws from the perimeter of the motherboard using the Phillips #1 screwdriver.
-
Remove the two M2 X 5mm screws from the upper corners of the motherboard using the Phillips #1 screwdriver.
-
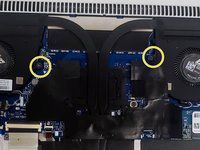
Finally, remove the two interior M2 X 3mm screws from the motherboard's cooling system.
-
-
-
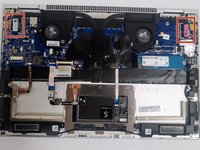
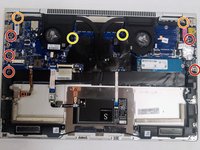
Lift the motherboard carefully from the computer shell. The motherboard can now be replaced.
-


To reassemble your device, follow these instructions in reverse order. Take your e-waste to an R2 or e-Stewards certified recycler.
To reassemble your device, follow these instructions in reverse order. Take your e-waste to an R2 or e-Stewards certified recycler.
crwdns2935221:0crwdne2935221:0
crwdns2935227:0crwdne2935227:0

crwdns2915084:0crwdne2915084:0

IUPUI, Team S1-G1, Hovde Fall 2019 crwdns2935289:0IUPUI, Team S1-G1, Hovde Fall 2019crwdne2935289:0
IUPUI-HOVDE-F19S1G1
crwdns2931471:03crwdne2931471:0
crwdns2935297:04crwdne2935297:0
crwdns2947410:01crwdne2947410:0
Hi! I think you should also mention that there is a sim-card slot dummy holding a motherbord, you can not lift it when a holder or a dummy is inside. it should be poked out with a pincer through the hole one the side of a motherboard above the slot itself (it do not eject on a spring like a normal sim card holder)