crwdns2933423:0crwdne2933423:0

HP Elitebook 820 G1 Monitor Display Replacement

crwdns2942213:0crwdne2942213:0

  1. HP Elitebook 820 G1 Monitor Display Replacement, Battery: crwdns2935265:01crwdnd2935265:01crwdnd2935265:01crwdne2935265:0
    • Ensure the laptop is completely powered off and power adapter is unplugged before removing the battery.

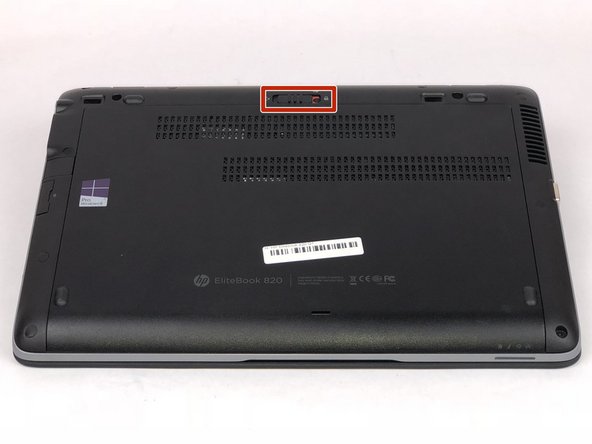
    • Turn over laptop so that the bottom is showing.

    • Unlock the latch.

  2. HP Elitebook 820 G1 Monitor Display Replacement: crwdns2935265:02crwdnd2935265:01crwdnd2935265:01crwdne2935265:0
    • Remove the back cover and you will then be able to see the battery.

  3. HP Elitebook 820 G1 Monitor Display Replacement: crwdns2935265:03crwdnd2935265:01crwdnd2935265:01crwdne2935265:0
    • Unlatch the two latches securing the battery in the case.

  4. HP Elitebook 820 G1 Monitor Display Replacement: crwdns2935265:04crwdnd2935265:01crwdnd2935265:01crwdne2935265:0
    • Use a plastic opening tool to lift and remove the battery.

  5. HP Elitebook 820 G1 Monitor Display Replacement, Fan: crwdns2935265:05crwdnd2935265:01crwdnd2935265:01crwdne2935265:0
    • Remove the hard drive by unscrewing the four 8mm screws with the T7 philip's head.

    In this step it is also important to unplug the WiFi antenna.

    tomasbasak - crwdns2934203:0crwdne2934203:0

    Hello, I would like to complete this tutorial, but I am not very knowledgeable on computer parts, so I have no idea where the wifi antenna is (in this picture) or what it looks like (I tried to google it tho), I’d be very thankful for a reply. :)

    Flora K -

  6. HP Elitebook 820 G1 Monitor Display Replacement: crwdns2935265:06crwdnd2935265:01crwdnd2935265:01crwdne2935265:0
    • Pry off ten rubber paddings on the outer edge of the laptop to reveal the torx screws.

    • Unscrew the ten 8mm torx screws that are under the rubber paddings using the T7 tip torx screwdriver.

  7. HP Elitebook 820 G1 Monitor Display Replacement: crwdns2935265:07crwdnd2935265:01crwdnd2935265:01crwdne2935265:0
    • Remove the two 4mm screws indicated by the M2.5X4 using the J00 tip screwdriver.

    • Remove SD card cap by just sliding out to reveal one screw.

  8. HP Elitebook 820 G1 Monitor Display Replacement: crwdns2935265:08crwdnd2935265:01crwdnd2935265:01crwdne2935265:0
    • Remove the two 3mm screws indicated by the M2.03 using the J00 tip screwdriver.

    • Remove the 4mm SD card screw using the J00 tip.

  9. HP Elitebook 820 G1 Monitor Display Replacement: crwdns2935265:09crwdnd2935265:01crwdnd2935265:01crwdne2935265:0
    • Remove the one 4mm fan screw using the J00 tip screwdriver.

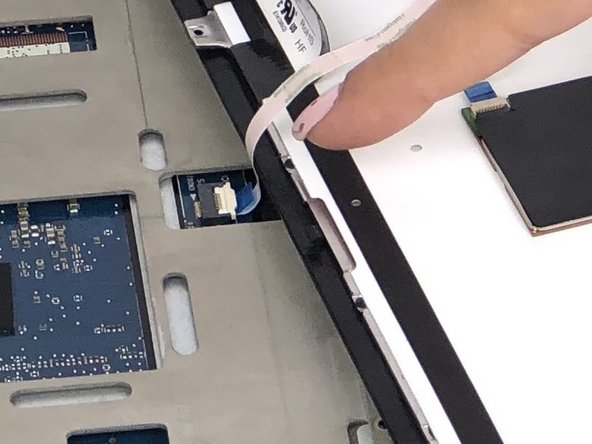
    • Remove screw and metal plate to expose ribbon cable connector.

  10. HP Elitebook 820 G1 Monitor Display Replacement: crwdns2935265:010crwdnd2935265:01crwdnd2935265:01crwdne2935265:0
    • Use an opening tool to pry up the ribbon connector to disconnect.

  11. HP Elitebook 820 G1 Monitor Display Replacement: crwdns2935265:011crwdnd2935265:01crwdnd2935265:01crwdne2935265:0
    • Turn laptop over back to normal position as shown in the image.

    • Use opening tools to pry up keyboard.

    • When prying up keyboard, be sure to start near any corner of the keyboard.

    • There are two ribbon cables that must be disconnected before fully removing keyboard.

    It is preferable to follow step 6 from "Keyboard replacement" to remove the keyboard as it shows that "4 tabs are located at the top of the keyboard, which lock it in place".

    See HP Elitebook 820 G1 Keyboard Replacement

    John Geerlings - crwdns2934203:0crwdne2934203:0

  12. HP Elitebook 820 G1 Monitor Display Replacement: crwdns2935265:012crwdnd2935265:01crwdnd2935265:03crwdne2935265:0 HP Elitebook 820 G1 Monitor Display Replacement: crwdns2935265:012crwdnd2935265:02crwdnd2935265:03crwdne2935265:0 HP Elitebook 820 G1 Monitor Display Replacement: crwdns2935265:012crwdnd2935265:03crwdnd2935265:03crwdne2935265:0
    • Carefully lift keyboard on one side to expose the two ribbon cables.

    • Use an opening tool to lift up the locking clip and unplug the two ribbon cables.

  13. HP Elitebook 820 G1 Monitor Display Replacement: crwdns2935265:013crwdnd2935265:01crwdnd2935265:01crwdne2935265:0
    • Remove the two 4mm screws centered notated by the keyboard logo using the J00 tip.

  14. HP Elitebook 820 G1 Monitor Display Replacement: crwdns2935265:014crwdnd2935265:01crwdnd2935265:03crwdne2935265:0 HP Elitebook 820 G1 Monitor Display Replacement: crwdns2935265:014crwdnd2935265:02crwdnd2935265:03crwdne2935265:0 HP Elitebook 820 G1 Monitor Display Replacement: crwdns2935265:014crwdnd2935265:03crwdnd2935265:03crwdne2935265:0
    • Once keyboard has been fully removed, the system case containing the motherboard can be lifted out easily.

    • The display is connected to the shell of the laptop.

  15. HP Elitebook 820 G1 Monitor Display Replacement: crwdns2935265:015crwdnd2935265:01crwdnd2935265:01crwdne2935265:0
    • Unplug fan cable by pulling away from its connector.

    Where is the speaker located?

    livfe - crwdns2934203:0crwdne2934203:0

  16. HP Elitebook 820 G1 Monitor Display Replacement: crwdns2935265:016crwdnd2935265:01crwdnd2935265:01crwdne2935265:0
    • Unscrew the two 6mm fan screws using the J00 tip.

    • Fan screws are encased in springs and cannot be removed.

  17. HP Elitebook 820 G1 Monitor Display Replacement, Monitor display: crwdns2935265:017crwdnd2935265:01crwdnd2935265:01crwdne2935265:0
    • Retrieve the monitor display connected to the plastic chassis.

  18. HP Elitebook 820 G1 Monitor Display Replacement: crwdns2935265:018crwdnd2935265:01crwdnd2935265:01crwdne2935265:0
    • Unscrew the two 4mm hinge screws using the Philips 00 tip screwdriver.

  19. HP Elitebook 820 G1 Monitor Display Replacement: crwdns2935265:019crwdnd2935265:01crwdnd2935265:01crwdne2935265:0
    • Unhinge the monitor display from the chassis.

crwdns2915888:0crwdne2915888:0

To reassemble your device, follow these instructions in reverse order.

crwdns2935227:0crwdne2935227:0

Alberto Carlos Perez

crwdns2935283:002/14/18crwdne2935283:0

404 crwdns2915208:0crwdne2915208:0

crwdns2935297:02crwdne2935297:0

crwdns2915084:0crwdne2915084:0

USF Tampa, Team S5-G1, Eyestone Spring 2018 crwdns2935289:0USF Tampa, Team S5-G1, Eyestone Spring 2018crwdne2935289:0

USFT-EYESTONE-S18S5G1

crwdns2931471:03crwdne2931471:0

crwdns2935297:07crwdne2935297:0

crwdns2947410:01crwdne2947410:0

Hello,

I need to replace the inverter as my screen is too much dark.

I cannot see the inverter and even I cannot find any inverter for this model.

Do you know how to access to this inverter? Is it embedded within the screen?

Thanks by advance.

BR

richard P - crwdns2934203:0crwdne2934203:0

crwdns2917038:0crwdne2917038:0

crwdns2936625:0crwdne2936625:0:

crwdns2936751:024crwdne2936751:0 1

crwdns2936753:07crwdne2936753:0 2

crwdns2936753:030crwdne2936753:0 15

crwdns2942667:0crwdne2942667:0 3,535