crwdns2915892:0crwdne2915892:0
The Wifi card can be one of the most important components of your computer. This is what connects the computer to the wireless internet by means of communicating through the router. If in range, they are able to connect to wireless internet if it's not password protected. If it doesn't work, the computer is rendered obsolete. If your computer can't connect to the internet or has trouble with the upload/download speed and you are wishing to replace or upgrade, you have come to the right place!
crwdns2942213:0crwdne2942213:0
-
-
Use a Phillips #1 screwdriver to undo the five screws. The top three screws are 10 mm and the two side screws are 7 mm.
-
Unscrew the bottom three screws using the same screwdriver.
-
-
-
Turn computer so that the hinged side is facing up.
-
Use the plastic opening tool to pry open the back plate.
-
Drag the plastic opening tool along the edge from left to right and use a second opening tool to pry open the top right corner.
-
Repeat the 3rd step for the other side.
-
Repeat on Left and Right sides of the system. There are two points in the middle (on the left and right sides of the center screw) that will release with slight lifting pressure.
-
-
-
-
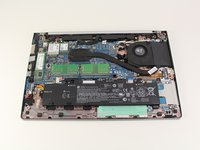
Grab the back plate and separate it slowly away from the device.
-
-
crwdns2935267:0crwdne2935267:0Tweezers$4.99
-
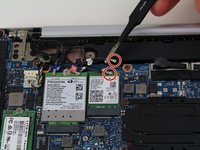
Using either the spudger, tweezers or your fingers, remove the wire connectors from the WiFi card by pulling up.
-
-
-
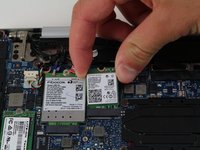
Remove the single 2mm screw that is holding the WiFi card in place using the Phillips #1 screwdriver.
-
-
-
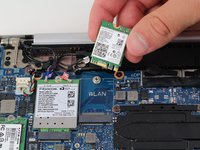
The WiFi card will pop up. Carefully grasp both sides of the card and pull outwards, away from its dock.
-


To reassemble your device, follow these instructions in reverse order. Make sure to handle the component with extreme care, as it is delicate and has no protection.
To reassemble your device, follow these instructions in reverse order. Make sure to handle the component with extreme care, as it is delicate and has no protection.
crwdns2935221:0crwdne2935221:0
crwdns2935227:0crwdne2935227:0
crwdns2915084:0crwdne2915084:0

Cal Poly, Team S25-G13, Maness Spring 2018 crwdns2935289:0Cal Poly, Team S25-G13, Maness Spring 2018crwdne2935289:0
CPSU-MANESS-S18S25G13
crwdns2931471:04crwdne2931471:0
crwdns2935297:018crwdne2935297:0
crwdns2947410:01crwdne2947410:0
It is not that helpful if there is no mention of the card model, form-factor, specifications of the original wifi card. which opens potential upgrades
On my HP EliteBook 840 G5, the “two side screws” (black) are found inside the two holes seen next to the left top screw, and between the center and right top screw.
Ruedi Port - crwdns2934203:0crwdne2934203:0
Mine had the same, and these black screws also need to be released in order to remove the bottom panel.
Josh -
Correct. Some other models have 2 black screws at the back, near the corners.
The models with the 2 black screws, are missing the 2 silver screws at the left side and the right side in the middle.
Note: You need to release the 2 black screws as well, if your type of model has them.
koppie007 - crwdns2934203:0crwdne2934203:0
Thank you this was very helpful. I was able to remove the cover and the SSD.
Stupid question but is this board considered the hard drive? my laptop failed (no power) and I did get an identical replacement. In the past I have been able to remove the hard drive in the failed laptop and connect it to the new one via a data transfer cable (removed hard drive to usb in new laptop. I could then browse files off of the old hard drive and transfer them over to the new. This SSD board has vastly different connectors. Do you know if they make a transfer cable that connects to this board with a usb on the other end?
dgtuk1 - crwdns2934203:0crwdne2934203:0
I removed the back cover and installed a new SSD. When I went to put the back cover, the center screw would not go back in. It turns but does not catch. Any advice?
Erik - crwdns2934203:0crwdne2934203:0