crwdns2915892:0crwdne2915892:0
This repair guide was authored by the iFixit staff and hasn’t been endorsed by Google. Learn more about our repair guides here.
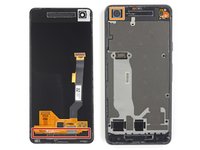
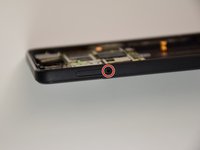
Replacement guide for the rear camera on a Google Pixel 2 smartphone.
This repair is extensive and requires that the motherboard be completely removed.
Note: Some images in this guide show the battery removed from the phone. You do not need to remove the battery in order to replace the rear camera.
crwdns2942213:0crwdne2942213:0
-
-
If your display glass is cracked, keep further breakage contained and prevent bodily harm during your repair by taping the glass. This also makes a smooth surface allowing the suction cup to bond.
-
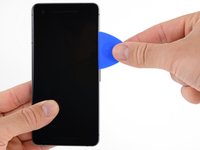
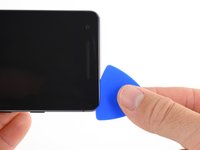
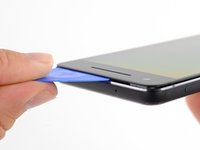
Apply a suction cup as close to the volume button edge of the phone as you can while avoiding the curved edge.
-
-
-
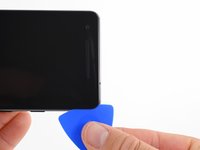
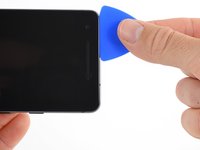
Pull up on the suction cup with firm, constant pressure and insert an opening pick between the front panel and rear case.
-
-
-
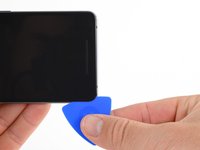
Do not insert the pick more than 9 mm into the bottom edge of the phone. If the pick contacts the folded portion of the OLED panel it can damage the display.
-
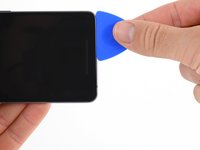
Only make very shallow cuts in the upper left corner, prying deeply can damage the front-facing camera.
-
-
-
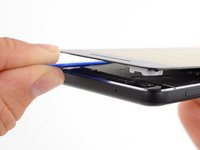
Slide the opening pick up the right side of the phone to separate the display adhesive.
-
-
-
Slide the opening pick around the upper-right corner and along the top edge of the phone.
-
-
-
Slide the pick around the upper-left corner of the phone and down the left edge of the phone.
-
-
-
Slide the pick around the bottom-left corner and along the bottom of the phone. Keep pick at a slight angle away from the screen to avoid damage to the OLED corners.
-
-
-
Reinsert the pick at the top edge of the phone and gently pry up the display.
-
-
-
crwdns2935267:0crwdne2935267:0Magnetic Project Mat$19.95
-
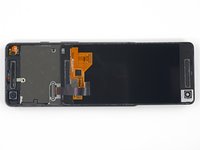
Carefully lay the display down on top of the rear case as shown, making sure not to crease or tear the display ribbon cable.
-
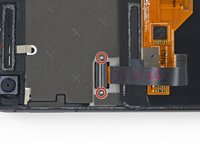
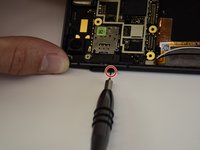
Remove the two 4.0 mm T5 Torx screws securing the display cable bracket.
-
-
-
Use the point of a spudger to lift the display cable connector up and out of its socket on the motherboard.
-
-
-
Apply a heated iOpener to the proximity sensor on the top edge of the midframe for two minutes to soften its adhesive.
-
-
-
Slide the point of a spudger under the proximity sensor cable, starting from the side closest to the front-facing camera.
-
Gently lift the edge of the sensor cable until the sensor is perpendicular to the midframe.
-
-
crwdns2935267:0crwdne2935267:0Magnetic Project Mat$19.95
-
Peel back the small piece of tape covering the screw below the earpiece speaker. Peel back any tape covering other screws as well.
-
Remove the following screws securing the midframe:
-
Eleven 3.7 mm Phillips screws
-
One 4 mm T5 Torx screw
-
-
-
Insert an opening tool into the notch in the midframe near the hold button.
-
Pry the midframe up enough to create a gap between it and the phone case. The midframe cannot yet be completely removed.
-
-
-
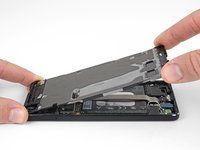
Lift the midframe up starting from the bottom edge.
-
When the midframe starts to make about a 45° with the rest of the phone, lift the midframe straight up and away from the phone.
-
As you lift the midfame, carefully guide the proximity sensor through the small slot in the midframe.
-
-
-
Use the flat end of a spudger to disconnect the battery connector.
-
-
-
use the flat end of a spudger to disconnect the charging assembly connector from the motherboard.
-
-
-
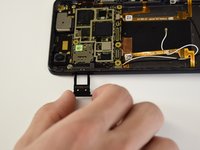
Insert a paperclip or SIM eject tool into the small hole on the left side of the phone and push until the SIM card tray pops out.
-
Remove the SIM card tray.
-
-
-
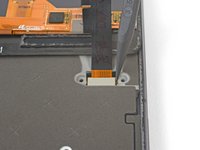
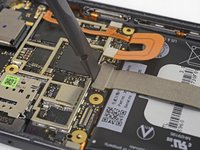
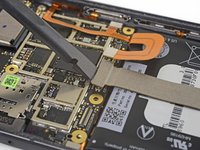
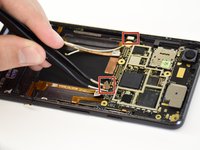
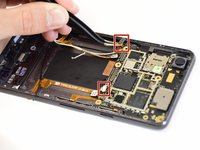
Disconnect two connectors at the bottom edge of the motherboard.
-
-
-
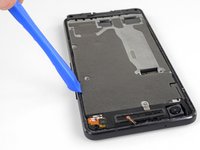
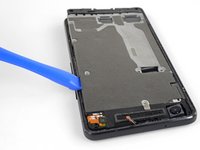
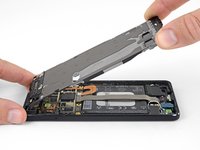
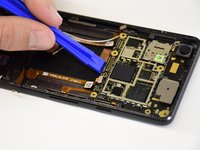
Pry up the motherboard using a plastic opening tool.
-
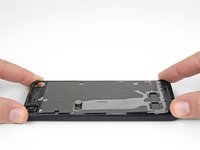
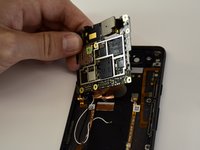
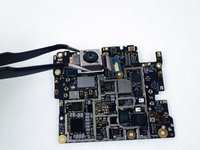
Remove the motherboard.
-
-
-
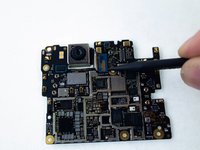
Flip the motherboard over.
-
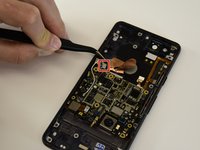
Disconnect the fingerprint sensor cable.
-
-
-
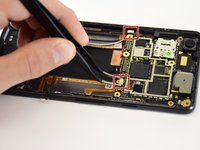
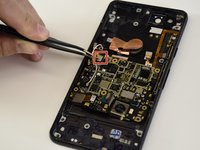
Use the pointed end of a spudger to lift up and disconnect the rear camera press-fit connector.
-
Remove the rear camera from the motherboard.
-


Compare your new replacement part to the original part—you may need to transfer remaining components or remove adhesive backings from the new part before installing.
To reassemble your device, follow the above steps in reverse order.
Take your e-waste to an R2 or e-Stewards certified recycler.
Repair didn’t go as planned? Check out our Answers community for troubleshooting help.
crwdns2935221:0crwdne2935221:0
crwdns2935229:07crwdne2935229:0

crwdns2947412:017crwdne2947412:0
Does anyone know if replacing the camera unit fixes the problem with the camera’s ‘fatal error’ issue? I’m trying to figure out if it’s just the camera unit that’s bad, or if there are other parts involved.
I just replaced my rear camera on pixel 2 and I can confirm YES it does fix it!
Well, I completed the repair on the camera but cannot confirm that it worked because I messed up my display which costs too much to replace :( That thing is super delicate I guess. I’m thoroughly upset.
Yes. This fixed my Pixel 2 camera crashing issue. My original symptom was that the autofocus stopped working properly. Then a month or so later the rear camera would crash 49 out of 50 times I opened it (completely unusable). Many people online swear this is a software issue caused by an android update but because I had that focus issue crop up first I suspected my issue was physical damage. I’m generally pretty careful with my phone, it lives in an official case. The only potentially damaging behaviour my phone is exposed to is my placing it in a windscreen mounted phone holder. Perhaps the repeated vibration can break something. Now my camera is fixed I will continue to place it in the phone holder and report back if it breaks again. For science. BE VERY CAREFUL REMOVING THE SCREEN. The guide is not being overly cautious about the screen removal. I broke my screen removing it and turned my $50 camera job into a $200 job with a new screen. Still worth it but I wish I’d heeded the warnings and cautions.
Alex, you may be onto something! There have been many reports of motorcycle riders breaking their smartphone cameras after they’ve mounted their smartphones for prolonged periods. The optical stabilization hardware on these camera modules is pretty fragile. I suspect repeated vibration can definitely result in breaking some very delicate wires in the OIS or flex cables.