crwdns2915892:0crwdne2915892:0
This repair guide was authored by a member of the iFixit community and hasn’t been endorsed by Google. Learn more about our repair guides here.
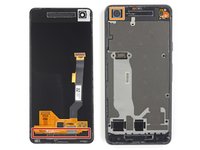
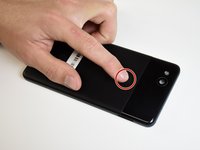
Use this guide to replace the fingerprint sensor on your Google Pixel 2.
crwdns2942213:0crwdne2942213:0
-
-
If your display glass is cracked, keep further breakage contained and prevent bodily harm during your repair by taping the glass. This also makes a smooth surface allowing the suction cup to bond.
-
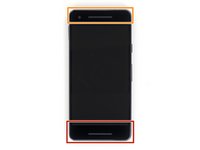
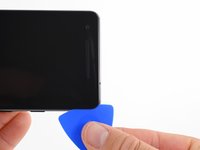
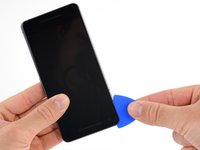
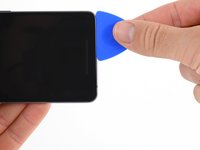
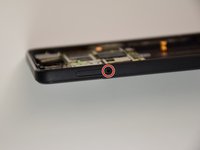
Apply a suction cup as close to the volume button edge of the phone as you can while avoiding the curved edge.
-
-
-
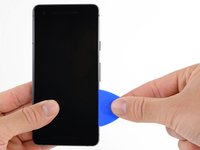
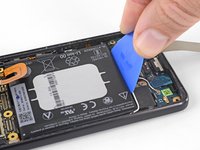
Pull up on the suction cup with firm, constant pressure and insert an opening pick between the front panel and rear case.
-
-
-
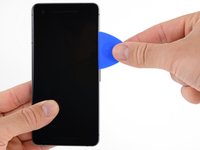
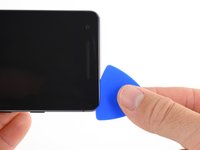
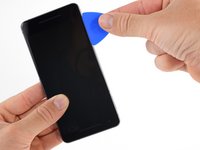
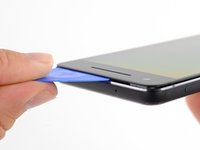
Do not insert the pick more than 9 mm into the bottom edge of the phone. If the pick contacts the folded portion of the OLED panel it can damage the display.
-
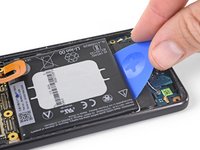
Only make very shallow cuts in the upper left corner, prying deeply can damage the front-facing camera.
-
-
-
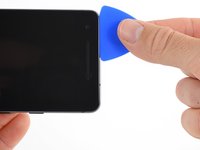
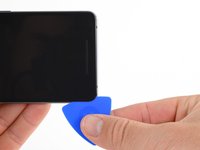
Slide the opening pick up the right side of the phone to separate the display adhesive.
-
-
-
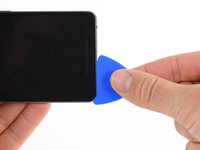
Slide the opening pick around the upper-right corner and along the top edge of the phone.
-
-
-
Slide the pick around the upper-left corner of the phone and down the left edge of the phone.
-
-
-
Slide the pick around the bottom-left corner and along the bottom of the phone. Keep pick at a slight angle away from the screen to avoid damage to the OLED corners.
-
-
-
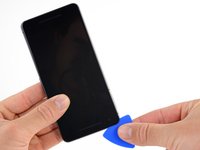
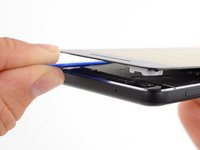
Reinsert the pick at the top edge of the phone and gently pry up the display.
-
-
crwdns2935267:0crwdne2935267:0Magnetic Project Mat$19.95
-
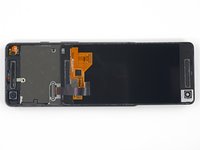
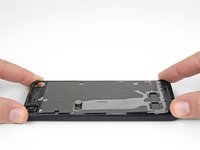
Carefully lay the display down on top of the rear case as shown, making sure not to crease or tear the display ribbon cable.
-
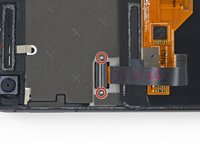
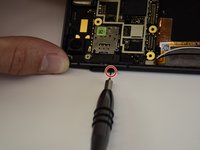
Remove the two 4.0 mm T5 Torx screws securing the display cable bracket.
-
-
-
-
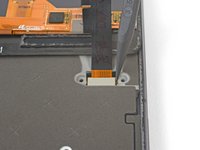
Use the point of a spudger to lift the display cable connector up and out of its socket on the motherboard.
-
-
-
Apply a heated iOpener to the proximity sensor on the top edge of the midframe for two minutes to soften its adhesive.
-
-
-
Slide the point of a spudger under the proximity sensor cable, starting from the side closest to the front-facing camera.
-
Gently lift the edge of the sensor cable until the sensor is perpendicular to the midframe.
-
-
crwdns2935267:0crwdne2935267:0Magnetic Project Mat$19.95
-
Peel back the small piece of tape covering the screw below the earpiece speaker. Peel back any tape covering other screws as well.
-
Remove the following screws securing the midframe:
-
Eleven 3.7 mm Phillips screws
-
One 4 mm T5 Torx screw
-
-
-
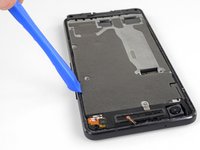
Insert an opening tool into the notch in the midframe near the hold button.
-
Pry the midframe up enough to create a gap between it and the phone case. The midframe cannot yet be completely removed.
-
-
-
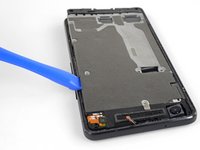
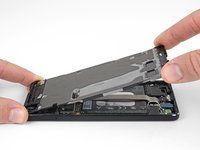
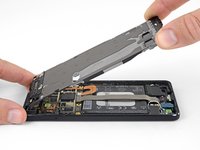
Lift the midframe up starting from the bottom edge.
-
When the midframe starts to make about a 45° with the rest of the phone, lift the midframe straight up and away from the phone.
-
As you lift the midfame, carefully guide the proximity sensor through the small slot in the midframe.
-
-
-
Use the flat end of a spudger to disconnect the battery connector.
-
-
-
Use the flat end of a spudger to disconnect the charging assembly connector.
-
-
-
Fill a plastic dropper or syringe with high concentration isopropyl alcohol and apply a few drops of alcohol under each corner of the battery. Give the alcohol a minute to weaken the battery adhesive.
-
Alternatively, apply a heated iOpener to the back of the phone over the battery for at least two minutes. Reheat and reapply the iOpener as needed until the battery adhesive is sufficiently weakened.
-
-
-
Hold the charging assembly cable out of the way and insert an opening pick along the bottom edge of the battery.
-
Apply steady, even pressure to slowly lever the battery up and out of the phone.
-
Only pry from the center of the battery to avoid damaging the delicate ribbon cables beneath either side of the battery.
-
If you are having trouble, apply some more alcohol under the battery and try again.
-
-
crwdns2935267:0crwdne2935267:0Tesa 61395 Tape$5.99
-
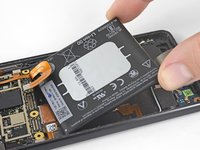
Remove the battery.
-
Use a spudger to scrape away any remaining adhesive from the phone, and clean the glued areas with isopropyl alcohol and a lint-free cloth.
-
Secure the new battery with pre-cut adhesive or double-sided adhesive tape. In order to position it correctly, apply the new adhesive into the phone, not directly onto the battery. The adhesive should not touch any of the cables under the battery.
-
Press the battery firmly into place for 20-30 seconds.
-
-
-
use the flat end of a spudger to disconnect the charging assembly connector from the motherboard.
-
-
-
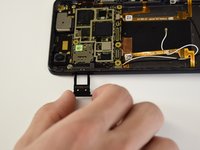
Insert a paperclip or SIM eject tool into the small hole on the left side of the phone and push until the SIM card tray pops out.
-
Remove the SIM card tray.
-
-
-
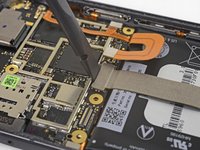
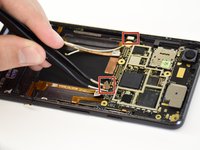
Disconnect two connectors at the bottom edge of the motherboard.
-
-
-
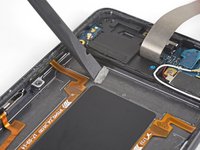
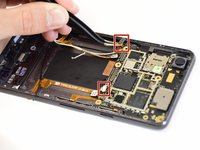
Pry up the motherboard using a plastic opening tool.
-
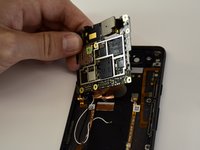
Remove the motherboard.
-
-
-
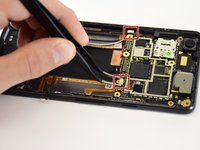
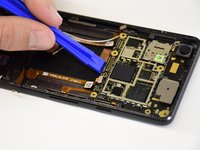
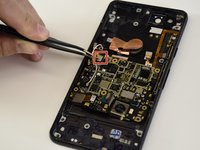
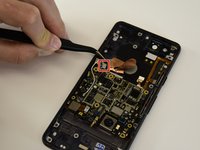
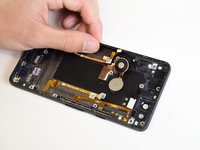
Flip the motherboard over.
-
Disconnect the fingerprint sensor cable.
-
-
-
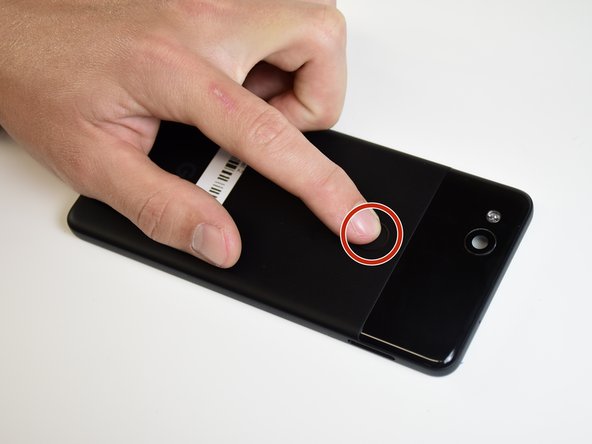
Flip the device over so that the display side is facing the ground.
-
Use your hand to push the fingerprint sensor down toward the inside of the phone.
-
-
-
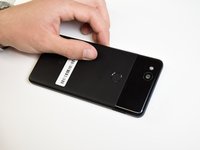
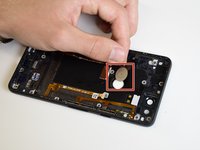
Flip the device over again so that the display side is facing up.
-
Remove the fingerprint sensor.
-


Compare your new replacement part to the original part—you may need to transfer remaining components or remove adhesive backings from the new part before installing.
To reassemble your device, follow the above steps in reverse order.
Take your e-waste to an R2 or e-Stewards certified recycler.
Repair didn’t go as planned? Check out our Answers community for troubleshooting help.
crwdns2935221:0crwdne2935221:0
crwdns2935229:04crwdne2935229:0
crwdns2915084:0crwdne2915084:0

Cal Poly, Team S18-G5, Livingston Winter 2018 crwdns2935289:0Cal Poly, Team S18-G5, Livingston Winter 2018crwdne2935289:0
CPSU-LIVINGSTON-W18S18G5
crwdns2931471:04crwdne2931471:0
crwdns2935297:011crwdne2935297:0
crwdns2947410:01crwdne2947410:0
Replacing the fingerprint sensor. I’m a Medical Device Electronics Technician. Specifically electronic repairs. Everything I repair is designed to be repaired and I have the facilities at hand, to make professional repairs that are FDA certified processes. I’ve tried replacing displays, batteries, and now a fingerprint detector. Thing about most phones is they require heat to both open and re-seal. Think Ametek Hermetic Board sealers. Douglas sandwich sealers. My Pixel 2 finger print sensor got scratched and stopped working. For my Pixel I was unsucessful in reinstalling the display. I got it all back together and working . After 2 weeks the device stopped working reliably. The display peeled off and I was unable to get it to recognize touch. VERY sensitive repairs. It’s why they are assembled in Class 100 clean rooms. A piece of lint is all it takes to short a pixel.
Incredible they charge what they do for a device that cannot be repaired. The phone itself is a inegrated circuit. Insane.