crwdns2915892:0crwdne2915892:0
Use this guide to replace a cracked or broken display on your Fitbit Ionic.
If the frame is deformed, we strongly suggest replacing it to make sure the new display will mount correctly and won’t suffer damage from uneven pressure.
You’ll need replacement adhesive to reattach components when reassembling the device.
crwdns2942213:0crwdne2942213:0
-
-
Before starting, take your Fitbit Ionic off the charger and power it down.
-
-
-
Heat an iOpener and apply it on the display for at least two minutes to soften the adhesive underneath.
-
-
-
Insert a technician's razor with a flat blade into the small gap between the watch case and the display.
-
Cut through the adhesive on the upper side of the Fitbit Ionic.
-
-
-
Use a technician's razor with a flat blade to pry up the top edge of the display and create a small gap.
-
-
-
Insert two opening picks underneath the top left and the top right corner.
-
Leave the opening picks in place to prevent the adhesive from resealing.
-
Remove the razor blade.
-
-
-
Insert a third opening pick underneath the top right corner and slide it along the right edge of the display.
-
Leave the opening pick in the bottom right corner to prevent the adhesive from resealing.
-
-
-
Insert a fourth opening pick underneath the top left corner and slide it along the left edge of the display.
-
Leave the opening pick in bottom left corner to prevent the adhesive from resealing.
-
-
-
-
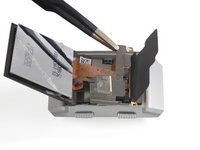
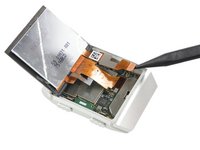
Carefully fold the display assembly in the direction of the bottom edge.
-
-
-
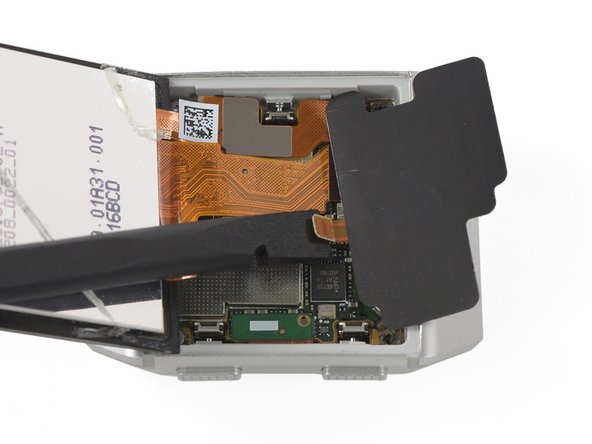
Use the flat end of a spudger to loosen and pry up the mildly glued NFC antenna.
-
Carefully fold the NFC antenna in the direction of the upper edge of the watch.
-
-
-
Carefully fold the display assembly onto the upper side of the watch.
-
-
-
Remove the Torx T2 screw (3.65 mm length) on the bottom left corner.
-
-
crwdns2935267:0crwdne2935267:0Tweezers$4.99
-
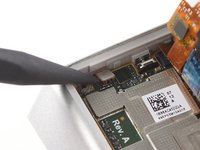
Use a pair of tweezers to remove the metal shield covering the battery flex cable.
-
-
-
Use a spudger to pry up and disconnect the battery flex cable.
-
-
-
Fold the display assembly back to its original position.
-
-
-
Remove the two Torx T2 screws (3.65 mm length) from the top edge of the watch.
-
-
-
Use a pair of tweezers to remove the metal cover.
-
-
-
Use a spudger to pry up and disconnect the NFC antenna.
-
Remove the NFC antenna.
-
-
-
Use a spudger to pry up and disconnect the two display cables from the motherboard.
-


To reassemble your device, follow these instructions in reverse order. Apply new adhesive where necessary after cleaning the relevant areas with isopropyl alcohol (>90%).
Compare your new replacement part to the original part—you may need to transfer remaining components or remove adhesive backings from the new part before installing.
Take your e-waste to an R2 or e-Stewards certified recycler.
Repair didn’t go as planned? Check out our Answers community for troubleshooting help.
crwdns2935221:0crwdne2935221:0
crwdns2935229:02crwdne2935229:0


crwdns2947412:02crwdne2947412:0
It says in the description that you need replacement adhesive when reassembling, but what adhesive do you mean? Adhesive strips, adhesive glue? In all my searching nobody seems to have a good answer. The best thing I could find was b-7000 glue on amazon, but some people say it is water proof some say it Isn’t waterproof, so I’m not sure what to do. Any advice/feedback would be much appreciated!
Hi JJB, it’s very difficult to seal your watch waterproof after a repair but I can recommend this glue. I hope your repair works! Feel free to share your experience with us when you have finished it.