crwdns2933423:0crwdne2933423:0

DualShock 4 Controller Rumble Motors Replacement

crwdns2942213:0crwdne2942213:0

  1. DualShock 4 Controller Rumble Motors Replacement, Rumble Motors: crwdns2935265:01crwdnd2935265:01crwdnd2935265:01crwdne2935265:0
    • Remove the four 2mm screws on the rear plate using the #000 Phillips screwdriver.

  2. DualShock 4 Controller Rumble Motors Replacement: crwdns2935265:02crwdnd2935265:01crwdnd2935265:01crwdne2935265:0
    • Remove the rear plate.

    • We recommend using a metal spudger for this step.

  3. DualShock 4 Controller Rumble Motors Replacement: crwdns2935265:03crwdnd2935265:01crwdnd2935265:02crwdne2935265:0 DualShock 4 Controller Rumble Motors Replacement: crwdns2935265:03crwdnd2935265:02crwdnd2935265:02crwdne2935265:0
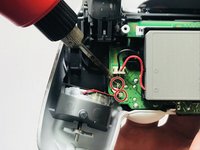
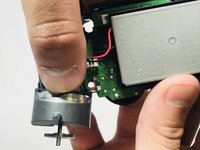
    • Desolder the joints that attach the rumble motors to the motherboard.

    • For more information on soldering, click here.

  4. DualShock 4 Controller Rumble Motors Replacement: crwdns2935265:04crwdnd2935265:01crwdnd2935265:02crwdne2935265:0 DualShock 4 Controller Rumble Motors Replacement: crwdns2935265:04crwdnd2935265:02crwdnd2935265:02crwdne2935265:0
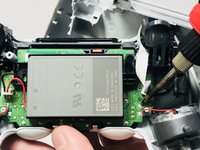
    • There is a hidden screw underneath the battery pack that attaches the faceplate to the motherboard.

    • Lift the pack and remove the 10mm screw using the #000 Phillips screwdriver.

  5. DualShock 4 Controller Rumble Motors Replacement: crwdns2935265:05crwdnd2935265:01crwdnd2935265:01crwdne2935265:0
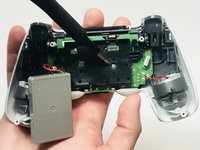
    • Remove the faceplate from the motherboard.

  6. DualShock 4 Controller Rumble Motors Replacement: crwdns2935265:06crwdnd2935265:01crwdnd2935265:03crwdne2935265:0 DualShock 4 Controller Rumble Motors Replacement: crwdns2935265:06crwdnd2935265:02crwdnd2935265:03crwdne2935265:0 DualShock 4 Controller Rumble Motors Replacement: crwdns2935265:06crwdnd2935265:03crwdnd2935265:03crwdne2935265:0
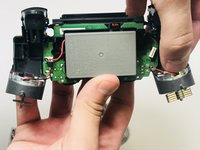
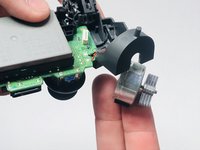
    • With some added pressure, push down and outward in order to free and remove the rumble motors from their socket.

    I spent an hour trying to push, pull, pry and hammer the motors out with no luck. They're really stuck in there. I finally solved it by wedging the iFixit jimmy tool into the top where you can see the adhesive residue, then sliding across to break the seal. After that they popped out easy.

    Goldom - crwdns2934203:0crwdne2934203:0

crwdns2915888:0crwdne2915888:0

To reassemble your device, follow these instructions in reverse order.

crwdns2935229:013crwdne2935229:0

Pedro Rodriguez

crwdns2935283:002/22/18crwdne2935283:0

515 crwdns2915208:0crwdne2915208:0

crwdns2935295:0crwdne2935295:0

crwdns2915084:0crwdne2915084:0

University of Memphis, Team S5-G4, Baddour Spring 2018 crwdns2935289:0University of Memphis, Team S5-G4, Baddour Spring 2018crwdne2935289:0

UM-BADDOUR-S18S5G4

crwdns2931471:02crwdne2931471:0

crwdns2935297:04crwdne2935297:0

crwdns2947412:02crwdne2947412:0

I’d recommend adding removal instructions for the touchpad also

AlexMorse - crwdns2934203:0crwdne2934203:0

the rumble packs are stuck with an adhesive on my controller. The best way to remove the rumble pack in this case? thanks

Ka Erd - crwdns2934203:0crwdne2934203:0

crwdns2917038:0crwdne2917038:0

crwdns2936625:0crwdne2936625:0:

crwdns2936751:024crwdne2936751:0 14

crwdns2936753:07crwdne2936753:0 79

crwdns2936753:030crwdne2936753:0 283

crwdns2942667:0crwdne2942667:0 27,971