crwdns2915892:0crwdne2915892:0
Use this guide to replace the plastic trigger buttons. The #2 trigger button has an attached internal spring.
crwdns2942213:0crwdne2942213:0
-
-
Remove the five 7.2 mm Phillips screws securing the rear cover to the controller.
-
-
-
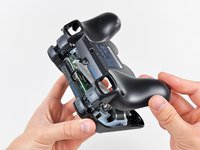
Press on the rear cover between the analog sticks and slightly lift the lower edge of it away from the rest of the controller.
Es ist nicht ganz eindeutig das zwischen den beiden Analog-Sticks gedrückt werden muss. Der gelbe Punkt fällt kaum auf. Ein Bild mit Daumen an dieser Stelle wäre gut oder soooo…
it’s not very clear but for this step you need to push where the yellow dot is shown on the picture. it’s rather tough. you kind of have to move the whole back plate a bit for it to work.
I’m stuck at this step because I can’t for the life of me undo the clip
Yeah I’m lost here too. I’m pushing where the dot is but nothing is happening. What am I trying to accomplish by pushing there? Is there a clasp on the inside I’m trying to undo or something? I really don’t want to break the controller by using too much force or opening it the wrong way.
Could it be that the sixaxis I have is constructed differently? Or is this just a difficult step?
Adding: I ended up getting the shell off but ended up breaking off a small piece which I'm guessing was securing the front and back shells together. The trigger buttons and pieces remained intact on one of my two controllers which is what I was worried about, though I did have to fit the small trigger pieces back in.
The one controller seemed to fit back together just fine without the small piece that broke off, and buttons seemed to feel and work fine too.Joe -
I had to use a small flathead to lever it apart.
-
-
-
Push the rear cover slightly toward the top edge of the controller to clear the front edge of the #2 triggers.
-
Pull the rear cover away from the rest of the controller, being careful not to pop off the #2 triggers.
the "trigger button guide" link links back to this page :o
I accidentally popped a trigger off, and both L1 and R1, because I skimmed and didn't read this step. Fortunately it's not hard. The tricky part with the triggers is that there's a little spring on them. You have to press the side of the spring that's pointing away from the trigger against the sloped surface of the controller (look at the other trigger for reference, if you only popped one off). Then you just slide the trigger on until the "handlebar" bits near the center click into place.
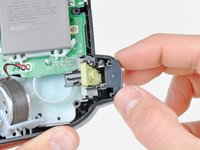
The reset button – a small mostly-rectangular rubberized piece – fell out as I removed the rear cover. It covers the hole near the middle screw and has a post that presses SW1 on the motherboard.
-
-
-
-
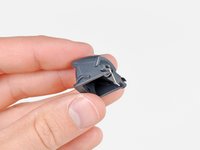
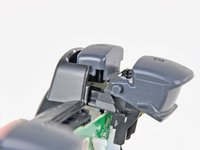
While holding the black plastic trigger retainer with one hand, pull the #2 trigger off of its axle.
-
-
For this step, i would suggest looking at the other trigger to get an idea of how to put it back in. So if you were replacing the L2 button look at R2 and vice versa.
Then looking at the picture above, just make sure that the spring is aligned in a similar fashion to the other button. Pushing it forward to match might help as the spring might fall out of place.
This totally helped me figure this out. Thanks for the excellent tip!
thank the heavens, bless this website and this post
this was extremely helpful. not sure why there’s only one side with a spring but mine’s all back together now
-
-
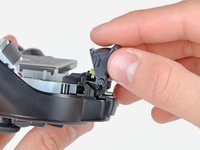
Pull the black plastic trigger retainer slightly away from the front cover.
-
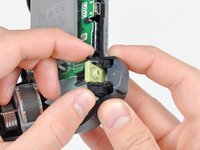
Pull the #1 button out of the front cover.
-
-
I really would have liked to see how the little metal piece on the #2 button is supposed to fit back in
Wow, so in reverse it’s really really fiddly- probably needs a separate guide as I can’t get it back together with the fiddly trigger parts
There is at least one step missing between steps 6 and 7. Step 6 tells you to remove button #1. That is the last mention of the buttons. There is no instruction on how to replace button #1. And there is no instruction on how to insert button #2, the entrie point of the instruction. TOTAL FAIL.


To reassemble your device, follow these instructions in reverse order.
To reassemble your device, follow these instructions in reverse order.
crwdns2935221:0crwdne2935221:0
crwdns2935229:073crwdne2935229:0

crwdns2947412:08crwdne2947412:0
Might want to add that there's a small catch/tab in the middle of the bottom of the controller that needs to be released when taking apart the covers.
This worked great, and also works on normal Sixaxis controllers. I used this to swap the broken spring from the L2 button on my DS3 for a good spring from my Sixaxis. Works like new now.
The little green eletronic ribben where is it supposed to go?
The #00 screwdriver is working better
Did you replace button 2 rod with plastic replacement part or use original rod piece when fixing button 2
Is there a way I can buy trigger retainers?
thank you!!!
I have SIXAXIS gamepad and I don’t know how to put it back I see it have ribborn.
My ps3 original controller's right trigger is not working properly, it won't regester a whole squeeze and also only register's about half way.
I have 2 controllers I'd like to fix, and both have at least one stripped screw in them. Any tips for removing them?
Joe - crwdns2934203:0crwdne2934203:0
For me the PH #0 had too much play. I ended up using the PH #1 which was a perfect fit.
Yokocapolo - crwdns2934203:0crwdne2934203:0