crwdns2915892:0crwdne2915892:0
Use this guide to replace or upgrade the RAM in a Dell XPS 17 9710.
crwdns2942213:0crwdne2942213:0
-
-
Power off and unplug your laptop.
-
Close the display and flip the entire laptop upside-down, with the hinge facing away from you.
-
-
-
Use a Torx T5 screwdriver to remove the eight 4.4 mm-long screws that secure the lower case.
-
-
-
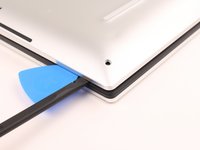
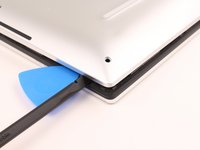
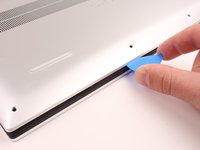
Insert an opening pick at the bottom left corner, between the lower case and the chassis.
-
Insert the flat end of a spudger into the gap created by the opening pick.
-
Pivot the spudger up to release the first set of retaining clips.
-
Repeat this process for the bottom right corner.
-
-
-
-
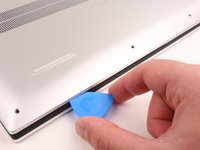
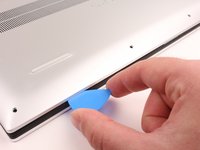
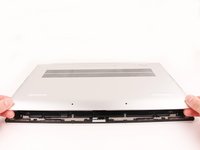
Insert an opening pick into the gap created on the front edge of the laptop.
-
Slide the opening pick around the entire perimeter of the laptop, prying up intermittently, until the lower case fully releases from the clips on the chassis.
-
-
-
Lift the lower case up and off of the chassis to remove it.
-
-
-
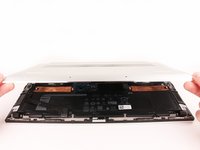
Use the flat end of a spudger to pry the battery's connector up, directly out of its socket.
-
Alternatively, grip the battery connector pull tab with your fingers and lift straight up to disconnect it.
-
-
-
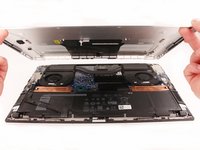
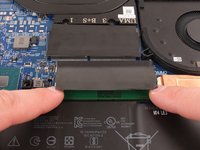
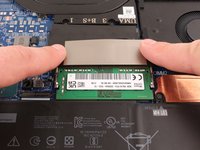
Push over and hold down the mylar flap covering the RAM chip.
-
-
-
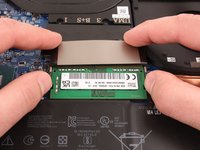
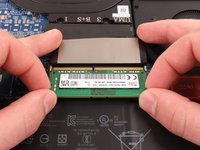
While holding down the flap, release the silver arms on each side of the RAM module by simultaneously pushing each arm away from the RAM.
-
-
-
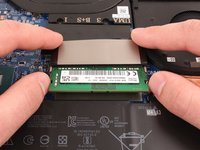
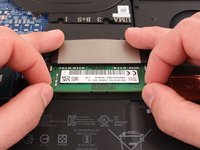
Grip the free end of the RAM and pull it straight out of its socket.
-


To reassemble your device, follow these instructions in reverse order.
Take your e-waste to an R2 or e-Stewards certified recycler.
Repair didn’t go as planned? Try some basic troubleshooting, or ask our Answers community for help.
To reassemble your device, follow these instructions in reverse order.
Take your e-waste to an R2 or e-Stewards certified recycler.
Repair didn’t go as planned? Try some basic troubleshooting, or ask our Answers community for help.
crwdns2935221:0crwdne2935221:0
crwdns2935227:0crwdne2935227:0

