crwdns2915892:0crwdne2915892:0
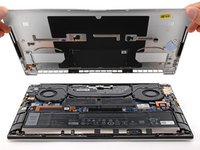
Use this guide to remove and replace the back cover on your Dell XPS 9520.
The cover on this XPS is very sharp and is secured tightly to the laptop body. Work slowly to prevent cutting your hands.
crwdns2942213:0crwdne2942213:0
-
-
Use a Torx T5 screwdriver to remove the eight 3.3 mm-long screws securing the back cover.
-
-
-
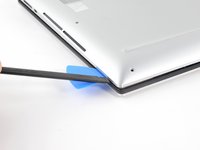
Insert an opening pick between the bottom-left corner of the aluminum back cover and the chassis.
-
Leave the pick inserted before continuing to the next step.
-
-
-
-
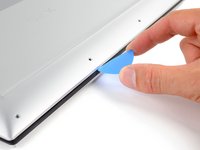
Insert the flat end of the spudger into the gap you just created.
-
Pry up to release the corner clips.
-
Repeat this process for the opposite corner of the back cover.
-
-
-
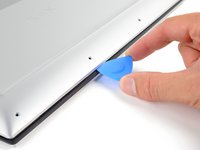
Reinsert your opening pick under the aluminum cover at the front edge of the laptop.
-
Pry to loosen the cover.
-
-
-
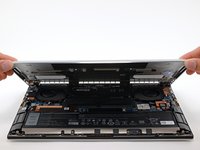
Lift the back cover off the chassis and remove it.
-


To reassemble your device, follow these instructions in reverse order.
Take your e-waste to an R2 or e-Stewards certified recycler.
Repair didn’t go as planned? Try some basic troubleshooting, or ask our Dell XPS answers community for help.
To reassemble your device, follow these instructions in reverse order.
Take your e-waste to an R2 or e-Stewards certified recycler.
Repair didn’t go as planned? Try some basic troubleshooting, or ask our Dell XPS answers community for help.
crwdns2935221:0crwdne2935221:0
crwdns2935229:04crwdne2935229:0

crwdns2947412:03crwdne2947412:0
Would these same steps be followed for the Dell XPS 15 2023 (9530) model?
While we can't say for sure without having the device in our hands, the back cover comes off relatively the same between newer XPS models. A Torx driver and unclipping the front half of the cover will more than likely get you into the laptop.
Hi everyone, first of all I wanted to appreciate the accurate and informative information regarding the replacement, but I had a question about changing the bottom cover. Since there is the number of mariculation on the aluminium cover, won't it be risky changing it? Or at least if you ask dell, will thay make another cover for you with your matriculation num? How much does it cost more less? Thank you in advanced for your gentle responce.