crwdns2915892:0crwdne2915892:0
There are multiple issues that can arise with the keyboard, this guide will allow you to fix a number of them. Using this guide you can clean the keyboard or access some of the more complex components of the laptop.
crwdns2942213:0crwdne2942213:0
-
-
Turn the laptop over to its back.
-
-
-
Slide the release latch while simultaneously pulling backwards on the battery.
-
-
-
Slide the battery out of the battery bay.
-
-
-
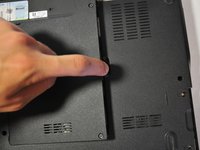
Unscrew the four screws (3mm Phillips #1) that hold the base cover in place.
-
-
-
-
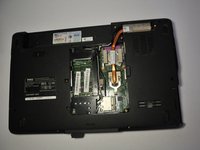
Carefully lift the base cover vertically away from the laptop.
-
-
-
After removing the battery, remove the two screws (3mm Phillips #1) beneath it. These screws hold the Center Control Cover in place.
-
-
-
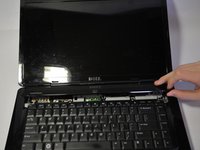
Flip the laptop over to the front and open the display as far as possible.
-
-
-
Pry the Center Control Cover from the laptop. On the right there is a small divot, it is advised that you start removing the panel from here.
-
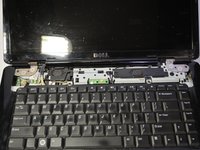
Carefully lift the Center Control Cover away from the laptop.
-
-
-
Remove the two screws (5mm Phillips #1) at the top of the keyboard.
-
-
-
Slide the keyboard out and away from the laptop and lift it up to access the keyboard connector.
-
-
-
Lift the connector latch that secures the keyboard cable to the connector on the motherboard and remove the cable.
The connector latch is the black piece.
Good tip! As shown. flips up and toward user
-
-
-
Lift the keyboard up and away from the laptop.
-


To reassemble your device, follow these instructions in reverse order.
To reassemble your device, follow these instructions in reverse order.
crwdns2935221:0crwdne2935221:0
crwdns2935229:015crwdne2935229:0

crwdns2915084:0crwdne2915084:0

Cal Poly, Team 9-14, Regan Spring 2014 crwdns2935289:0Cal Poly, Team 9-14, Regan Spring 2014crwdne2935289:0
CPSU-REGAN-S14S9G14
crwdns2931471:04crwdne2931471:0
crwdns2935297:015crwdne2935297:0
crwdns2947412:03crwdne2947412:0
Step 4 and 5 are not needed.
Steps 4 and 5 are unnecessary for removing the keyboard. Other than that, well done.
The connector latch is broken. What should I do?