crwdns2915892:0crwdne2915892:0
This replacement guide of the motor involves one phillips PH00 screwdriver and use of a soldering tool. The plastic pieces are fragile, so be careful of using excessive force when taking apart the product.
crwdns2942213:0crwdne2942213:0
-
-
Remove one 9.2mm (0.36 in) screw using the PH00 screwdriver.
-
Remove the battery cover by pulling it away from the vacuum once the 9.2mm (0.36 in) screw is removed.
-
-
-
Remove batteries from the vacuum by pulling them out and away from the vacuum.
-
-
-
Remove all seven 9.2mm (0.32 in) screws on the back of the vacuum.
-
-
-
Remove the front side covers by pulling them away from the vacuum.
-
-
-
-
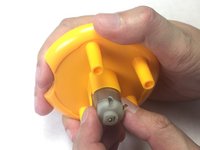
Separate the battery compartment from the ball and bead cylinder by sliding the vacuum ball away from the battery compartment.
-
-
-
Separate the bead cylinder and the fan compartment by pulling the bead cylinder away from the fan compartment.
There is a clip inside the lip on the front side that needs to be overcome. I used a flathead screwdriver through the gap to help lift the corner of the clip.
-
-
-
Remove four 9.2mm (0.32 in) screws on bottom of air cylinder motor mount using the PH00 screwdriver.
-
-
-
Remove one 11.5mm (0.45 in) screw in battery compartment using the PH00 screwdriver.
-
-
-
Remove the red fan from the motor by pulling the red fan away from the bead cylinder motor compartment.
-
-
-
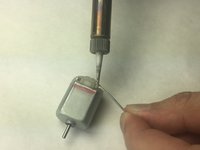
Cut wires connected to faulty motor using a set of wire cutters.
-
-
-
Remove and replace faulty air cylinder motor.
-


To reassemble your device, follow these instructions in reverse order.
To reassemble your device, follow these instructions in reverse order.
crwdns2935221:0crwdne2935221:0
crwdns2935227:0crwdne2935227:0
crwdns2915084:0crwdne2915084:0

IUPUI, Team S3-G5, Harley Fall 2017 crwdns2935289:0IUPUI, Team S3-G5, Harley Fall 2017crwdne2935289:0
IUPUI-HARLEY-F17S3G5
crwdns2931471:03crwdne2931471:0
crwdns2935297:010crwdne2935297:0