crwdns2915892:0crwdne2915892:0
The Canon Sure Shot Z115 (Models Prima Super 115 globally, Autoboy S in Japan) is wonderful for capturing important moments and memories with high-quality photos.
The Z115 is a compact, automatic, 35mm film camera with a flash and a 38-115mm zoom lens. It has a mode-selection dial called the Best Shot Dial on the back of the camera. You can use the dial to select one of several programmed shutter and aperture settings such as moving subjects, backlit portraits, or close-up shots. If one or more of the settings are not working correctly, or if the dial does not click into position or stay in place, you may have a damaged or faulty Best Shot Dial.
Over time, the dial may become damaged or worn, the mounting screw may be lost or stripped, or there may be dirt or debris preventing proper contact and alignment.
Symptoms like distorted images, inability to focus, or a non-functional camera may indicate a problem with the camera. A replacement may be necessary if general troubleshooting or replacing the dial doesn't resolve the problem.
In this tutorial, we will guide you through the process of removing and replacing the Best Shot Dial. This guide requires a replacement part (Best Shot Dial) and a Phillips #0 screwdriver.
Before starting, always power off your device, and remove the batteries to avoid electrical hazards. While not the primary focus, be cautious if you encounter a swollen battery during disassembly and handle it carefully, as it poses a fire hazard.
If your screen is cracked, wear safety glasses and gloves, and consider taping it to prevent injury. Ensure you do not touch the camera lens or image sensor with your fingers or any tools during the repair, as oils and dust can severely affect image quality. Be patient, organize parts, use correct tools, and avoid excessive force.
Following this guide and taking these precautions, you can successfully replace the Best Shot Dial on your Canon Sure Shot Z115 camera.
crwdns2942213:0crwdne2942213:0
-
-
Find the black switch on the side of the camera.
-
Push the switch down.
-
-
-
Use a Phillips #0 screwdriver to remove the five screws circled in red.
-
-
-
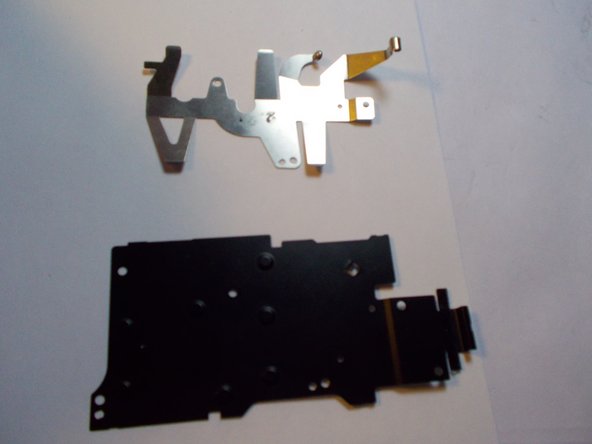
Locate the metal tab sticking up from underneath the black plastic.
-
Gently pull the tab to remove the black plastic along with the metal part underneath.
-
-
-
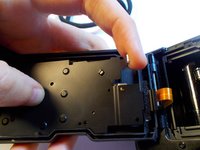
Find the black plastic cover that protects the display logic board.
-
Remove the screw circled in red.
-
-
-
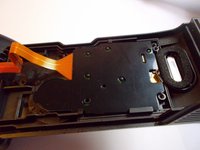
Gently pull the orange cable to lift the logic board out.
-
Move the logic board out of the way so you can see the screw that holds the dial in place.
-


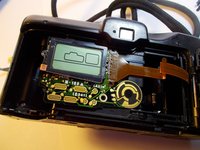


Congratulations, you have successfully removed the Best Shot Dial from your camera. To reassemble your device, follow these instructions in reverse order.
Take your e-waste to an R2 or e-Stewards certified recycler.
crwdns2935287:0crwdne2935287:0

UMass Dartmouth, Team 2-3, Shastany Spring 2015 crwdns2935289:0UMass Dartmouth, Team 2-3, Shastany Spring 2015crwdne2935289:0
UMASSD-SHASTANY-S15S2G3
crwdns2931471:05crwdne2931471:0
crwdns2935297:03crwdne2935297:0