crwdns2933423:0crwdne2933423:0

BlackBerry Pearl 8100 Disassembly

crwdns2942213:0crwdne2942213:0

  1. BlackBerry Pearl 8100 Disassembly, Rear Cover: crwdns2935265:01crwdnd2935265:01crwdnd2935265:01crwdne2935265:0
    • Push the button indicated by the yellow marker to remove the rear cover.

    • Remove the battery (not pictured).

  2. BlackBerry Pearl 8100 Disassembly, Screws underneath the rear cover: crwdns2935265:02crwdnd2935265:01crwdnd2935265:01crwdne2935265:0
    • Use a T6 Torx screwdriver to remove the two screws indicated by the yellow markers.

  3. BlackBerry Pearl 8100 Disassembly, Bottom Cover: crwdns2935265:03crwdnd2935265:01crwdnd2935265:02crwdne2935265:0 BlackBerry Pearl 8100 Disassembly, Bottom Cover: crwdns2935265:03crwdnd2935265:02crwdnd2935265:02crwdne2935265:0
    • Use the plastic opening tool to loosen the bottom cover, and then remove the bottom cover from the cellphone.

  4. BlackBerry Pearl 8100 Disassembly, Side Cover: crwdns2935265:04crwdnd2935265:01crwdnd2935265:02crwdne2935265:0 BlackBerry Pearl 8100 Disassembly, Side Cover: crwdns2935265:04crwdnd2935265:02crwdnd2935265:02crwdne2935265:0
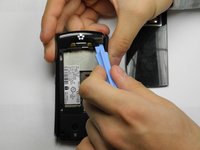
    • Use the plastic opening tool to remove the side covers.

    • The side covers are attached to the cell phone with small plastic snaps. These snaps can be bent or broken easily.

  5. BlackBerry Pearl 8100 Disassembly, More screws: crwdns2935265:05crwdnd2935265:01crwdnd2935265:01crwdne2935265:0
    • With the bottom and side covers removed, the two screws indicated by yellow markers will be visible.

    • Use the T6 Torx screwdriver to remove the screws.

  6. BlackBerry Pearl 8100 Disassembly, Frame: crwdns2935265:06crwdnd2935265:01crwdnd2935265:02crwdne2935265:0 BlackBerry Pearl 8100 Disassembly, Frame: crwdns2935265:06crwdnd2935265:02crwdnd2935265:02crwdne2935265:0
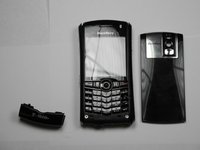
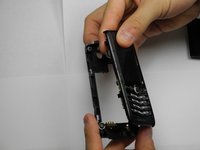
    • With the screws removed, the frame can be detached.

  7. BlackBerry Pearl 8100 Disassembly, Logic Board: crwdns2935265:07crwdnd2935265:01crwdnd2935265:02crwdne2935265:0 BlackBerry Pearl 8100 Disassembly, Logic Board: crwdns2935265:07crwdnd2935265:02crwdnd2935265:02crwdne2935265:0
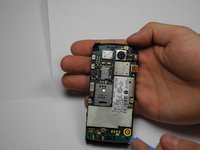
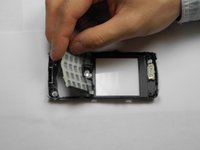
    • Use the plastic opening tool to separate the motherboard from the front cover.

    • While removing the motherboard, the button that opens the rear cover may come loose along with a small spring. Do not lose these.

  8. BlackBerry Pearl 8100 Disassembly, Keypad and Trackball: crwdns2935265:08crwdnd2935265:01crwdnd2935265:02crwdne2935265:0 BlackBerry Pearl 8100 Disassembly, Keypad and Trackball: crwdns2935265:08crwdnd2935265:02crwdnd2935265:02crwdne2935265:0
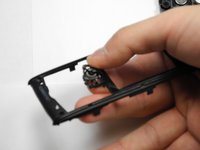
    • Separate the keypad (first picture) and trackball (second picture) from the front cover.

    • Lift the piece of plastic that overlays the trackball (second picture). The trackball should then come loose.

    • Keep the trackball intact. The trackball has extremely small magnetic bolts underneath that are difficult to reassemble.

  9. BlackBerry Pearl 8100 Disassembly, Complete: crwdns2935265:09crwdnd2935265:01crwdnd2935265:01crwdne2935265:0
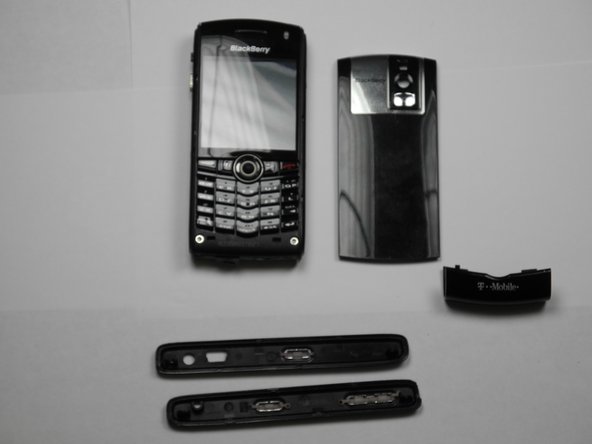
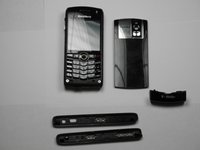
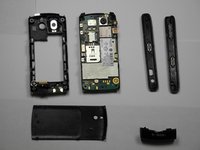
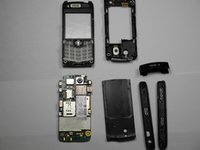
    • These are all the parts of the BlackBerry Pearl 8100 completely disassembled. From left to right, the parts are as follows: rear cover, front cover, motherboard, side covers, trackball, keypad, bottom cover, and frame.

crwdns2915888:0crwdne2915888:0

To reassemble your device, follow these instructions in reverse order.

crwdns2935227:0crwdne2935227:0

Justin

crwdns2935283:010/06/14crwdne2935283:0

150 crwdns2915208:0crwdne2915208:0

crwdns2935297:02crwdne2935297:0

crwdns2915084:0crwdne2915084:0

Aristotle crwdns2935289:0Aristotlecrwdne2935289:0

Community

crwdns2931471:05crwdne2931471:0

crwdns2935297:03crwdne2935297:0

crwdns2944067:00crwdne2944067:0

crwdns2917038:0crwdne2917038:0

crwdns2936625:0crwdne2936625:0:

crwdns2936751:024crwdne2936751:0 2

crwdns2936753:07crwdne2936753:0 6

crwdns2936753:030crwdne2936753:0 16

crwdns2942667:0crwdne2942667:0 661