crwdns2915892:0crwdne2915892:0
This guide serves to aid users in replacing the battery of the Black and Decker PHV1810 Hand Vacuum. The battery inside a Black and Decker Hand Vacuum gives the device power and allows the vacuum to run. The Black and Decker Hand Vacuum battery will become worn out and degrade over time. This can cause shorter battery life, less output power of the battery, and even a non-working battery. This guide will show you how to replace this old and worn-out battery so you can use your vacuum for longer periods and generate more power to get the job done faster!
Before you begin make sure to be aware of the following:
- Check the owner manual for safety precautions that may be listed here
- Consider wearing gloves and/or eye protection as battery acid can be quite harmful to the skin
- Before you begin the disassembly of the product turn it on and leave it on until the motor completely stops ensuring the complete discharge of the battery
Does my Vacuum need a new battery?
- The Vacuum is not running as long as it used to on full charge
- The battery looks bloated
- Takes longer to charge
- Does not have the same amount of power and feels weaker
Finally, no special skills are required; it only requires eight simple steps to take apart and replace the battery.
crwdns2942213:0crwdne2942213:0
-
-
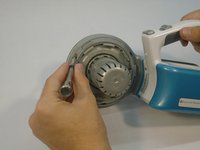
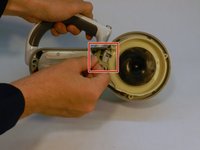
To take off the nozzle, filter, and catch bowl first start off by pushing in the button identified with a red square and twist that part of the device toward the handle portion of the vacuum and it should click and pop off the chassis.
-
-
-
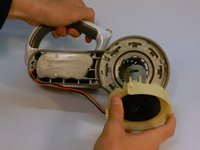
Once the nozzle, filter and dust bowl have been removed each part can be removed from the nozzle section of the device.
-
-
-
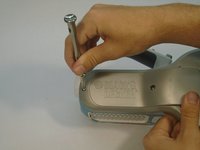
Remove the three screws displayed in the image.
There are no screws on my model
There are no 3 screws on my model either. No way to remove the cover or remove the battery. Unit goes in the recycle.
The screws are there. They are hidden by the plastic ring with the 3 notches in it.
It is being held in place by the 8 clips. You have to pry the ring out from the clips and the screws will be revealed.
This is the same model number I have, but it seems the plastic ring was installed to cover the screws either accidentally or on purpose.
Push the nozzel rotate button and manually rotate the ring that covers the 3 screws.
-
-
-
-
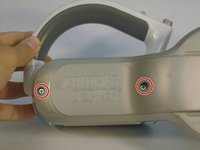
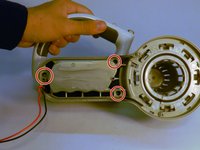
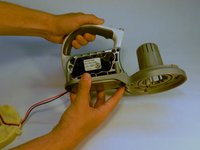
Turn the vacuum around until you see the company logo. Once we are there remove the two screws on the vacuum.
-
-
-
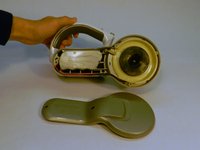
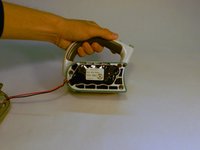
Once all screws are removed the casing of the vacuum can be removed.
-
Remove the L-shaped plastic hook.
-
Once the L shaped hook has been removed the motor will easily fall out of place.
-
-
-
Disconnect any wires or components attached to the motor by gently unplugging them. Remove the motor by unscrewing or unclipping it from the casing
-
This will then allow for you to replace the motor.
-
-
-
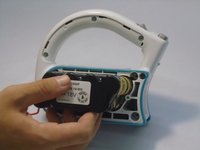
Remove the three screws highlighted with red circles.
I got all that figured out myself. It the battery won't budge.
-
-
-
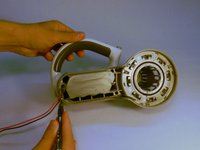
Remove the battery by pulling it out of the slot it sits in.
Battery is connected to wires how do you disconnect the wires from the batteryBattery is connected to wires how do you disconnect the wires from the battery
How do you remove the plastic bit on the handle to get to those screws?
I figured it out. Used a knife to pry it off. Knife is easiest, screwdriver wasn't narrow enough
I was able to swap the useless B & D NiCad batteries with a single 14.4 volt Lithium ion battery pack found on Amazon that is designed for a Eufy Robot vacuum cleaner and others. This pack was only $15.99 and is a single unit with wires attached to a connector. Here is description of item -Homesuit 14.4V 3300mAh Battery Replacement for Deebot N79S, N79, DN622 Eufy RoboVac 11 - I simply snipped off the connector and soldered the red wire to the red connector from the old battery pack and same with the black side. The wires are short, but worked ok and this pack is smaller than the orig. Nicad so bubble wrap on the sides and top worked well to fill the battery compartment. This 14.4 vol\t pack has plenty of power, is Liith. Ion so should last a long time and have no memory effect like the prior Nicad. I opted for this vs. another rec. of using the 4 18650 3.7 volt batteries in a holder as all the battery holders I could find did not seem robust enough for the power and was worried about too much heat.
Did you have to get a new charger or could you use the old one?
-


To reassemble your device, follow these instructions in reverse order.
To reassemble your device, follow these instructions in reverse order.
crwdns2935221:0crwdne2935221:0
crwdns2935229:07crwdne2935229:0
crwdns2915084:0crwdne2915084:0

The Citadel Military College of South Carolina, Team S2-G4, Eggleston Fall 2018 crwdns2935289:0The Citadel Military College of South Carolina, Team S2-G4, Eggleston Fall 2018crwdne2935289:0
CMCSC-EGGLESTON-F18S2G4
crwdns2931471:03crwdne2931471:0
crwdns2935297:04crwdne2935297:0
crwdns2947412:014crwdne2947412:0
Where can I get a replacement battery?
Anyone? Good place to order a replacement?
“Remove the battery” sounds pretty simple, but my pivot vac seems to be “hard-connected” to the battery terminal, and I haven’t a clue where to go from here (though the trash heap—and recycling center—are strong candidates). Mine is an older model (2012) and perhaps that explains why these otherwise excellent instructions lead me to a dead-end.
Jim 4/14/21
Agree. I dissembled down to this last photo, but the battery won’t budge.
the gray handle on one side pops open if you pry at it and there are screws underneath.
Thanks, do appreciate the instructions, much better step by step, but why did they made it so difficult.
Yes, it’s too difficult. Wondering if it’s worth replacing the battery.
Would be happy if they let us trade for a newer model.
Same here. Would like to know how to get it out.
For anyone still reading this, I was able to replace the batteries in my 18V pivot vac with 18650's. These are much more reasonably priced than the OEM battery pack (which I've only seen for about $50). I found that I was able to go up to four 18650's (= 14.8V) -- when I tried to go up to five (= 18.5V), I started to smell smoke, so it probably couldn't handle the current.
Some notes:
1) I simply snipped the leads to the existent battery pack and attached the leads to a four slot 18650 holder... these are available on Amazon: https://www.amazon.com/gp/product/B08B86...
2) For the 18650's, I'm using these: https://www.amazon.com/gp/product/B09TZW...
3) The four slot holder takes a LOT less space than the OEM pack, so I filled the remaining space with bubble wrap.
4) I found it wasn't necessary to remove the motor to access the battery pack, though it helps.
5) It's a good idea to keep track of the screws and where they go.
No idea yet how much time I get off a single charge, but it has to be better than before!
Charged this thrift store 2012 vacuum overnight and it appears the battery is weak. To me, running an 18vdc motor on 14.8 volts is worse than 18.5 volts.
Also how did you add the fifth battery in a four cell holder? It has to be in series, if you paralleled the 5th battery the Total voltage was lower than 14.8.
Having a problem. I know somethings can be different depending upon year of manufacture, but I can not access the 3 screws that are in step 3 motor. My vac is solid ring all the way around. Any recommendations?
You may need to rotate the plastic ring to see the screws. The ring has three slots to let the screws accessible and you would not see the screws unless the slots are lined up on top of the screws. Push the button in front of the power switch as if you are pivoting the nozzle and rotate the ring.
s park -
cant find the replacement battery anywhere
Look at Marc Mittlemans answer of 1/2023 in step 8. The battery he used is on Amazon for about $18. I’m going to take my vac apart before ordering. But it’s available.
RJN -