crwdns2933423:0crwdne2933423:0

Asus ROG G751JL-BSI7T28 Fan Replacement

crwdns2942213:0crwdne2942213:0

  1. Asus ROG G751JL-BSI7T28 Fan Replacement, Back Panel: crwdns2935265:01crwdnd2935265:01crwdnd2935265:01crwdne2935265:0
    • With the laptop closed, turn it upside-down so the bottom is facing up toward you.

  2. Asus ROG G751JL-BSI7T28 Fan Replacement: crwdns2935265:02crwdnd2935265:01crwdnd2935265:03crwdne2935265:0 Asus ROG G751JL-BSI7T28 Fan Replacement: crwdns2935265:02crwdnd2935265:02crwdnd2935265:03crwdne2935265:0 Asus ROG G751JL-BSI7T28 Fan Replacement: crwdns2935265:02crwdnd2935265:03crwdnd2935265:03crwdne2935265:0
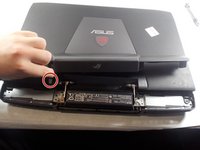
    • Place a spudger into the notch, and pry the small triangular piece away from the laptop.

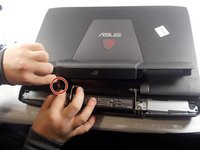
    • Using a Phillips #00 screwdriver, remove the single 3 mm screw.

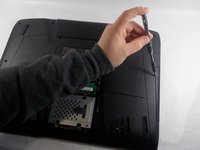
    • Place a spudger beneath the back panel and pry it away from the laptop.

  3. Asus ROG G751JL-BSI7T28 Fan Replacement, Display Assembly: crwdns2935265:03crwdnd2935265:01crwdnd2935265:02crwdne2935265:0 Asus ROG G751JL-BSI7T28 Fan Replacement, Display Assembly: crwdns2935265:03crwdnd2935265:02crwdnd2935265:02crwdne2935265:0
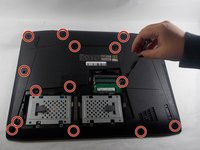
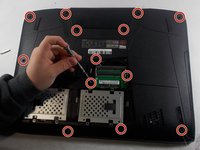
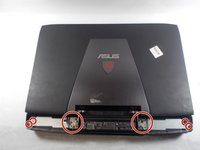
    • Remove all 5mm Phillips #00 screws from the back cover.

  4. Asus ROG G751JL-BSI7T28 Fan Replacement: crwdns2935265:04crwdnd2935265:01crwdnd2935265:02crwdne2935265:0 Asus ROG G751JL-BSI7T28 Fan Replacement: crwdns2935265:04crwdnd2935265:02crwdnd2935265:02crwdne2935265:0
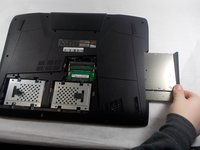
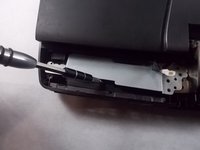
    • Use a spudger to pry the disc drive out of the laptop.

  5. Asus ROG G751JL-BSI7T28 Fan Replacement: crwdns2935265:05crwdnd2935265:01crwdnd2935265:03crwdne2935265:0 Asus ROG G751JL-BSI7T28 Fan Replacement: crwdns2935265:05crwdnd2935265:02crwdnd2935265:03crwdne2935265:0 Asus ROG G751JL-BSI7T28 Fan Replacement: crwdns2935265:05crwdnd2935265:03crwdnd2935265:03crwdne2935265:0
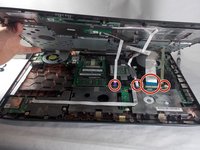
    • Open the laptop and turn it so that the ASUS logo is facing you.

    • Gently lift up the display hinge housing shroud, but don’t pull it completely away yet.

    • Disconnect the RGB light power cable in the shroud, now the shroud can be put aside.

  6. Asus ROG G751JL-BSI7T28 Fan Replacement: crwdns2935265:06crwdnd2935265:01crwdnd2935265:03crwdne2935265:0 Asus ROG G751JL-BSI7T28 Fan Replacement: crwdns2935265:06crwdnd2935265:02crwdnd2935265:03crwdne2935265:0 Asus ROG G751JL-BSI7T28 Fan Replacement: crwdns2935265:06crwdnd2935265:03crwdnd2935265:03crwdne2935265:0
    • Remove the 5mm Phillips #00 screws.

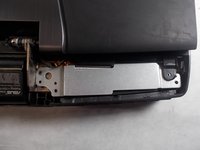
    • Lift up the silver hinge brackets on each side of the laptop.

  7. Asus ROG G751JL-BSI7T28 Fan Replacement: crwdns2935265:07crwdnd2935265:01crwdnd2935265:02crwdne2935265:0 Asus ROG G751JL-BSI7T28 Fan Replacement: crwdns2935265:07crwdnd2935265:02crwdnd2935265:02crwdne2935265:0
    • Remove the 5mm Phillips #00 screws from the hinges.

    • Detach the ribbon cable and remove the display assembly from the laptop.

  8. Asus ROG G751JL-BSI7T28 Fan Replacement, Keyboard Assembly: crwdns2935265:08crwdnd2935265:01crwdnd2935265:02crwdne2935265:0 Asus ROG G751JL-BSI7T28 Fan Replacement, Keyboard Assembly: crwdns2935265:08crwdnd2935265:02crwdnd2935265:02crwdne2935265:0
    • Carefully lift the keyboard up, being careful to not damage the fragile ribbon connectors.

    • Use an opening tool to detach the ribbon cables connecting the keyboard to the rest of the laptop.

    • Remove the keyboard from the laptop.

  9. Asus ROG G751JL-BSI7T28 Fan Replacement, Fan: crwdns2935265:09crwdnd2935265:01crwdnd2935265:02crwdne2935265:0 Asus ROG G751JL-BSI7T28 Fan Replacement, Fan: crwdns2935265:09crwdnd2935265:02crwdnd2935265:02crwdne2935265:0
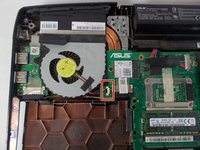
    • Remove the fan's power cable by pulling carefully outward towards the fan.

  10. Asus ROG G751JL-BSI7T28 Fan Replacement: crwdns2935265:010crwdnd2935265:01crwdnd2935265:03crwdne2935265:0 Asus ROG G751JL-BSI7T28 Fan Replacement: crwdns2935265:010crwdnd2935265:02crwdnd2935265:03crwdne2935265:0 Asus ROG G751JL-BSI7T28 Fan Replacement: crwdns2935265:010crwdnd2935265:03crwdnd2935265:03crwdne2935265:0
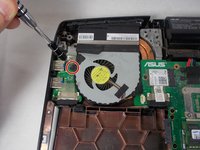
    • Remove the 5mm Phillips #00 screw.

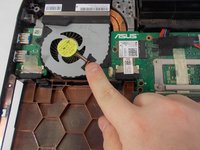
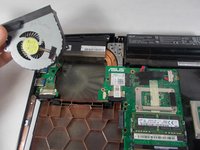
    • Pull up on the black tab connected to the fan. This will pull it away from the cooling fins, allowing it to be removed.

    • Remove the fan from the laptop.

crwdns2915888:0crwdne2915888:0

To reassemble your device, follow these instructions in reverse order.

Kristen Gismondi

crwdns2935283:011/12/14crwdne2935283:0

82 407 crwdns2915208:0crwdne2915208:0

crwdns2935297:0200crwdne2935297:0

crwdns2915084:0crwdne2915084:0

iFixit crwdns2935289:0iFixitcrwdne2935289:0

Staff

crwdns2931471:0136crwdne2931471:0

crwdns2935297:017 392crwdne2935297:0

crwdns2917034:0crwdne2917034:0

crwdns2917038:0crwdne2917038:0

crwdns2936625:0crwdne2936625:0:

crwdns2936751:024crwdne2936751:0 0

crwdns2936753:07crwdne2936753:0 3

crwdns2936753:030crwdne2936753:0 22

crwdns2942667:0crwdne2942667:0 661