crwdns2915892:0crwdne2915892:0
This is a guide to assist you in replacing your touchpad on an Asus Eee PC 900. If you have been struggling to get the mouse to move by using the touchpad, or the movements are glitching, you may need to replace your touchpad. This guide has easy steps for you to follow and correctly install the new part.
crwdns2942213:0crwdne2942213:0
-
-
Slide the battery's locking tabs from the locked position to unlocked positions.
-
-
-
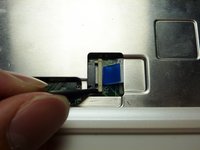
Slide the battery out while holding the left locking tab in the unlocked position.
a (minor good, as liion batteries tend to degrade, esp in alltimeuse in bay: warm, max voltage=minimumlifespan) solution is:
try to revive the no more recognized one! first!!
either at the poles: need three connections: two at the ends, one in the middle like 1(+ -)-2-(+-)3
(need a hole through the casing/housing… (each of the two packs must be over 3.0volts: you can easily put a good charged liion from outside for a few moments to get a bit charge in to rise each pack over the 3.0 threshold that prevents pack of being recocknized as ok…)
or need a bridge at the connector to see realbatterypackvoltage there… check it out
good luck, thomas@biopilze.de
addendum:
if too old, too long lying at voltages under 3v… well possible that the liions wont keep the voltage, then at least one of two packs: (each two parallel 18650 liions) are gone -in that case you could try to dissassemble casing and replace a /or both pack/s, but is rather difficult: housing is a: well glued, try to open with sharpe knive but take extreme care not to destroy or short sircuit internals!!!!!! and b: is brittle and not much space for adding solder etc… -alltogether a thorny way…
you could just add external batteries at these poles, too… -if the originalones have just a high impedence/resistance, but do NOT leak (low impedence/resistance), otherwise constant energy-loss + heating… : problem: eeepc checks voltage-drift and regulates power-up/booster… if you added to much more voltage , as a flyby addendum: it rekocknizeses overload and shuts down imediately: so try to add batteries with similar voltage, possibly via a smal resisor first that buffers drain… give feedback to me please!
>>…or need a bridge at the connector to see realbatterypackvoltage there… check it out
the connector has generally spoken: plus, minus, switch, thermal-control… some: ie2, too…
did that for a eeeepc900, external charge just at the connector, worked fine, now got eeepc900a, is different: one pin less, have to find out myself first… today did no more find any schematics in the web yet -any suggestions folks?
-
-
-
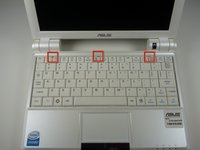
Identify the three metal tabs holding down the laptop's keyboard.
-
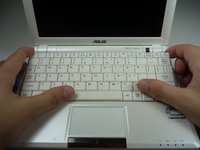
Using a spudger, depress each metal tab to remove the keyboard.
-
-
-
Clips hold the bottom portion of the keyboard to the laptop. Gently lift the upper portion of the keyboard and then move the entire keyboard towards the computer's screen until the ribbon cable is visible.
-
-
-
Using a spudger, gently push the two black pins holding the ribbon cable towards the computer's screen.
-
Slide the keyboard's ribbon cable from the connector.
-
-
-
Remove the keyboard by lifting upwards.
-
-
-
-
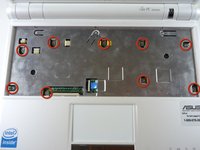
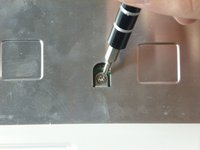
Remove the nine 4.76mm Phillips #0 screws on the top cover of the laptop.
-
-
-
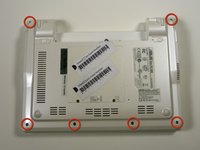
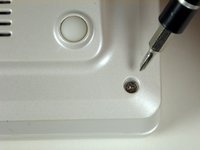
Remove the six 4.76 mm Phillips #0 screws on the back of the laptop.
-
-
-
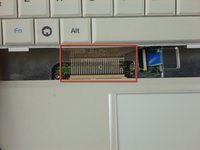
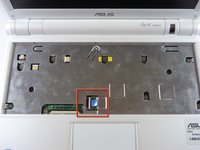
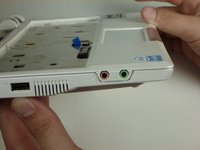
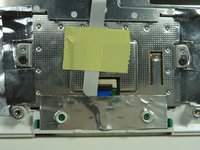
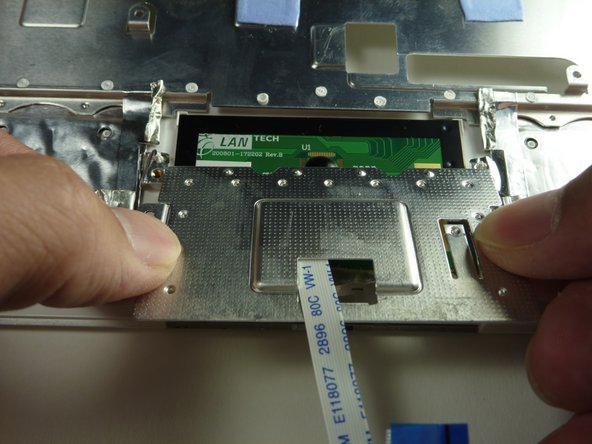
Flip the laptop back over and identify the touchpad ribbon.
-
Unlock the tan locking pin from the black connector by pushing the pin to the right with a spudger.
-
-
-
Slide out the touchpad's ribbon connector by pulling the blue tab to the right.
-
-
-
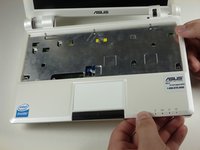
Use a plastic opening tool to gently detach the top cover from the laptop's base. See the next step for removing the cover.
-
-
-
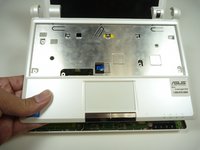
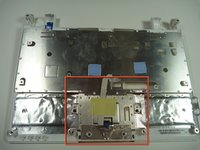
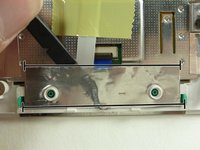
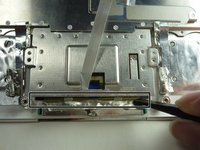
Flip the top cover over and identify the touchpad back plate.
-
-
-
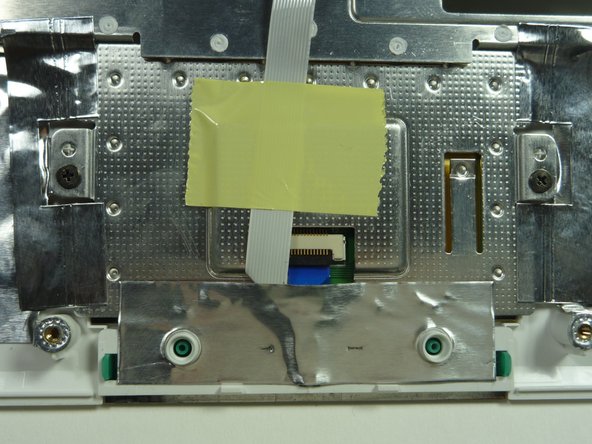
Identify the conductive foil.
-
Fold back the conductive foil from the touchpad back plate using a spudger.
-
-
-
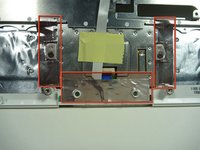
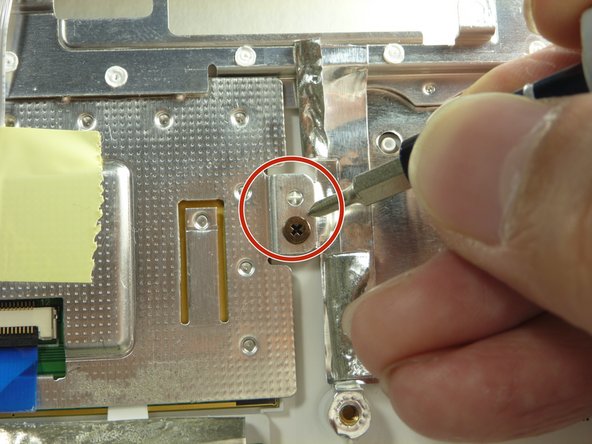
Remove the two 4.76mm Phillips #0 screws securing the touchpad back plate.
-
-
-
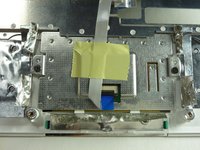
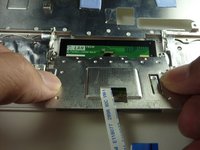
Remove the yellow tape holding the touchpad's ribbon connector with a spudger.
-
-
-
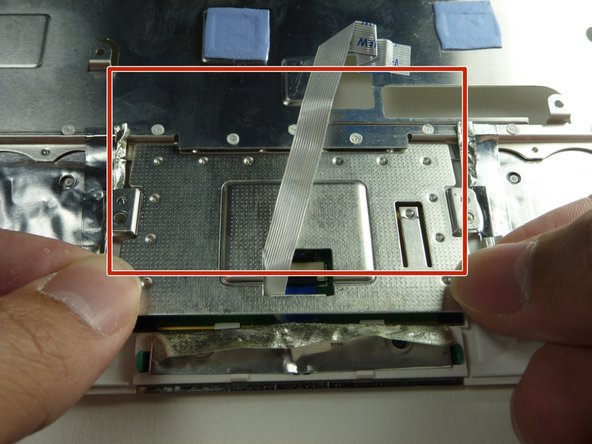
Use a spudger to lift the front edge of the touchpad back plate.
-
Gently grasp the edges of the back plate and pull towards you to remove.
-
-
-
Lift the touchpad out of its placeholder.
-


To reassemble your device, follow these instructions in reverse order.
To reassemble your device, follow these instructions in reverse order.
crwdns2935221:0crwdne2935221:0
crwdns2935229:06crwdne2935229:0
crwdns2915084:0crwdne2915084:0

Cal Poly, Team 3-27, Amido Winter 2012 crwdns2935289:0Cal Poly, Team 3-27, Amido Winter 2012crwdne2935289:0
CPSU-AMIDO-W12S3G27
crwdns2931471:04crwdne2931471:0
crwdns2935297:016crwdne2935297:0
crwdns2947412:02crwdne2947412:0
Where is STEP 2 1/2? my keyboard dosnt just fall out nice, how do you remove the keyboard?
Yeah I don't know how to remove keyboard. Also once I get to step 14.. What do I do? You tell me how to identify the broken piece but is it replaceable or fixable?