crwdns2915892:0crwdne2915892:0
Hello, today we will begin you repair of The Astro A50 Headset (2019). The most likely reason for you needing to repair this headset is either rage-quitting a game or simply your battery died & needs replacing. We did some searching on the web and couldn’t find any generous guides on how to repair. Just have to play harder so you don’t have worry about other kinds of repair on this headset. Thier aren’t many manufactured defects in the product meaning the battery should be your only fix needed. So today we will help you change your battery of an Astro A50 (2019). Hopefully, this guide helps you now & in the future.
crwdns2942213:0crwdne2942213:0
-
-
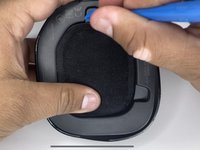
Remove the right side ear cushion by pulling toward you on the top tab.
-
-
-
Remove the speaker filter by using a prying tool and peeling it off.
-
Work your way around the filter until it comes off.
-
-
-
-
Remove all four 1.5 mm screws using the Phillips #00 screwdriver.
-
-
-
Remove all four 1.5 mm screws holding the motherboard using the Phillips #00 screwdriver.
-
Unplug the battery by pulling the plug.
-
-
-
Remove the old battery with a plastic opening tool.
I found a way to get around replacing the battery. For my case, I had my Astros stored away for 2 years without turning them on so the battery was below the voltage where the board would allow the battery to charge.
To fix it I followed this guide to remove the battery. The battery has a small board that you need to peel up to expose the + and - poles at the bottom. I carefully cut and peeled some of the yellow tape to be able to fold the small board away to expose them.
The board itself won’t allow the charge to pass through since it’s too low volt. You need to pass a current onto the battery itself and get it up to 3.5 to 4v.
I used a mini usb charger to pass current. Cut the mini usb side off a spare cable, I taped the + to + and - to -. Plug the usb cable to power for about 10 seconds. Then unplug for a few sec. Then plug in for 30 secs. Then cycle like this slowly introducing power to it.
Use a voltmeter to check the voltage of the battery though out , max 4.5v. Reinsert battery. The LED should turn on now.
You can also use a 9v battery it’s just a bit slower. Attach the positive to positive. Neg to neg with some spare wire. The battery has the indicators of which side is which as does the 9v battery.
Start by checking the battery voltage. Mine was as 0.02v completely dead.
Introduce power 10 seconds. Then 30. Then a few more cycles of 30. Check what the voltage settles at after each cycle. Once it’s over 2v I left it a bit longer just aim for 3.5-4v. Do not leave it plugged in unmonitored or it can overheat and ignite.
I did the usb power method and took about 5 minutes of manual charging. The 9v battery may take 10-15 minutes.
When you plug the battery back o to the headset, the LED should turn on. Now you want to charge it on the base for a few hours and as usual.
Prior to doing this my LED light didn’t turn on and my battery would not charge even after charging it overnight. Now it works!
Daniel -
When I say to use a mini usb cable to introduce power to the battery, I mean use a spare one and cut off the mini usb side. Strip the black and red cables. And then touch these to the battery. Use a voltmeter to find which is pos and neg if needed but usually the red is the positive. I used small pieces of tape to hold them onto the battery just long enough.
Last note. Use voltmeter to test battery +\- to be sure you’re touching actual metal. There may be yellow plastic tape covering it so just be sure you’re getting metal contact and not just touching the yellow tape. Take your time don’t cut into the battery sleeve just the yellow tape. Good luck!
Daniel -
To recap, my problem was a completely dead battery after not charging my A50’s for years. I just had to “jumpstart” the battery because if the voltage on the battery gets too low(near 0 in my case), the circuit board on the battery will not allow the base charger power to pass through. This is for safety reasons but usually to not allow the battery to overcharge and catch fire. So no power was actually getting through to the battery.
I bypassed the circuit board and passed power directly to the battery up to 4v. Now the board works as intended and allows the normal charger to charge the battery.
One more note :)
After you’re done, set the headset on the charger/base station while powered on. If the LED light is still white, take then off the base station and place them on the charger again.
The LED light should now be orange/amber indicating it’s charging.
My understanding of why this happens is, first we manually jump started the battery. When you first put them on the base station, the power hits the circuit board but doesn’t realize the battery is now awoken. When you put them on the base station again a second time it makes the full connection. Essentially making it realize oh, the battery is back lets charge! So now the power is making it all the way through to the battery. Mission accomplished.
Charge for 4 hours at least
-


To reassemble your device, follow these instructions in reverse order.
For optimal performance, after completing this guide, calibrate your newly installed battery.
Take your e-waste to an R2 or e-Stewards certified recycler.
To reassemble your device, follow these instructions in reverse order.
For optimal performance, after completing this guide, calibrate your newly installed battery.
Take your e-waste to an R2 or e-Stewards certified recycler.
crwdns2935221:0crwdne2935221:0
crwdns2935229:03crwdne2935229:0
crwdns2915084:0crwdne2915084:0

CSU Los Angeles, Team 11-6, Grodsky Fall 2021 crwdns2935289:0CSU Los Angeles, Team 11-6, Grodsky Fall 2021crwdne2935289:0
CSULA-GRODSKY-F21S11G6
crwdns2931471:02crwdne2931471:0
crwdns2935297:04crwdne2935297:0
crwdns2947412:08crwdne2947412:0
Where did you source the battery for this? Do you have the part number at least? Astro doesn't sell them.
I am also looking for this without having to get them from china as it will take 4 to 6 weeks to get it. Any local source for this battery?
I had to order from China, only batteries that are held domestically I could find were for the gen3/solder only and not the connector style
Luft -
For those with a gen3 a50, the battery is mounted slightly different, you don't need to remove the PCB, just pinch the black tabs holding the outer cover on. See here: https://imgur.com/a/m2Nv2Ze
I performed this battery replacement. I sourced a new battery from another new A50 Gen 4 that was firmware bricked.
I’m having an issue charging the new battery with the base station. The headset does not seem to accept a charge from the base station however it will charge via a micro USB cable plugged into a usb wall brick.
I believe the issue is related to the battery not being calibrated to the old headset. Any ideas?
SRP603443 but now I need the adapter to be able to connect it to the port anybody know where I could buy it?
I bought a battery with 3,7V and 900mA from the company Cellonic. They have a fitting one.
Was easy to do! Merci for the tutorial and the translation.
It's a 623441 battery. But you can get any similarly sized/rated battery at 3.7v to work.