crwdns2933423:0crwdne2933423:0

Amazon Echo Studio Subwoofer Replacement

crwdns2942213:0crwdne2942213:0

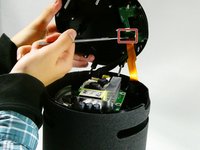
  1. Amazon Echo Studio Subwoofer Replacement, Power Supply Board: crwdns2935265:01crwdnd2935265:01crwdnd2935265:03crwdne2935265:0 Amazon Echo Studio Subwoofer Replacement, Power Supply Board: crwdns2935265:01crwdnd2935265:02crwdnd2935265:03crwdne2935265:0 Amazon Echo Studio Subwoofer Replacement, Power Supply Board: crwdns2935265:01crwdnd2935265:03crwdnd2935265:03crwdne2935265:0
    • Flip the device upside down.

    • Pry up the edge of the rubber base panel with a spudger, then pull the rest of it off by hand.

  2. Amazon Echo Studio Subwoofer Replacement: crwdns2935265:02crwdnd2935265:01crwdnd2935265:03crwdne2935265:0 Amazon Echo Studio Subwoofer Replacement: crwdns2935265:02crwdnd2935265:02crwdnd2935265:03crwdne2935265:0 Amazon Echo Studio Subwoofer Replacement: crwdns2935265:02crwdnd2935265:03crwdnd2935265:03crwdne2935265:0
    • Use a T15 Torx screwdriver to remove the nine 3.2 mm screws.

    • Use a Torx T10 screwdriver to remove the six 2.7 mm screws.

    • After removing the screws, gently lift the base off, with care not to damage any of the connected cables.

    As the diagram shows, there are actually nine T15 Torx screws, not ten.

    Brian Dipert - crwdns2934203:0crwdne2934203:0

    Good catch, Brian.

    Connor -

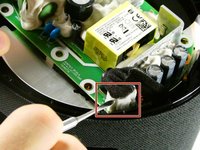
  3. Amazon Echo Studio Subwoofer Replacement: crwdns2935265:03crwdnd2935265:01crwdnd2935265:03crwdne2935265:0 Amazon Echo Studio Subwoofer Replacement: crwdns2935265:03crwdnd2935265:02crwdnd2935265:03crwdne2935265:0 Amazon Echo Studio Subwoofer Replacement: crwdns2935265:03crwdnd2935265:03crwdnd2935265:03crwdne2935265:0
    • Before fully removing the base, remove the three attached connectors.

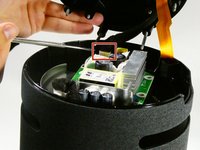
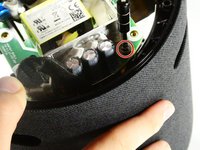
  4. Amazon Echo Studio Subwoofer Replacement: crwdns2935265:04crwdnd2935265:01crwdnd2935265:02crwdne2935265:0 Amazon Echo Studio Subwoofer Replacement: crwdns2935265:04crwdnd2935265:02crwdnd2935265:02crwdne2935265:0
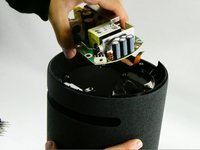
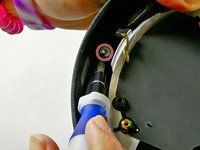
    • Now unscrew the the single 10 mm Phillips screw.

    • Remove the power supply board.

    I hope this helps some folks.

    My echo studio blows the fuse in the plug every time I plug it in.

    I believe the culprit is a high voltage ceramic capacitor located under the foam insulation next to a large transistor and a large green resistor next to the heat sync. See images below.

    https://ibb.co/R7jbvDQ

    https://ibb.co/gFvchcG

    https://ibb.co/jTxXZvc

    https://ibb.co/d2fs15m

    https://ibb.co/sKTq3G7

    I have ordered a replacement capacitor so I'll let you know if this is in fact the problem or just a casualty of the problem.

    Horrox101 - crwdns2934203:0crwdne2934203:0

  5. Amazon Echo Studio Subwoofer Replacement, Subwoofer: crwdns2935265:05crwdnd2935265:01crwdnd2935265:01crwdne2935265:0
    • Remove the two screws located across from each other on the outside of the plastic ring shown.

    • Remove the plastic outer ring that hugs the inside of the edges of the device.

    • This may require you to use a soft prying tool to separate it from the outer shell.

  6. Amazon Echo Studio Subwoofer Replacement: crwdns2935265:06crwdnd2935265:01crwdnd2935265:03crwdne2935265:0 Amazon Echo Studio Subwoofer Replacement: crwdns2935265:06crwdnd2935265:02crwdnd2935265:03crwdne2935265:0 Amazon Echo Studio Subwoofer Replacement: crwdns2935265:06crwdnd2935265:03crwdnd2935265:03crwdne2935265:0
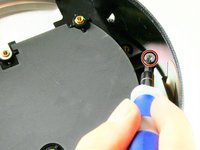
    • Remove the two 2.7 mm screws with a T10 Torx screwdriver.

    • Once the screws are removed, take the power supply's baseplate out of the unit.

    • You may need to gently pry the subwoofer's air ports from the round slots In the side of the unit.

    Power supply baseplate must be rotated clockwise, ~1cm at outside edge, to release catch tabs before lifting out of unit.

    Jeff Roske - crwdns2934203:0crwdne2934203:0

  7. Amazon Echo Studio Subwoofer Replacement: crwdns2935265:07crwdnd2935265:01crwdnd2935265:02crwdne2935265:0 Amazon Echo Studio Subwoofer Replacement: crwdns2935265:07crwdnd2935265:02crwdnd2935265:02crwdne2935265:0
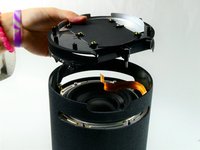
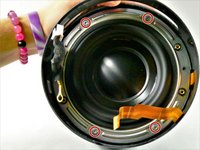
    • On the silver ring located on the outer edge of the plastic portion of the subwoofer, you will see four 2.7 mm screws. Use a Torx T10 screwdriver to remove them, in order to remove of the subwoofer.

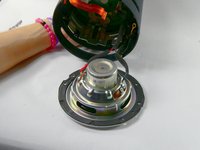
    • Once the four screws have been removed, gently pull the subwoofer out as to not damage the wiring connecting the subwoofer to the main board inside the unit.

    • Follow the wires from the subwoofer to the main board and disconnect the connector attaching them.

    • Your subwoofer is now disconnected and ready to be replaced.

    Und wo bekomme ich nun einen neuen Sub Speaker ?

    LG

    M.M.

    Michael Meyer - crwdns2934203:0crwdne2934203:0

    How do you "gently remove subwoofer"?

    It won't move at all and it has nowhere to grip. I doubt it would move even if I turned it and gave it a thump.

    Marko - crwdns2934203:0crwdne2934203:0

crwdns2915888:0crwdne2915888:0

To reassemble your device, follow these instructions in reverse order.

Jaiden Wiles

crwdns2935283:010/26/22crwdne2935283:0

160 crwdns2915208:0crwdne2915208:0

crwdns2935295:0crwdne2935295:0

crwdns2915084:0crwdne2915084:0

UMass Dartmouth, Team 2-6, Petersen Fall 2022 crwdns2935289:0UMass Dartmouth, Team 2-6, Petersen Fall 2022crwdne2935289:0

UMASSD-PETERSEN-F22S2G6

crwdns2931471:04crwdne2931471:0

crwdns2935297:06crwdne2935297:0

crwdns2947410:01crwdne2947410:0

Does anybody know where to get a replacement subwoofer?

Matthew Johnson - crwdns2934203:0crwdne2934203:0

crwdns2917038:0crwdne2917038:0

crwdns2936625:0crwdne2936625:0:

crwdns2936751:024crwdne2936751:0 2

crwdns2936753:07crwdne2936753:0 7

crwdns2936753:030crwdne2936753:0 23

crwdns2942667:0crwdne2942667:0 1,057